User management
Introduction
NetXMS has its own user database. All NetXMS user accounts are stored in the backend SQL database. Each account has its own unique login name and identifier. The account may also have a password.
Terms and Definitions
Users
NetXMS has the following attributes for users:
Unique identifier
Unique login name
Full name
Email
Phone number
Description
System Access Rights configuration
Authentication method configuration
TOTP configuration
Password
Certificate
Not all attributes are mandatory.
Superuser
NetXMS has a built-in superuser account with ID 0, which always has full access to
the system. The default login name for the superuser account is system. By default this account is
disabled. The superuser account can be renamed or disabled/enabled, but cannot be deleted.
The system user can be used to correct access rights to objects that exists, but to which no other users have access to.
Groups
Each user can be a member of several groups. Groups are the preferred way to organize access permissions. You should always grant permission to groups instead of using individual users. That way you will get a much shorter access control list which is easier to handle. Access rights from multiple groups are summarized to calculate effective user access rights.
Other groups can also be added as group members, in this case, the user access rights will be calculated by summarizing the access rights from all the groups in the path to the user.
Everyone Group
NetXMS has a built-in virtual group called Everyone. This group always contains all users in the system. It cannot be deleted, and its member list cannot be edited.
System Access Rights
NetXMS has two types of access rights: system access rights as described in this chapter and object access rights.
System access rights used to grant access to system-wide configuration (like Event processing) and functions (like agent registration).
The following system access rights can be granted:
Access Right |
Description |
|---|---|
Access server console |
Allow user to access the server debug console. Server debug console |
Configure event templates |
Allow user to add, edit and delete event templates. Event processing |
Configure object tools |
Allow user to configure object tools. Object Tools |
Configure server actions |
Allow user to configure server actions. Event processing |
Configure SNMP traps |
Allow user to configure SNMP trap mapping. |
Control user sessions |
Allow user to see active user sessions and forcefully terminate them. (Not yet implemented) |
Edit event processing policy |
Allow user to edit Event Processing Policy. Event processing |
Edit server configuration variables |
Allow user to edit server configuration variables. |
External tool integration account |
Allow external software user authentication using NetXMS user accounts via Web API/Rest API. |
Import configuration |
Allow user to import configuration from file. Dashboard import is not restricted by this access right. |
Initiate TCP proxy sessions |
Allow to use functionality that allows to forward TCP connections inside the connection between NetXMS server and agent. |
Login as mobile device |
Allows user to login via mobile application. |
Manage agent configurations |
Allow user to create, edit and delete agent configurations stored on the server. Agent configuration options from server |
Manage all scheduled tasks |
Allow user to create, edit and delete all Scheduled tasks, including system ones. |
Manage DCI summary table |
Allows user to manage DCI summary table. Summary table |
Manage geographical areas |
Allows user to manage geographical areas |
Manage image library |
Allows user to manage image library. Image library |
Manage mapping tables |
Allows user to create, edit and delete mapping tables. |
Manage object categories |
Allows user to create, edit and delete object categories. |
Manage object queries |
Allows user to create, edit and delete saved object queries. |
Manage own scheduled tasks |
Allow user to create new and modify Scheduled tasks created by the user. |
Manage packages |
Allow user to install, remove, and deploy server agent packages. Centralized agent upgrade |
Manage persistent storage |
Allows user to create, edit and delete persistent storage records |
Manage script library |
Allows user to add, edit, rename and delete scripts in script library. |
Manage server files |
Allow user to upload files to server and delete files stored on server. Server File Management |
Manage SSH keys |
Allows user to generate, import, edit and delete SSH keys. |
Manage two-factor authentication methods |
Allows user to configure system-wide two-factor authentication settings. |
Manage user support application notifications |
Allows to send, list and delete notifications that are being sent via user support application. |
Manage user scheduled tasks |
Allow user to create, edit and delete user-created Scheduled tasks (not system scheduled tasks). |
Manage users |
Allow user to manage user accounts. Please note that user having this access right granted can modify own account to get any other system right granted. |
Manage web service definitions |
Allow user to manage system-wide definitions of web services. |
Read server files |
Allow user to read files stored on the server and upload to agents (user still needs appropriate object rights for upload). Server File Management |
Manage agent tunnels |
Allow user to list, bind and unbind agent tunnels. |
Reporting server access |
Allow user to execute report generation, view generated reports, schedule report generation. Reporting |
Schedule file upload |
Allow user to schedule server file upload to an agent. Scheduled tasks |
Schedule object maintenance |
Allow user to schedule maintenance for an object. Scheduled tasks |
Schedule script execution |
Allow user to schedule script execution. Scheduled tasks |
Send notifications |
Allow user to send manual notifications via NetXMS server. |
Unlink helpdesk tickets |
Allow user to unlink alarms from external helpdesk system Integration with external HelpDesk. |
View all alarm categories |
Allow user to view all alarms generated by Event Processing Policy rules. If this is off, user will only see alarms for categories he/she has access to. |
View audit log |
Allow user to view audit log. |
View event log |
Allow user to view event log, alarm log. |
View event templates configuration |
Allow user to view configured event templates. |
View SNMP trap log |
Allow user to view SNMP trap log. |
View syslog |
Allow user to view syslog. |
By granting the View all alarms access right, the user (or members of the group) will have access to view all generated alarms. Should it be required to configure alarm viewing access for specific users or groups, please refer to Alarm Category Configurator.
UI Access Rules
UI access rules allow to hide specific UI elements from user. This does not securely blocks access - hiding is only implemented in NetXMS Management Client, so e.g. nxshell is not affected by UI access rules.
UI access rules are stored in textual format, one UI element per line. UI
elements have category:name format, * GLOB wildcard can be used to match
multiple elements. E.g. perspective:objects.maps refers to Maps perspective,
perspective:* refers to all perspectives, view:objects.fdb is FDB view
(tab) on an object and * means all UI elements.
Adding UI element means that it should be included. Adding ! prefix means
exclusion. ^ prefix means priority inclusion.
Rules are checked in the following order, until a matching rule is found:
Priority inclusion rules (rules with
^prefix). If a rule is matched, UI element is enabled.Exclusion rules (rules with
!prefix). If rule is matched, UI element is disabled.Inclusion rules (without any prefix). If a rule is matched, UI element is enabled.
If no matching rules found, UI element is disabled.
Default configuration has * inclusion rule for user Everyone and
Admins groups, thus enabling all UI elements. Based on that exclusion rules
can be added, or it’s possible to remove * rule and configure specific set
of inclusion and, if needed, exclusion rules.
User Authentication
Internal Password
This is the default method for user authentication. The password provided by the user when authenticating is compared against the password stored in the NetXMS database.
Password Policy
Various restrictions can be put on internal passwords to force users to choose stronger passwords. The following server configuration variables controls password policy:
Variable |
Description |
Default |
|---|---|---|
MinPasswordLength |
Default minimum password length for a NetXMS user. The default applies only if a per-user setting is not defined. |
0 |
PasswordComplexity |
Required password complexity. See table below for details. |
0 |
PasswordExpiration |
Password expiration time in days. If set to |
0 |
PasswordHistoryLength |
Number of previous passwords to keep. Users are not allowed to set password if it matches one from their previous passwords list. |
0 |
Possible flags for PasswordComplexity:
Value |
Description |
|---|---|
1 |
Password must contain digits |
2 |
Password must contain uppercase letters |
4 |
Password must contain lowercase letters |
8 |
Password must contain special characters |
16 |
Forbid alphabetical sequences (a password is considered invalid if it contains an alphabetical sequence of 3 or more letters of the same case). |
32 |
Forbid keyboard sequences (a password is considered invalid if it
contains a sequence of 3 or more characters that are located on
keyboard next to each other, like |
Complexity flags can be combined to get the desired restrictions. For example, to
force passwords to contain uppercase and lowercase letters,
PasswordComplexity variable must be set to 6 (2 + 4).
Changes to these configuration variables become effective immediately and do not require an NetXMS server restart.
RADIUS
If RADIUS authentication method is selected, the password provided by the user
is sent to a RADIUS server for validation. The user is granted access if the RADIUS server
responds with Access-Accept. Communication between NetXMS server and RADIUS
server is controlled by the following server configuration variables:
Variable |
Description |
Default value |
|---|---|---|
RADIUS.AuthMethod |
RADIUS authentication method to be used (PAP, CHAP, MS-CHAPv1, MS-CHAPv2). |
PAP |
RADIUS.NASIdentifier |
Value for NAS-Identifier attribute in RADIUS request (will not be sent if empty) |
none |
RADIUS.NumRetries |
The number of retries for RADIUS authentication. |
5 |
RADIUS.Port |
Port number used for connection to primary RADIUS server. |
1645 |
RADIUS.SecondaryPort |
Port number used for connection to secondary RADIUS server. |
1645 |
RADIUS.SecondarySecret |
Shared secret used for communication with secondary RADIUS server. |
netxms |
RADIUS.SecondaryServer |
Host name or IP address of secondary RADIUS server. |
none |
RADIUS.Secret |
Shared secret used for communication with primary RADIUS server. |
netxms |
RADIUS.Server |
Host name or IP address of primary RADIUS server. |
none |
RADIUS.ServiceType |
Value for Service-Type attribute in RADIUS request. Value of 0 will exclude service type from request attributes. |
8 |
RADIUS.Timeout |
Timeout in seconds for requests to RADIUS server |
3 |
Changes to these configuration variables become effective immediately and do not require an NetXMS server restart.
Certificate Authentication
This type of authentication can be selected manually in user preferences.
Login process using a certificate works as follows:
The server sends a random challenge to the client
The client signs the servers challenge with their certificates’ private key and send a signed challenge along with the public part of their certificate to the server
The server validates the certificate using its CA certificate
If the certificate is valid, the server validates the challenge signature using the certificates’ public key
If the signature is valid, the server compares the certificate subject with mapping data from the user record
If the mapping data matches with the certificate subject, access is granted
So, to login successfully, the user must posses a valid certificate with a private key. Authentication by certificate also allows smart card login - you just need to store the certificate used for login on a smart card instead of in a local certificate store.
Certificate management
CA certificates are looked up in the list configured by the “TrustedCertificate” configuration parameter in the server configuration file.
Link certificate and user
In the “User Manager” view select the user properties for the required user. Then go to the “Authentication” section.
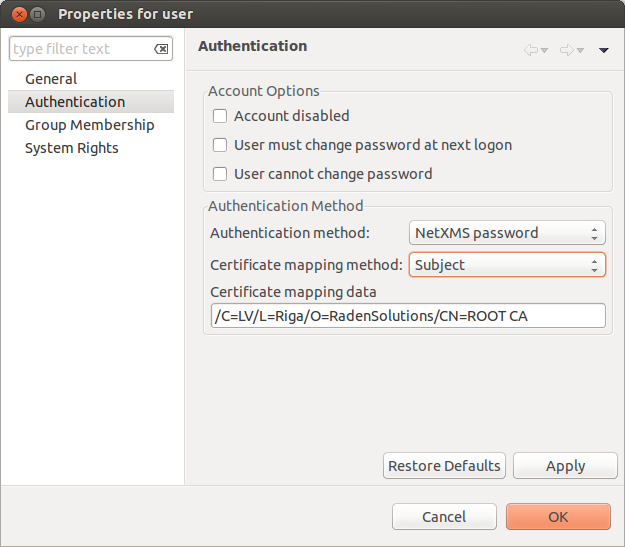
In the “Authentication Method” section: “Certificate”, “Certificate or Password”, “Certificate or RADIUS”.
The next two fields in combination:
Certificate mapping method: “Subject”
Certificate mapping data: the subject of the CA.
Certificate mapping method: “Public key”
Certificate mapping data: the public key of the certificate
Certificate mapping method: “Common name”
Certificate mapping data: if no mapping data is set, then the linking certificate CN = user name, otherwise CN = mapping data
CAS authentication
Central Authentication Service (CAS) single sign-on is supported in the web interface only. The following server configuration parameters control CAS operation: CAS.AllowedProxies, CAS.Host, CAS.Port, CAS.Service, CAS.TrustedCACert, CAS.ValidateURL. See Server configuration parameters for the explanation of the meaning of the mentioned parameters.
Changes to these configuration variables become effective immediately and do not require a NetXMS server restart.
Two-factor authentication
In addition to the above authentication methods, two-factor authentication using TOTP or via a notification channel can be set up.
TOTP configuration is done in two places - in system-wide Two-factor authentication methods and in properties of specific users.
First of all it is necessary to configure a method in Two-factor authentication methods. For TOTP, select the driver name TOTP. No driver configuration is necessary. For using a notification channel, select the driver name Message and in driver configuration the name of notification channel should be specified, e.g.:
ChannelName=NotificationChannelName
The second step is to add the two-factor authentication method in properties of a user.
For message method it is necessary to specify the recipient for the message. This concludes the configuration - on login the user will receive a message with numeric code.
For the TOTP method no additional configuration is necessary. On the following login the user will be presented with a dialog containing a qr code and a secret as text. After entering the secret into the users TOTP application, it will generate a numeric code that should be entered to confirm TOTP initialization.
To repeat initialization it is possible to perform a reset for the TOTP method in the user properties. After that, on next login of the user the dialog with qr code and secret will be presented again.
It is possible to specify several two-factor authentication methods. In this case the user will be presented with a menu on login, allowing to choose which method to use.
Integration with LDAP
NetXMS can perform one-way synchronization of users and groups with an external LDAP server. The user list replica is refreshed automatically.
Already existing NetXMS users or groups will not be modified during initial synchronization (e.g. user “admin” or group “Everyone”).
LDAP synchronization configuration
Server parameters controlling LDAP synchronization:
Variable |
Description |
Default value |
|---|---|---|
LdapConnectionString |
Comma- or whitespace-separated list of URIs in a format schema://host:port. Supported schemas: ldap://, ldaps:// (LDAP over TLS), ldapi:// (LDAP over IPC), and cldap:// (connectionless LDAP). Windows specific: for servers based on Windows this parameter should be set according to these rules: empty string attempts to find the “default” LDAP server), a domain name, or a space-separated list of host names or dotted strings that represent the IP address of hosts running an LDAP server to which to connect. Each host name in the list can include an optional port number which is separated from the host itself with a colon (:). Note: most LDAP implementations except recent versions of OpenLDAP do not support mixed schema types in the single connection string. |
|
LdapSyncUser |
User login for LDAP synchronization |
|
LdapSyncUserPassword |
User password for LDAP synchronization |
|
LdapSearchBase |
The LdapSearchBase configuration parameter is the DN of the entry at which to start the search. |
|
LdapSearchFilter |
The LdapSearchFilter is a string representation of the filter to apply in the search. |
|
LdapUserDeleteAction |
This parameter specifies what should be done while synchronization with users deleted from the LDAP user/group. 0 - if user should be deleted from NetXMS DB. 1 - if the user should be disabled but kept in the database. If 1 is chosen, then on LDAP sync the user will be disabled and its description will be changed to “LDAP entry was deleted.” Afterwards this user/group can be detached from LDAP and enabled or deleted manually. |
1 |
LdapUserMappingName |
The name of the attribute which value will be used as a users’ login name |
|
LdapGroupMappingName |
The name of the attribute which value will be used as a group’s identifier |
|
LdapMappingFullName |
The name of the attribute which value will be used as the user full name |
|
LdapMappingDescription |
The name of the attribute which value will be used as a user description |
|
LdapGroupClass |
The object class which represents group objects. If the found entry is not of a user or group class, it will be simply ignored. |
|
LdapUserClass |
The object class that represents user objects. If the found entry is not of a user or group class, it will be simply ignored. |
|
LdapGroupUniqueId |
Unique identifier for the LDAP group object. By default LDAP groups are identified by DN. If in your configuration the DN can be changed at any time it is useful to choose another attribute as a unique group identifier. |
|
LdapUserUniqueId |
Unique identifier for the LDAP user object. By default LDAP users are identified by DN. If in your configuration the DN can be changed at any time it is useful to choose another attribute as a unique user identifier. |
|
LdapSyncInterval |
This parameter is for setting a synchronization interval in minutes between the NetXMS server and the LDAP server. If the synchronization parameter is set to 0 the synchronization will not be done. |
0 |
LdapPageSize |
Limit of records that can be returned in one search page. |
1000 |
* Required fields
Synchronization also can be done manually with ldapsync or the ldap command in the server debug console.
LDAP users/groups relationships with native NetXMS users/groups
LDAP users and groups are handled in exactly the same way as users from the internal database. The only difference is that for LDAP group membership is refreshed at each synchronisation and any non-LDAP user then will be removed from the group.
Login with help of LDAP user
The login process is completely transparent for the user - their user name should match the attribute set by LdapMappingName and their password should be the current LDAP password for that user.
LDAP configuration debugging
If users are not synchronized, the reason can be found by running ldapsync manually or by the ldap command in the server debug console on debug lever 4.
Log when LDAP sync passed correctly:
[11-Sep-2014 16:28:08.352] [DEBUG] LDAPConnection::initLDAP(): Connecting to LDAP server
[11-Sep-2014 16:28:08.353] [DEBUG] LDAPConnection::syncUsers(): Found entry count: 3
[11-Sep-2014 16:28:08.354] [DEBUG] LDAPConnection::syncUsers(): Found dn: CN=Users,CN=Customers,DC=Northwind,DC=Extranet
[11-Sep-2014 16:28:08.354] [DEBUG] LDAPConnection::syncUsers(): CN=Users,CN=Customers,DC=Northwind,DC=Extranet is not a user nor a group
[11-Sep-2014 16:28:08.354] [DEBUG] LDAPConnection::syncUsers(): Found dn: CN=zev333,CN=Users,CN=Customers,DC=Northwind,DC=Extranet
[11-Sep-2014 16:28:08.354] [DEBUG] LDAPConnection::syncUsers(): User added: dn: CN=zev333,CN=Users,CN=Customers,DC=Northwind,DC=Extranet, login name: zev333, full name: (null), description: (null)
[11-Sep-2014 16:28:08.354] [DEBUG] LDAPConnection::syncUsers(): Found dn: CN=user,CN=Users,CN=Customers,DC=Northwind,DC=Extranet
[11-Sep-2014 16:28:08.354] [DEBUG] LDAPConnection::syncUsers(): User added: dn: CN=user,CN=Users,CN=Customers,DC=Northwind,DC=Extranet, login name: user, full name: (null), description: (null)
[11-Sep-2014 16:28:08.354] [DEBUG] LDAPConnection::closeLDAPConnection(): Disconnect from ldap.
[11-Sep-2014 16:28:08.354] [DEBUG] UpdateLDAPUsers(): User added: dn: CN=zev333,CN=Users,CN=Customers,DC=Northwind,DC=Extranet, login name: zev333, full name: (null), description: (null)
[11-Sep-2014 16:28:08.354] [DEBUG] UpdateLDAPUsers(): User added: dn: CN=user,CN=Users,CN=Customers,DC=Northwind,DC=Extranet, login name: user, full name: (null), description: (null)
[11-Sep-2014 16:28:08.354] [DEBUG] RemoveDeletedLDAPEntry(): Ldap uid=john,ou=People,dc=nodomain entry was removed from DB.
[11-Sep-2014 16:28:08.354] [DEBUG] RemoveDeletedLDAPEntry(): Ldap uid=zev,ou=People,dc=nodomain entry was removed from DB.
[11-Sep-2014 16:28:08.354] [DEBUG] RemoveDeletedLDAPEntry(): Ldap uid=kasio,ou=People,dc=nodomain entry was removed from DB.
[11-Sep-2014 16:28:08.355] [DEBUG] RemoveDeletedLDAPEntry(): Ldap uid=usr1,ou=People,dc=nodomain entry was removed from DB.
Login credentials incorrect:
[11-Sep-2014 15:49:39.892] [DEBUG] LDAPConnection::initLDAP(): Connecting to LDAP server
[11-Sep-2014 15:49:39.896] [DEBUG] LDAPConnection::loginLDAP(): LDAP could not login. Error code: Invalid credentials
[11-Sep-2014 15:49:39.896] [DEBUG] LDAPConnection::syncUsers(): Could not login.
Search base is set incorrectly or sync user does not have access:
[11-Sep-2014 15:54:03.138] [DEBUG] LDAPConnection::initLDAP(): Connecting to LDAP server
[11-Sep-2014 15:54:03.140] [DEBUG] LDAPConnection::syncUsers(): LDAP could not get search results. Error code: No such object
LDAP configuration examples
Active Directory
Variable |
Value |
|---|---|
LdapConnectionString |
|
LdapSyncUser |
CN=user,CN=Users,CN=Customers,DC=Domain,DC=Extranet |
LdapSyncUserPassword |
xxxxxxxx |
LdapSearchBase |
CN=Customers,DC=Domain,DC=Extranet |
LdapSearchFilter |
(objectClass=*) |
LdapUserDeleteAction |
1 |
LdapMappingName |
sAMAccountName |
LdapMappingFullName |
displayName |
LdapMappingDescription |
description |
LdapGroupClass |
group |
LdapUserClass |
user |
LdapGroupUniqueId |
objectGUID |
LdapUserUniqueId |
objectGUID |
LdapSyncInterval |
1440 |
OpenLDAP
Variable |
Value |
|---|---|
LdapConnectionString |
|
LdapSyncUser |
cn=admin,dc=nodomain |
LdapSyncUserPassword |
xxxxxxxx |
LdapSearchBase |
dc=nodomain |
LdapSearchFilter |
(objectClass=*) |
LdapUserDeleteAction |
1 |
LdapMappingName |
cn |
LdapMappingFullName |
displayName |
LdapMappingDescription |
description |
LdapGroupClass |
groupOfNames |
LdapUserClass |
inetOrgPerson |
LdapGroupUniqueId |
entryUUID |
LdapUserUniqueId |
entryUUID |
LdapSyncInterval |
1440 |
Managing User Accounts
All NetXMS user accounts can be managed from the User Manager view available at in NetXMS Management Client. Only users with granted system right Manage users can access User Manager.
To create a new user account, select Create new user from the view menu or context menu.
To create a new group, select Create new group from the view menu or context menu.
To delete user account, select it in the list, right-click, and select Delete from pop-up menu. You can delete multiple accounts at a time.
To modify properties of a user or group, select it in the list, right-click, and select Properties from the pop-up menu.
To reset the password of a user, select the user account in the list, right-click, and select Change password from the pop-up menu.
Audit
All important user actions are written to the audit log. There are two audit logging modes: internal and external. Internal audit logging is on by default and writes audit records into a table in the NetXMS database. External audit logging allows sending audit records to an external system via the syslog protocol. External audit logging is off by default. Audit logging is controlled by the following server configuration variables:
Variable |
Description |
Default value |
|---|---|---|
AuditLogRetentionTime |
Retention time in days for the records in the internal audit log. All records older than specified will be deleted by the housekeeping process. |
90 |
EnableAuditLog |
Enable ( |
1 |
ExternalAuditFacility |
Syslog facility to be used in audit log records sent to external server. |
13 |
ExternalAuditPort |
UDP port of the external syslog server to send audit records to. |
514 |
ExternalAuditServer |
External syslog server to send audit records to. If set to none, external audit logging is disabled. |
none |
ExternalAuditSeverity |
Syslog severity to be used in audit log records sent to the external server. |
5 |
ExternalAuditTag |
Syslog tag to be used in audit log records sent to the external server. |
netxmsd-audit |