Event processing
Introduction
NetXMS is event based monitoring system. Events can come from different sources - polling processes (status, configuration, discovery), data collection, SNMP traps, from NXSL scripts and directly from external applications via client library. All events are forwarded to NetXMS Event Queue.
NetXMS Event Processor can process events from Event Queue in either sequential or parallel mode. In sequential mode events are processed one-by-one which guarantees that events will be processed in the same sequence as they arrive into the queur. For installation where a lot of events could be generated in a short period of time this mode can be a bottleneck.
Parallel processing mode allows to process events in several parallel threads, thus allowing to scale horizontally and to increase processing performance. Number of threads for parallel processing is set by Events.Processor.PoolSize server configuration parameter.
Event Processing Rules can read/write persistent storage and custom attributes, create/terminate alarms, can run scripts that are checking other node statuses and care should be taken to ensure that no race condition would occur when performing parallel processing.
Correct operation is ensured by properly setting Events.Processor.QueueSelector server configuration parameter. This parameter contains macros that are expanded when an event is created. Events that have same QueueSelector string will be processed sequentially by one and the same event processing thread, thus ensuring that there will be no race condition between these events.
Event Processing Policy
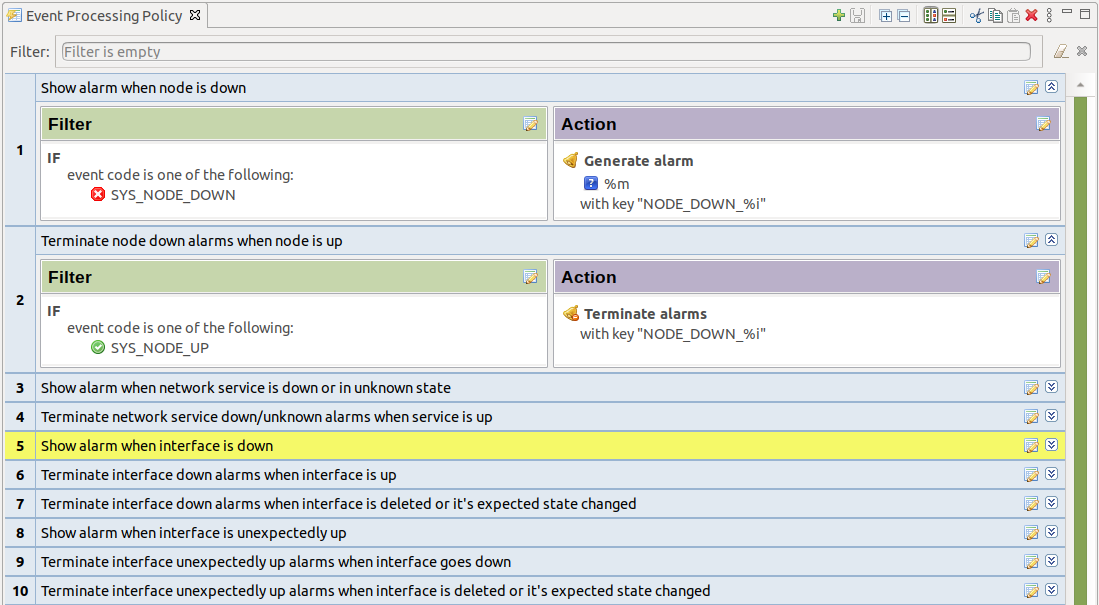
Actions taken by event processor for any specific event are determined by a set of rules called Event Processing Policy (EPP).
Every rule has two parts - matching part (called Condition in the rule configuration dialog), which determines if the rule is applicable to an event, and action part, which defines actions to be taken for matched events.
Each event passes through all rules in the policy, so if it matches more than one rule, actions specified in all matched rules will be executed. You can change this behavior by setting Stop Processing flag on a rule. If this flag is set for a rule and that rule is matched, subsequent rules (with higher rule number) will not be processed.
Rules with empty filter (no events, no source objects, no severity filter, no time filter, and no filtering script) are ignored.
Event Processing Policy rules are managed using Event Processing Policy Editor available in Configuration –> Event Processing Policy.
Only one user of NetXMS server can access Event Processing
Policy Editor window at a time. Other users will receive Component locked
error message when attempting to open this window.
Changes made in Event Processing Policy Editor are applied at the
moment when Save button is clicked.
Event Processing Policy Screen
To expand or collapse a rule, double click on its title or use
Expand/collapse button on the right hand side of rule title.
Event Processing Policy Editor window toolbar buttons have the following meaning (from left to right): Add new rule, Save changes, Expand all, Collapse all, Horizontal layout, Vertical layout, Cut rule, Copy rule, Paste rule, Delete rule.
To create event policy rule, right click on entry before or after which new Event Processing Policy should appear and select Insert before or Insert after. Drag and drop can be used for rule reorganization.
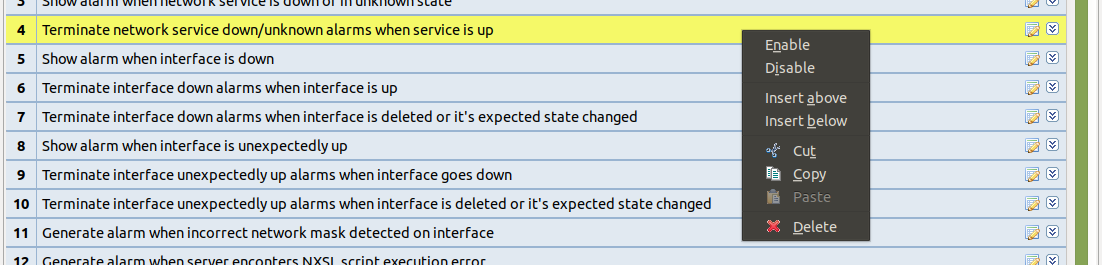
Event Processing Policy item context menu
To edit Event Processing Policy’s properties, click edit button in right corner of an entry, or double-click text in Filter or Action text.
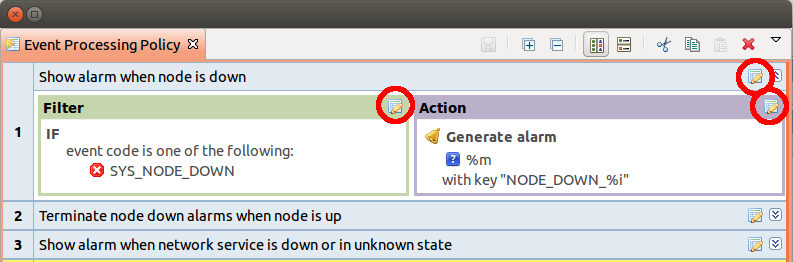
Edit buttons
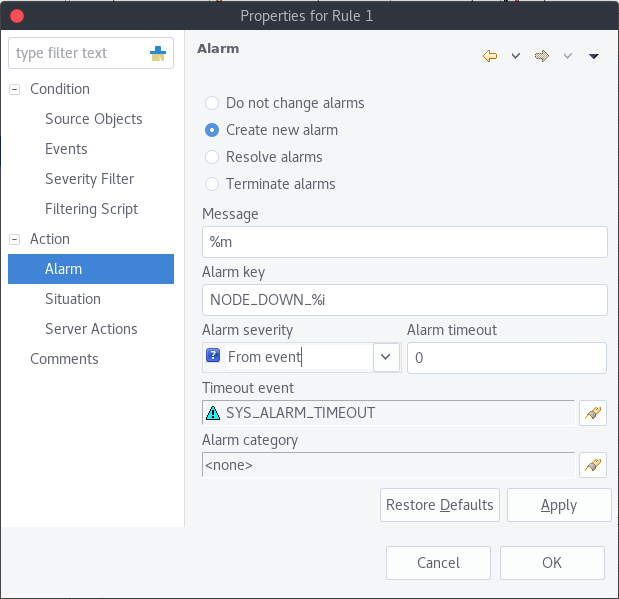
Properties of Event Processing Policy rule have the following sections:
Section |
Description |
|---|---|
Condition |
Sub-sections of Condition section determine if the rule is applicable to a particular event. If checkbox Rule is disabled is set, this rule is ignored. Checkbox Accept correlated events defines, if events, which are correlated to another events should be processed (e.g. when when node is in maintenance, all node events are correlated to the maintenance event). |
Condition –> Events |
Event code. This field can be left empty, which matches any event, or contain list of applicable events. Inverse rule checkbox allows to react to all events except to thouse listed. |
Condition –> Source Objects |
Source objects and exclusions lists allow to specify for which objects this rule is applicable. If source objects list is empty, rule would match any object. Multiple objects can be specified in the lists. If you specify subnet, container, collector, cluster, rack or chassis, any object within it will also be matched. If one and the same object is present both in source objects and exclusions, exclusions list has priority. E.g. you can specify a container in source objects and one specific node from that container in exclusions list - rule would match all nodes from that container except that one specified node. Inverse rule checkbox allows to invert the logic, so objects that would be matched by given combination of source objects and exclusions will not be matched and vice versa. |
Condition –> Time Filter |
Allows to specify time frames when rule should be matched. Time frames allow to specify time range, days of week, days of month and months. Days of month are specified as comma-separated lists of days or ranges, e.g. 1,3,5,20-25. Letter L denotes last day of month. |
Condition –> Severity Filter |
Event’s severity. This field contains selection of event severities to be matched. |
Condition –> Filtering Script |
Optional matching script written in NXSL. If this field is empty (or only
contains comments according to NXSL language specification), no
additional checks are performed. Otherwise, the event will be considered
as matched only if the script returns boolean Note: Script execution is a blocking operation - event processor will wait for the script to complete. Make sure that script is written in a way that it would execute quickly. |
Action |
Sub-sections of Action section determine what actions are performed if an event meets all conditions of a rule. If checkbox Stop event processing is set, then subsequent rules (with higher rule number) will not be processed for a given event. However, actions of given rule will be performed. |
Action –> Alarm |
Action in regard to alarms. Alarm can be created, resolved or terminated or no action to alarms is done. See Generating and Terminating Alarms from EPP for more information. |
Action –> Downtime Control |
Allows to add records to |
Action –> Persistent Storage |
NXLS Persistent Storage action like add/update or delete can be performed. |
Action –> Custom Attributes |
Actions with Custom attributes like add/update or delete can be performed. |
Action –> Server Actions |
List of predefined actions to be executed. Action execution could be delayed with ability to cancel a delayed action later on. Execution of action could be snoozed for a specified period of time. For action configuration refer to Actions chapter. Delayed execution and snoozing is controlled using timers which can be referred to using timer key. This allows cancelling a timer or checking, if its still running from NXSL script. |
Action –> Script |
Script writen in NXSL. Note: Script execution is a blocking operation - event processor will wait for the script to complete. Make sure that script is written in a way that it would execute quickly. If you need to execute a long-running script, create Execute NXSL script action and execute it from EPP rule. |
Action –> Timer Cancellations |
List of timers to cancel identified by timer keys. This allows to cancel delayed actions and snooze/blocking timers. |
Comments |
Rule comment which can be multi-line text. The comment is displayed as a name of the rule. |
After all manipulations are done - save changes by pressing save icon.
Examples
This rule defines that for every major or critical event originated from a node named “IPSO” two e-mail actions will be executed.
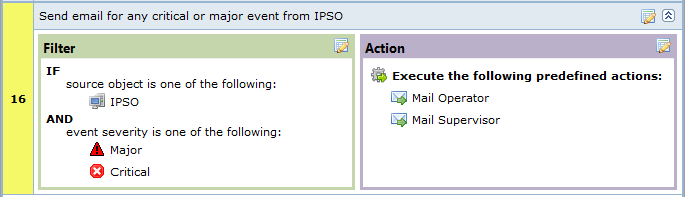
Example 1
Events
Alarms
Alarms Overview
As a result of event processing some events can be shown up as alarms. Usually alarm represents something that needs attention of network administrators or network control center operators, for example low free disk space on a server.
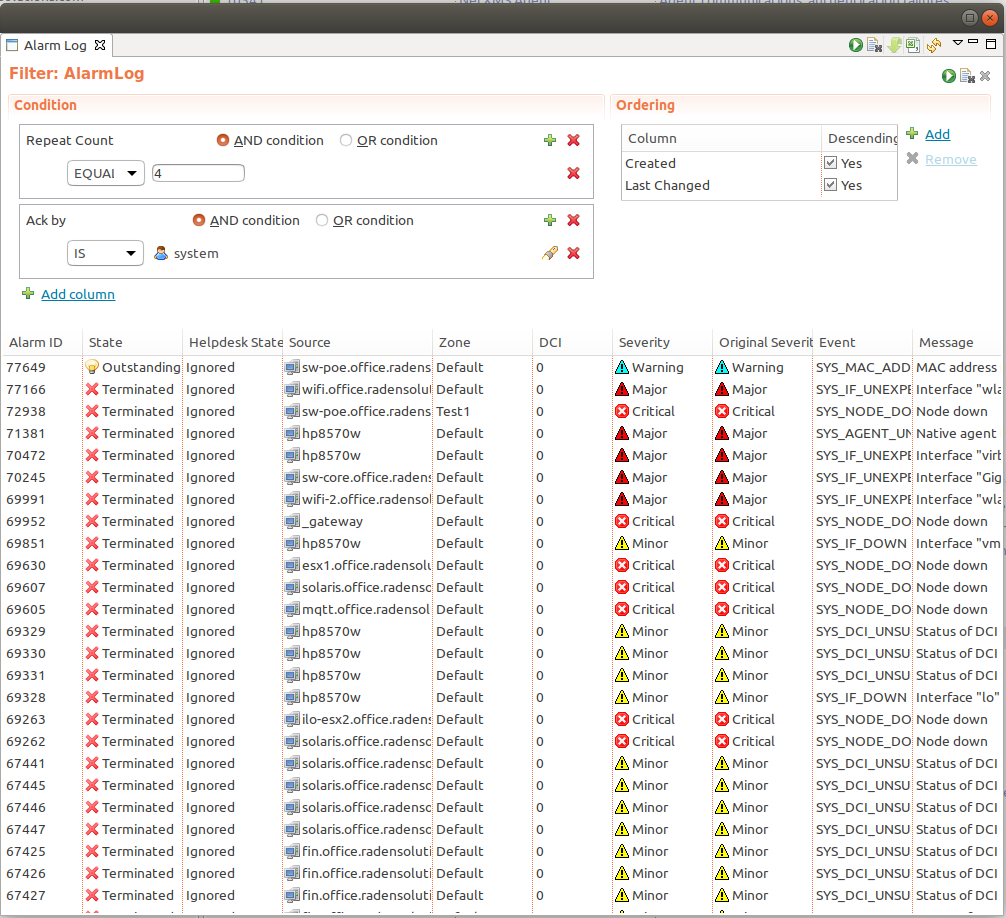
All alarm events are logged to alarm log. The number of days the server keeps alarm history can be configured by “AlarmHistoryRetentionTime” server configuration parameter. Alarm log can be viewed in “Alarm Log View”(Alt+F8). This view gives option to query for required information from alarm log.
Every alarm has the following attributes:
Attribute |
Description |
|---|---|
Creation time |
Time when alarm was created. |
Last change time |
Time when alarm was last changed (for example, acknowledged). |
State |
Current state of the alarm, see table bellow |
Message |
Message text (usually derived from originating event’s message text). |
Severity |
Alarm’s severity - Normal, Warning, Minor, Major, or Critical. |
Source |
Source node (derived from originating event). |
Key |
Text string used to identify duplicate alarms and for automatic alarm termination. |
Possible alarm states:
Outstanding |
New alarm. |
Acknowledged |
When network administrator sees an alarm, he may acknowledge it to indicate that somebody already aware of that problem and working on it. A new event with the same alarm ID will reset the alarm state back to outstanding |
Sticky Acknowledged for time |
Alarm will remain acknowledged for given time interval even after new matching events, after time will pass alarm will be moved to outstanding state. This option can be used like snooze. When you know that there will be new matching events, but it will not change the situation. But after some time someone should check this problem. For example, if you have problem that cannot be solved until next week, so this alarm can be sticky acknowledged for 7 days. After 7 days this problem again will be in outstanding state. This type of acknowledge can be disabled by changing EnableTimedAlarmAck server configuration parameter. |
Sticky Acknowledged |
Alarm will remain acknowledged event after new matching events. This can be useful when you know that there will be new matching events, but it will not change the situation. For example, if you have network device which will send new SNMP trap every minute until problem solved, sticky acknowledge will help to eliminate unnecessary outstanding alarms. |
Resolved |
Network administrator sets this state when the problem is solved. |
Terminated |
Inactive alarm. When problem is solved, network administrator can terminate alarm. This will remove alarm from active alarms list and it will not be seen in Management Client, but alarm record will remain in database. |
There are 2 types of alarm state flows: strict and not strict. This option can be configured in Preference page of Alarms or on server configuration page, parameter “StrictAlarmStatusFlow”. The difference between them is that in strict mode Terminate can be done only after Resolve state.
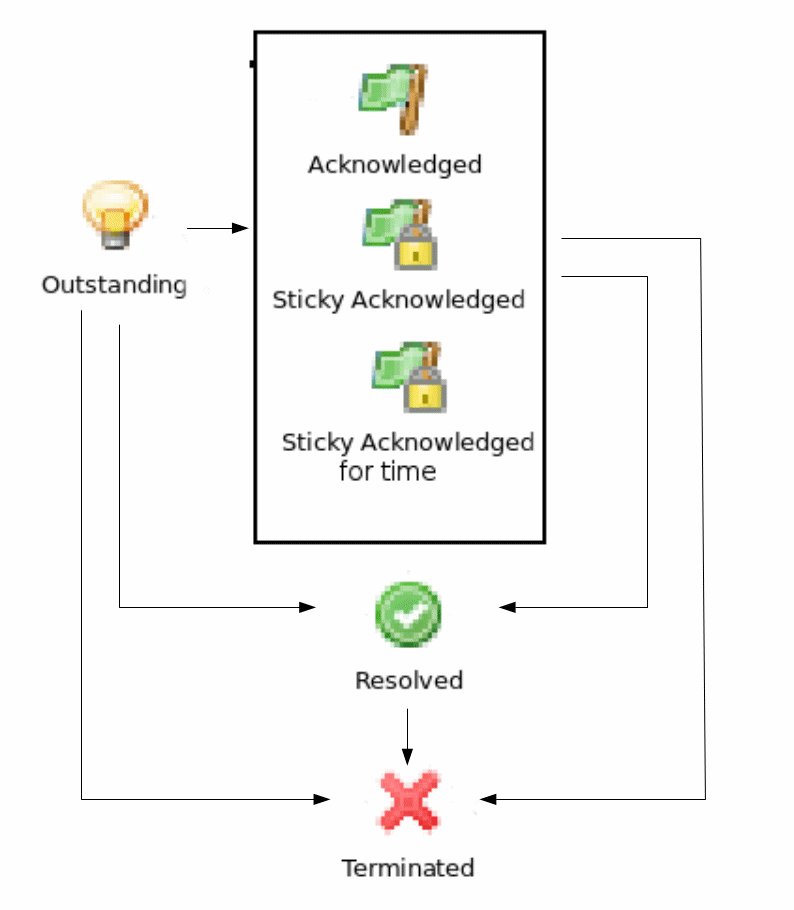
Not strict(default)
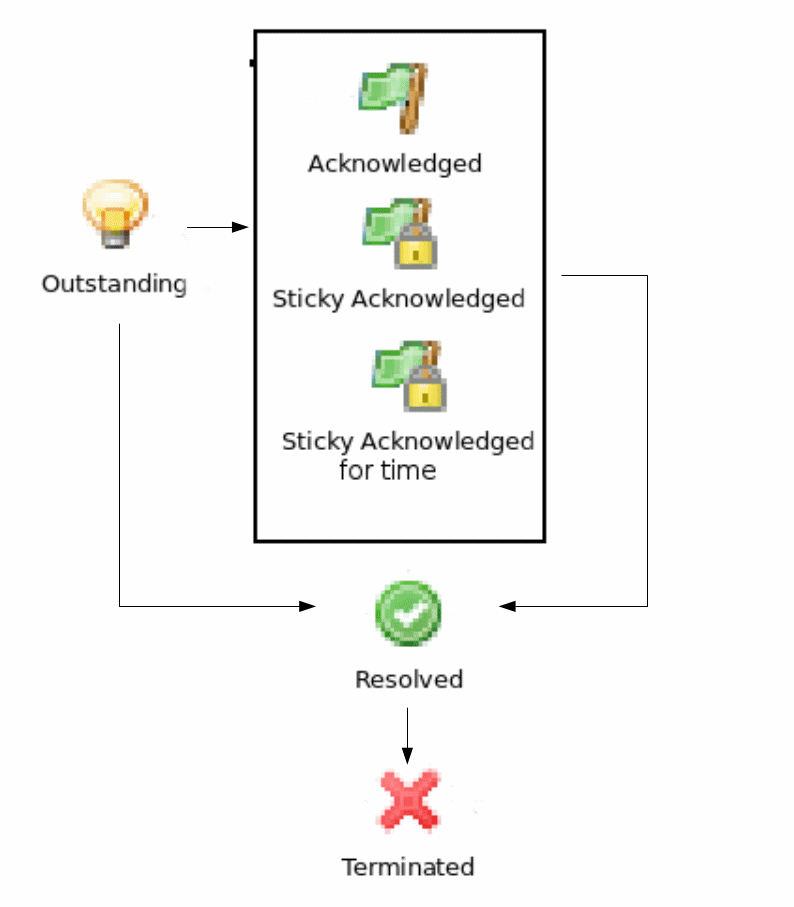
Strict
Alarm Melodies
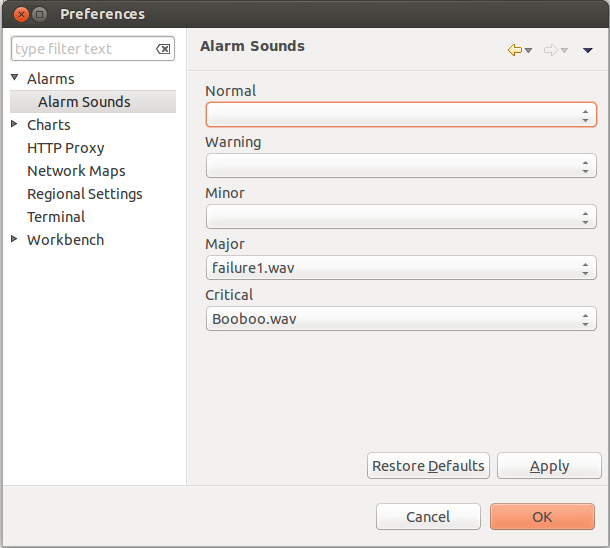
On each severity of alarm can be set melody to play. This melody will be played when new alarm in state outstanding will occur. Melody that should be played should exist on server in wav format. See instruction there: Upload file on server. By default there are no sounds on alarms.
To set sound open preferences, there select tab. There in drop-down will be seen all possible options. If sound will not be chosen, alarm with this severity will come silently.
To configure sounds, open preferences and select tab. Drop-downs next to each severity level have a list of available sounds. If no sound is chosen, alarm for given severity will come silently.
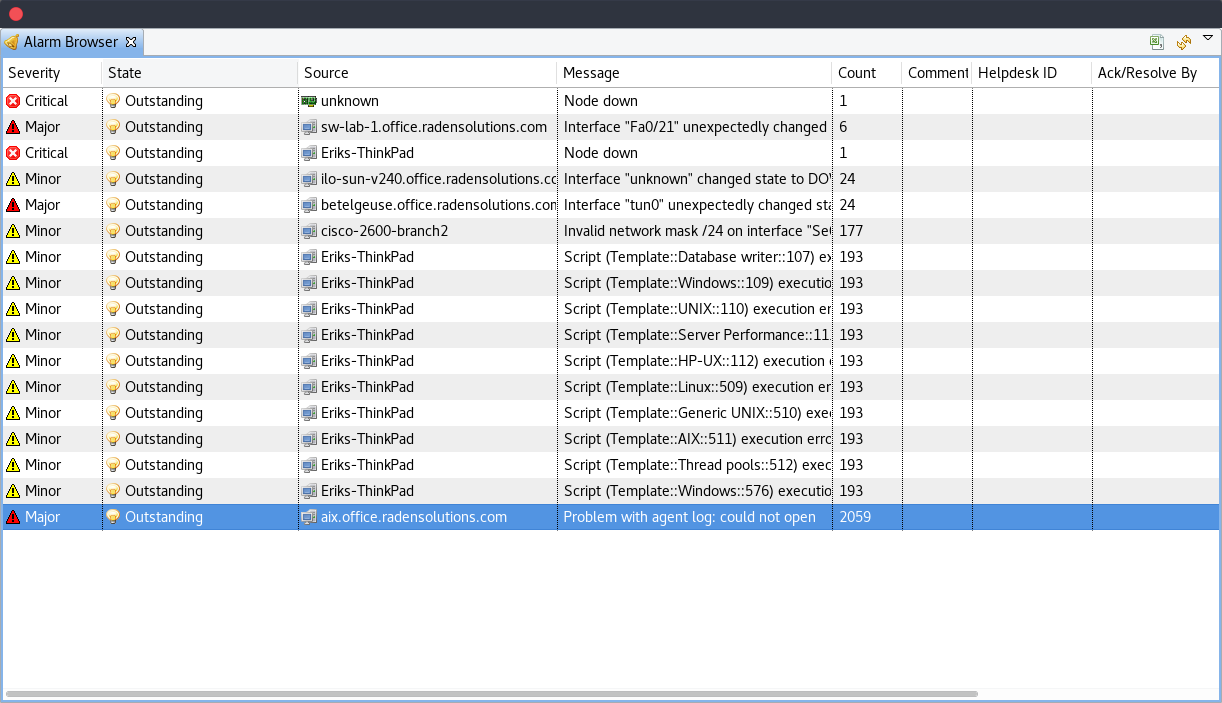
Alarm Browser
When an alarm is generated it will appear in the Alarm Browser where information about currently active alarms can be viewed.
Alarm Comments
For each alarm can be created comments in “Alarm Details”
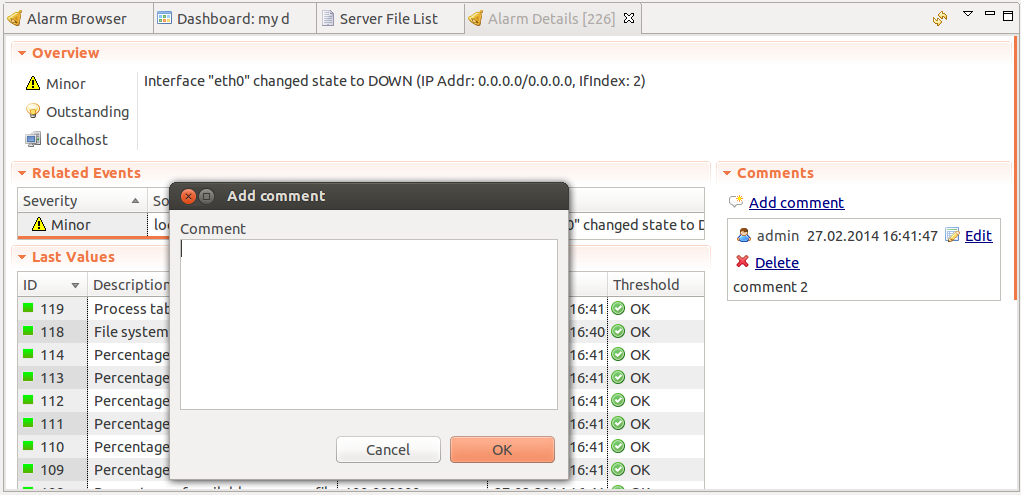
or “Alarm Comments” views.
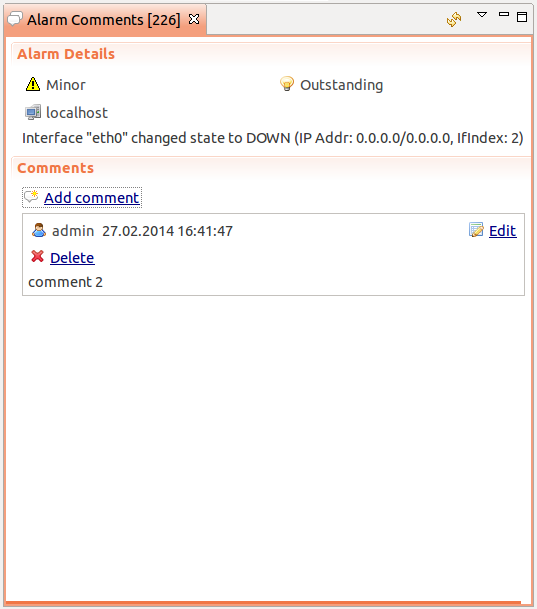
Comment can be created, edited or deleted. All comments will be deleted after alarm termination.
Alarm Summary Emails
It is possible to schedule emails which contain a summary of all currently active alarms, similar to what can be seen in the Alarm Browser.
Summary emails are sent through SMTP notification channel with HTML formatting. It should be first configured in Notification channels configuration and then it’s name should be set in “DefaultNotificationChannel.SMTP.Html” server configuration parameter.
To enable Alarm Summary Emails it is required to configure the following server parameters:
Name |
|---|
DefaultNotificationChannel.SMTP.Html |
EnableAlarmSummaryEmails |
AlarmSummaryEmailSchedule |
AlarmSummaryEmailRecipients |
Further information on server configuration parameters can be found in Server configuration parameters.
Generating and Terminating Alarms from EPP
To generate alarms from events, you should edit Alarm field in appropriate rule of Event Processing Policy. Alarm configuration dialog will look like this:
You should select Generate new alarm radio button to enable alarm generation from current rule. In the Message field enter alarm’s text, and in the alarm key enter value which will be used for repeated alarms detection and automatic alarm termination. In both fields you can use macros described in the Macros for Event Processing section.
You can also configure sending of additional event if alarm will stay in
Outstanding state for given period of time. To enable this, enter
desired number of seconds in Seconds field, and select event to be
sent. Entering value of 0 for seconds will disable additional event
sending.
Alarms generated by rules can by categorised to limit what alarms can be seen by what users. This can be done by applying a category in the Alarm Category field, which can be created and configured in the Alarm Category Configurator.
Alarm Category Configurator
Alarm categories can be created and configured in the Alarm Category Configurator which can be found in menu:
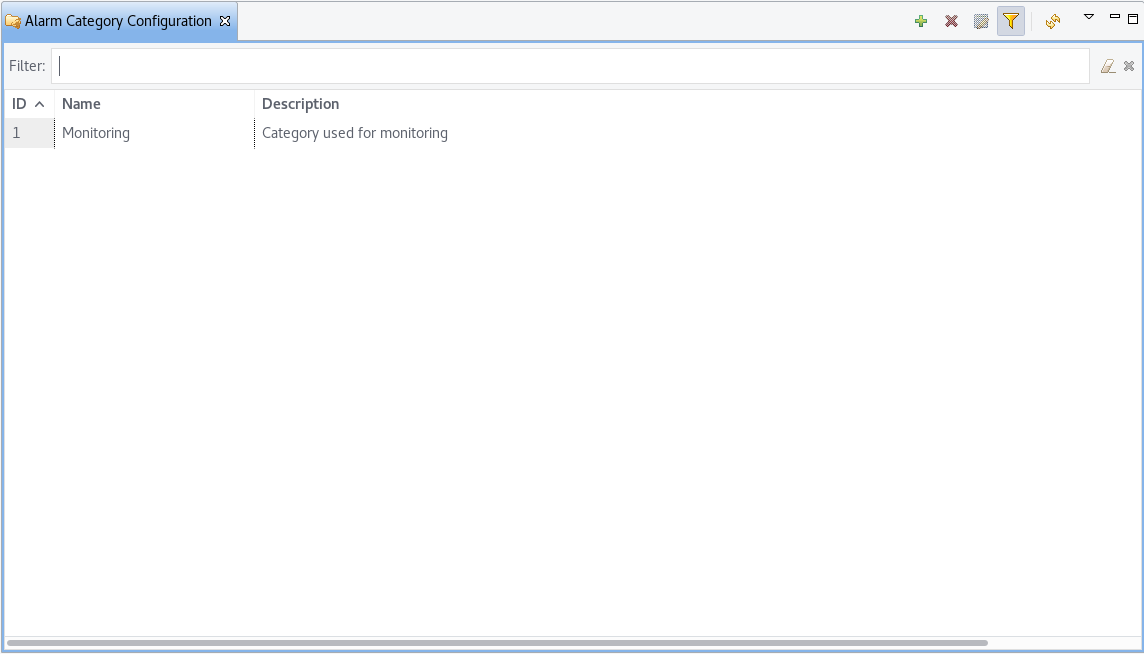
Alarm Category Configurator
Alarm categories provide the possibility to configure access rights for viewing generated alarms on a per user or per group basis. When creating an alarm category, it is possible to set the Category name, Description.
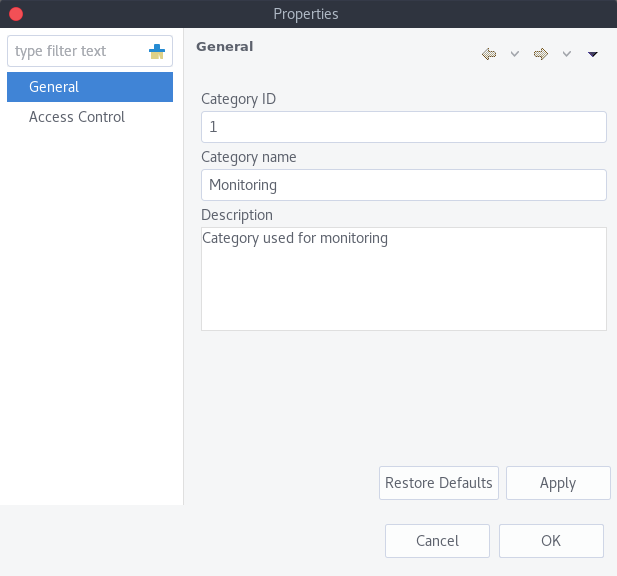
Alarm Category properties
Alarm category access rights can be configured by adding users or groups to the access list of the category in the Access Control property page.
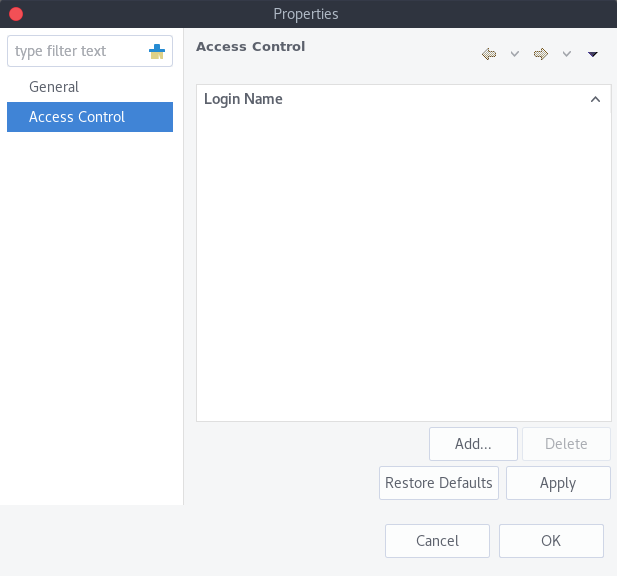
Alarm Category Access Control
By default, all alarms can be viewed by all users due to the View all alarms system right being set as default to the Everyone user group. In order to limit the viewing of alarms, this system right should be removed and the access rights configured in the categories themselves. When the categories have been configured, they can be applied to the necessary Event Processing Policy rules.
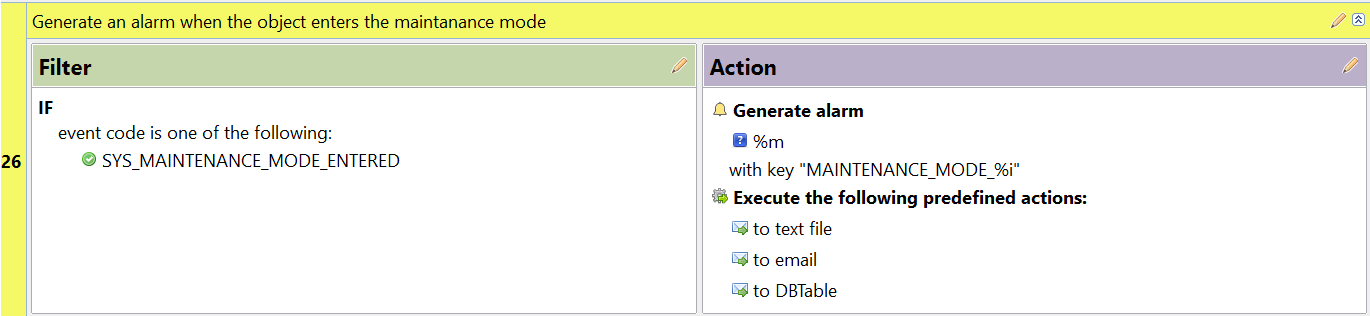
If an alarm category has been applied to an Event Processing Policy rule, it will appear in the Event Processing Policy Editor when a rule is expanded under the Action section.
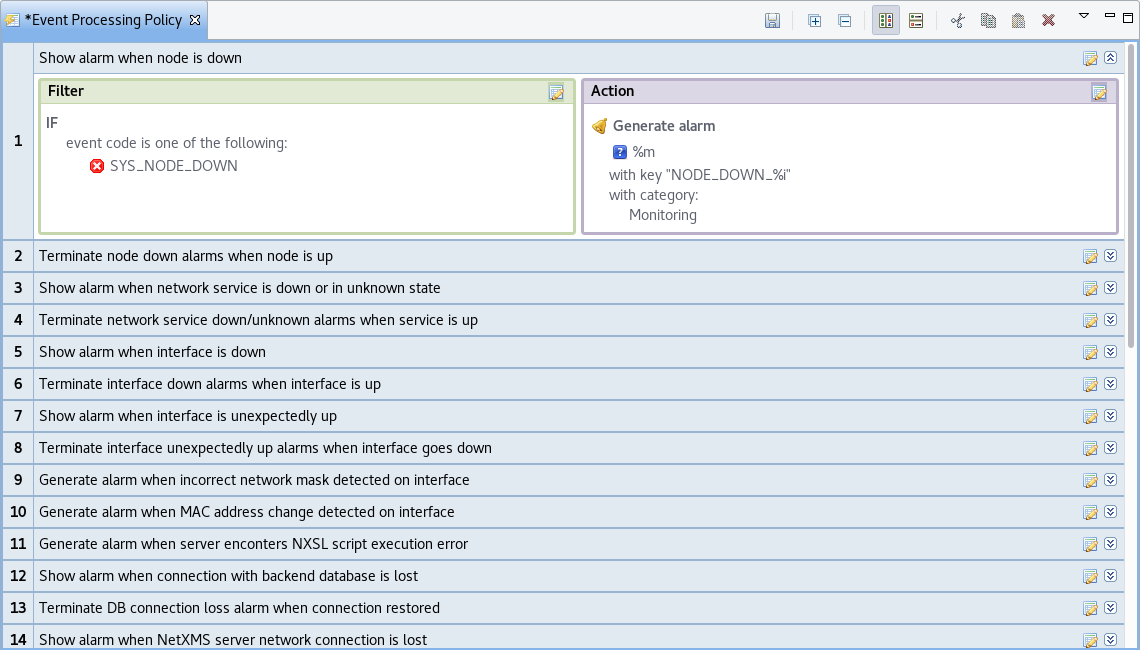
Event Processing Policy expanded
Automatic Alarm Termination/Resolve
You can terminate or resolve all active alarms with given key as a reaction for the event. To do this, select Terminate alarm radio button or Resolve alarm radio button in alarm configuration dialog and enter value for alarm key. For that field you can use macros described in the Macros for Event Processing chapter.
Escalation
As it was described in Generating and Terminating Alarms from EPP chapter there is possibility to generate new event if alarm stay in Outstanding state for too long. Escalation is built on this option. When alarm was generated, but no action was done from operator in predefined time, new event can be generated and this time email or notification (SMS, instant message) can be sent to operator or to it’s manager. This escalation process can have as many steps as it is required.
Actions
In addition to alarm generation server can perform various types of actions as a reaction to an event. Action types available in NetXMS are described in the following sections. Each action can be separately disabled in action configuration.
After the action is added, it can be edited to add delay time and timer key. This option can be used to prevent notification sending in case if problem solved quickly enough. Key is a free form string that supports macros and delay is the delay time in seconds before action is executed.
The following example shows the configuration for the situation when there is no need to notify anyone if node went down and back up in less then 5 minutes.
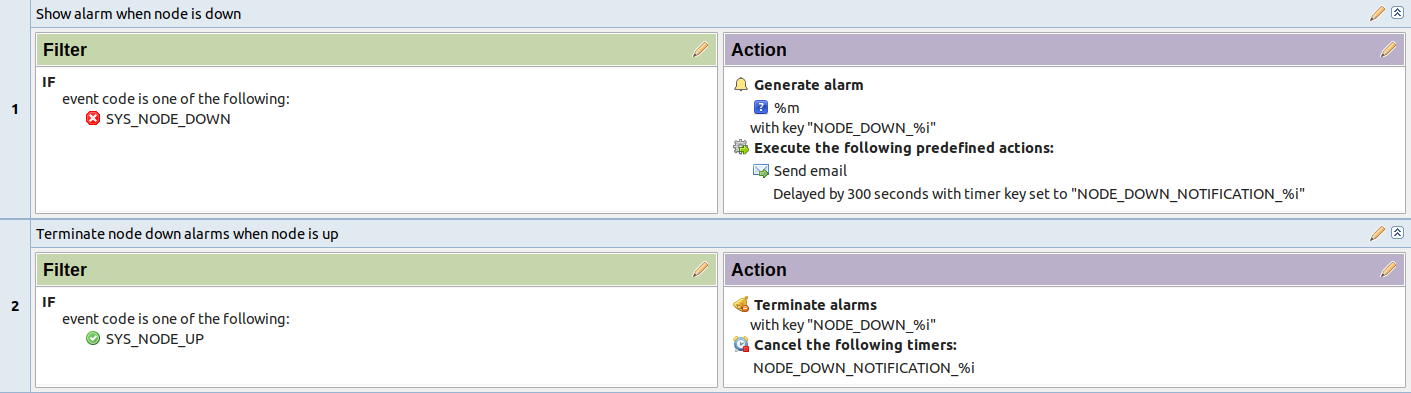
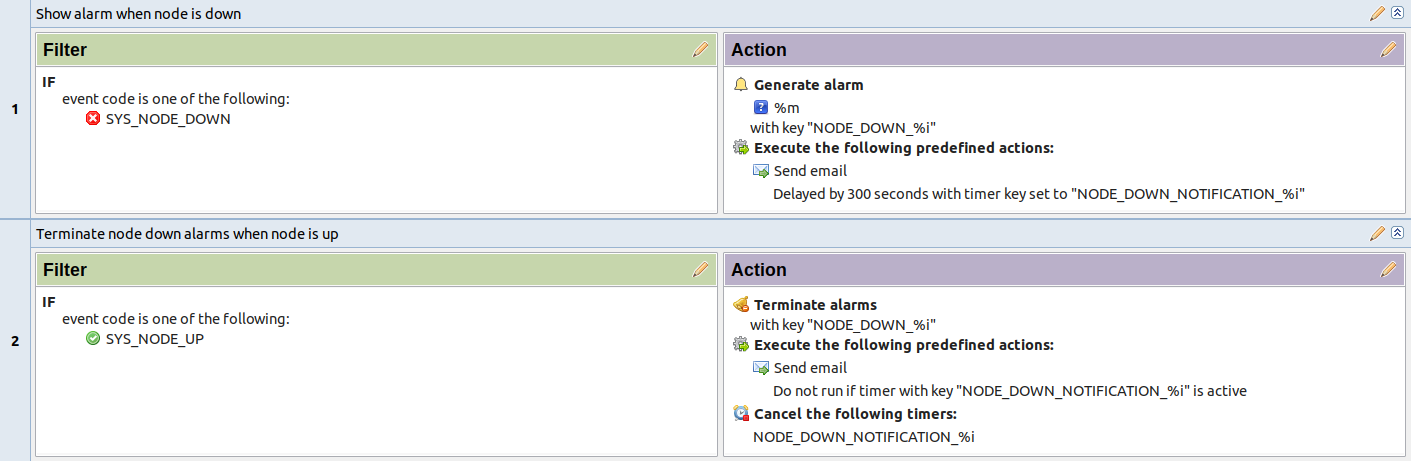
If, in adddition, we want to send notification when node goes up, but only if notification about node down was sent:
Escalation
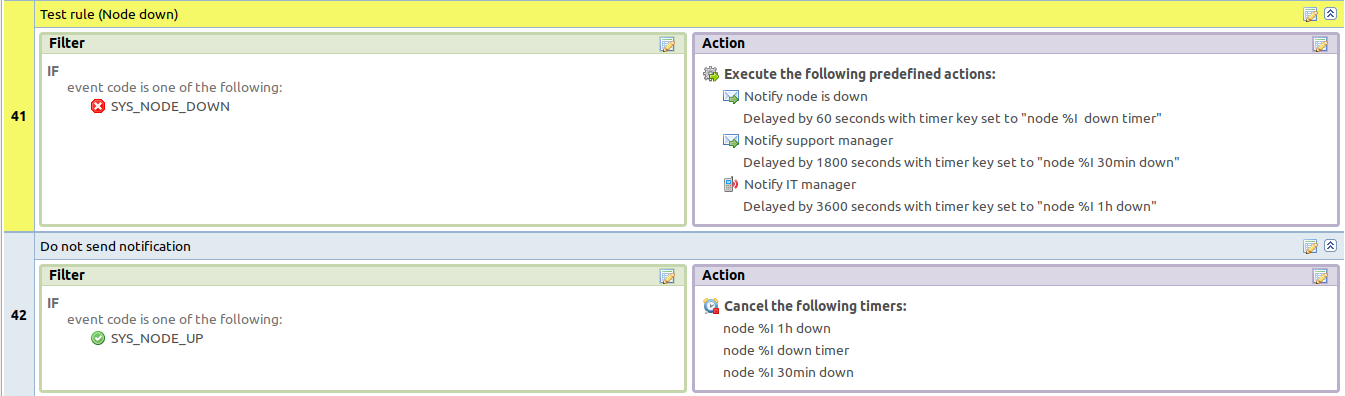
One EPP rule can contain multiple actions with different delays. Delay timers are canceled by other rule in case of problem resolution.
- The next example shows that if node went down, then
after 1 minute responsible person will be notified if the problem still persists
after 30 minutes the support manager will be notified if the problem still persists
after 1 hour the IT manager will be notified if the problem still persists
Action types
Execute command on management server
Executes provided command on server node. Check that user under which
netxmsd process run has permission to run this command.
Execute command on remote node
Executes provided command name defined in this node’s agent configuration file.
To this command can be given parameters in format: commandName param1 param2
param3... Check that user under which nxagentd process run has
permission to run this command.
Several formats are supported in Remote Host field. This field supports macros.
Format |
Description |
|---|---|
|
Hostname or IP address of agent node. Use |
|
Name of the node. Allows to identify a node behind proxy. |
|
Object ID of node. |
Send notification
Send notification, e.g. SMS, MicrosoftTeams, e-mail etc, to one or more recipients. This can be configured in Notification channels section described below and appropriate action created in Actions section and then available for use in EPP. Driver configuration parameters are detailed in Drivers section.
In message text can be used Macros for Event Processing.
Execute NXSL script
This action executes script form scrip library. In action configuration should be defined name of script. Information about scripting and library can be found there.
Forward event
NetXMS does not support configuration synchronization between two NetXMS servers(Distributed Monitoring). But it is possible to forward events from one server to another. This option allow synchronize events between servers but there are some limitation.
Configuration
- Source server configuration:
Create new action of type “forward event” - it will have destination server address property.
Create a rule in event processing policy with filter for events you want to forward and add forwarding action as action.
- Destination server configuration:
Enable EnableISCListener and ReceiveForwardedEvents in server configuration.
Open port 4702.
Check that receiving server have all events as on a sending server
Limitation
- Limitations of event forwarding:
Event template with same event code or event name must exist on recipient server
Node object with same IP address as event’s source node’s address must exist on recipient server
Does not work with zones
Events not met these conditions are discarded. It is possible to check if and why incoming events are discarded by turning on level 5 debug on receiving server.
There can be used one of two options if it is required to disable polling of sender server nodes on recipient server: disable all polling protocols or unmanage nodes. Chose depends on how you wish to see node’s status. For unmanaged node, it always be “unmanaged”, regardless of active alarms. If you disable polling, node’s status will be “unknown” unless there will be active alarms for that node - in that case node’s status will change to severity of most critical alarm.
Event forwarders
Added in version 7.0.
While notification channels deliver human-readable messages (SMS, e-mail, chat), event forwarders relay whole events to external systems in a machine-readable form. NetXMS uses a pluggable driver framework for this, so a single Forward event action can deliver events to another NetXMS server, to an SNMP manager, or to an OpenTelemetry collector, depending on the driver selected.
Configuration of event forwarders is done in . To create a forwarder, provide:
Name - unique forwarder name, used to reference it from event processing policy actions.
Description - free text description.
Driver - one of the drivers listed below.
Driver configuration - driver parameters in JSON format, e.g.
{ "hostname": "collector.example.com", "port": 162 }. Meaning of the parameters is driver dependent and described separately for each driver.
The forwarder list shows per-forwarder counters (number of forwarded events, failures, dropped events, queue length) as well as Status and Error message columns.
An event forwarder is not triggered on its own - it is invoked by a Forward event action (see Forward event) that references the forwarder by name in its Channel name field. The action’s Recipient field is passed to the driver (its meaning is driver-specific, see table below), while the Message text field is not used by event forwarders - the event itself is always sent in full.
Drivers
The following event forwarder drivers are provided with NetXMS:
Driver |
Description |
|---|---|
isc |
Forwards events to another NetXMS server over ISC (inter-server communication on top of NXCP). The recipient is ignored - the target is always the server specified in the configuration. Configuration parameters:
The destination server must have |
snmptrap |
Sends events as SNMP traps (or INFORM requests) with structured
varbinds carrying event code, name, id, severity, message, timestamp,
source object name and id, tags, and parameters. If the action
Recipient is set, it is used as the trap target host,
otherwise the
|
otlp |
Exports events as OpenTelemetry logs to an OTLP/HTTP collector. Events are
buffered and delivered asynchronously in batches. If the action
Recipient is set, it is attached to the exported record as the
|
Notification channels
NetXMS supports concept of notification channel drivers to provide SMS and instant message sending functionality. Role of notification channel driver is to provide level of abstraction on top of different notification sending mechanisms and uniform notification sending interface for server core. It is possible to set up and use several notification channels.
Configuration of notification channels is done in .
Notification channel driver parameters are specified in Driver configuration input field. Each parameter is given on a separate line in format: parameter_name=parameter_value. Meaning of parameters is driver dependent and described separately for each driver. It a parameter is not given, it’s default value will be used.
Once notification channel is created is is seen in channel list with green or read square next to the name - it is channel status identifier. It should be green if driver initialization was successful or read in other cases. Status column displays last sent attempt status and Error message column provide more information about driver initialization or sending error.

Drivers
The following drivers are provided by default with NetXMS installation:
Driver |
Description |
|---|---|
AnySMS |
SMS driver for any-sms.biz service (http://any-sms.biz). Configuration parameters:
|
DBTable |
This driver saves notifications to a database. Configuration parameters:
|
Dummy |
Dummy driver for debugging purposes. Does not send any actual notifications and only logs them to server log file. This driver has no configuration parameters. It is necessary to set debug level to debug=6 or higher to get records in the log file. |
Google chat |
Driver to send notifications to Google charts. You need to create incoming web hook first. Each web hook have it’s own URL, you can either put it as recipient, or setup mapping in notification channel configuration. Mapping is done in the section “Rooms”. Example: [Rooms]
RoomName=URL
AnotherRoomName=URL
|
GSM |
Driver for serial or USB attached GSM modems with support for standard GSM AT command set. Configuration parameters:
|
Kannel |
Driver for Kannel SMS gateway (http://www.kannel.org). Configuration parameters:
|
Mattermost |
Mattermost online chat service driver. Configuration parameters:
|
MicrosoftTeams |
Notification channel driver for Microsoft Teams. Configuration parameters:
Optional configuration section “Channels” should contain list of channels in the following format: channelName=URL, where channelName is an arbitrary name later used as recipient in action configuration. More information about setting up the URL of incoming webhook available there #config example
ThemeColor=FF6A00
UseMessageCards = false
[Channels]
Channel=URL
AnotherChannel=URL
MsTeams requires 2 fields in action configuration:
|
MQTT |
Driver for sending messages to MQTT broker. Sending is done by NetXMS server process. When sending, MQTT topic is specified in recipient field, value in message body field. Configuration parameters:
|
MyMobile |
SMS driver for MyMobile API gateways. Configuration parameters:
|
Nexmo |
SMS driver for Nexmo gateway. Configuration parameters:
|
NXAgent |
Similar to gsm.ncd, but sending is done via GSM modem, attached to NetXMS agent. Configuration parameters:
|
NXSL |
Added in version 7.0. Built-in driver that executes an NXSL script for each notification, giving full access to the server scripting environment. Unlike other drivers, the Driver configuration field does not contain configuraiton parameters but the NXSL script source itself. The following global variables are available to the script:
When the triggering event has a source object, the standard object
variables ( The script return value controls the sending result:
If the script fails to compile or aborts with an execution error, the channel is marked as failed and the error is written to the server log. |
Portech |
Driver for Portech MV-372 and MV-374 GSM gateways (https://www.portech.com.tw/p3-product1_1.asp?Pid=14). Configuration parameters:
|
Shell |
Driver executes shell commands on the server. Configuration parameter:
In the command ${recipient}, ${subject} and ${text} macros will be correspondingly replaced with values of recipient, subject and text. |
Slack |
Driver for slack.com service. Configuration parameters:
|
SMSEagle |
Driver for SMSEagle Hardware SMS Gateway. Configuration parameters:
|
SMTP |
Driver to send notifications using SMTP protocol. Encryption and authentication are supported. Driver is using libcurl library to send emails. Mail encoding is always utf8.
The following parameters configure OAuth2 authentication using the XOAUTH2 SASL mechanism (client credentials flow), available since version 6.2.0:
When AuthMethod is XOAUTH2, the Login parameter must contain the mailbox address used as the SMTP user name, and ClientId, ClientSecret and TokenEndpoint must be set. The server obtains an access token from TokenEndpoint and reuses it until shortly before it expires. |
SNMPTrap |
Driver to send notifications as SNMP traps. Driver configuration parameters:
Driver configuration parameters applicable to SNMP v3 only:
Raden Solutions has IANA assigned Private Enterprise Number (57163). MIB files defining the OIDs (RADENSOLUTIONS-SMI.txt and NETXMS-MIB.txt) are included with NetXMS server. It’s also possible to use custom OIDs by setting the following driver configuration parameters:
Recipient’s address should contain host name or IP address the trap is sent to. Message and subject are sent as separate fields (MessageFieldID and AdditionalDataFieldID) in the trap message. In addition to that, if subject contains semicolon-separated key=value pairs or JSON and the key is from below list, additional fields with these values will be added to trap message. List of supported keys:
E.g. subject could be JSON data can have more fields in addition to the above mentioned, this allows to send more information in the trap. |
Telegram |
Notification channel driver for Telegram messenger. Configuration parameters:
Only AuthToken field is mandatory field all others are optional. It is necessary to create a telegram bot that NetXMS server will
use to send messages. In order to create a new bot it’s necessary to talk
to BotFather and get bot authentication token (AUTH_TOKEN). Set
authentication token in notification channel configuration, e.g.:
The bot can:
Telegram’s bot can’t initiate conversations with users in a private chat or a group. A user must either add bot to a group or send a private message to the bot first. Chat, group or channel is identified by ID or name (without @ prefix). For private chats only users who configured a Username can be identified by name (without @ prefix). NetXMS stores the correspondence between ID and name when the bot receives a message in chat or group (NetXMS server should be running a that moment). If group, channel name or username is changed, it’s necessary to send any message to the bot so new correspondence could be stored. Telegram notification channel requires 2 fields in action configuration:
If you want to use ID to identify a recipient, you can get it by opening Telegram API URL in your browser, e.g. https://api.telegram.org/bot1234567890:jdiAiwdisUsWjvKpDenAlDjuqpx/getUpdates After sending a message to the bot or adding it to a group you should see chat id there. You might need to temporary deconfigure Telegram notification channel, otherwise if NetXMS server is running, it will read data from Telegram API first. |
Text2Reach |
Driver for Text2Reach.com service (http://www.text2reach.com). Configuration parameters:
|
TextFile |
Notification driver that writes messages to text file. Configuration parameter:
|
Twilio |
Driver for Twilio.com service (http://www.twilio.com). Configuration parameters:
|
WebSMS |
Driver for websms.ru service (https://websms.ru). Configuration parameters:
|
XMPP |
Driver for XMPP/Jabber messages. Configuration parameters:
|
NXLS Persistent Storage
NXSL
- There are 2 functions:
ReadPersistentStorage(“key”) - read value by key
WritePersistentStorage(“key”, “value”) - insert or update value by key. If value will be empty - variable will be deleted.
View
Persistent Storage view () provide information about current state of Persistent Storage variables.
Macros for Event Processing
On various stages of event processing you may need to use macros to include information like event source, severity, or parameter in your event texts, alarms, or actions. You may use the following macros to accomplish this:
Macro |
Description |
|---|---|
|
IP address of event source object. |
|
Alarm’s text. This macro is populated when creating, resolving or terminating alarm in EPP rule. Macro is available in that EPP rule for persistent storage and server action and in subsequent EPP rules. Changed in version 3.8.314. Prior to 3.8.314 this macro was available only withing given EPP rule. |
|
Event’s code. |
|
Comment of event source object. Added in version 4.4.3. |
|
Comment of Data Collection Item (only for threshold violation events) Added in version 4.4.3. |
|
List of comma-separated user tags associated with the event. |
|
Globally unique identifier (GUID) of event source object. |
|
Unique ID of event source object in hexadecimal form. Always prefixed with 0x and contains exactly 8 digits (for example 0x000029AC). |
|
Unique ID of event source object in decimal form. |
|
Alarm’s key (can be used only in actions to put text of alarm from the same event processing policy rule). |
|
Alias of event source object. Added in version 4.4.3. |
|
Event’s message text (meaningless in event template). |
|
Custom message text. Can be set in filtering script by setting
|
|
Name of event source object. Name of interface when interface name is generated using macros. |
|
Event’s name. |
|
Event’s severity code as number. Possible values are:
|
|
Event’s severity code as text. |
|
Event’s timestamp is a form day-month-year hour:minute:second. |
|
Event’s timestamp as a number of seconds since epoch (as returned by time() function). |
|
NetXMS server’s version. |
|
Zone UIN of event source object. |
|
Zone name of event source object. |
|
Value returned by script library script named |
|
Value of custom attribute. Expansion is attempted in the following order:
If custom attribute exists, but has empty value, this empty value is taken (if this macro is used in a place where its value is converted to numeric value - e.g. as threshold value for a numeric DCI - then empty value will be converted to 0). |
|
Event’s parameter with given name. |
|
Formatted event’s parameter with given name. This is applicable to DCI
value and threshold value parameters.
|
|
Event’s parameter number 1 .. 99. |
|
Insert new line character. |
|
Insert tab character. |
|
Insert |