Agent encryption is now restricted to AES-256 only. The EnabledCiphers agent
configuration parameter has been removed. Server configuration parameter
Server.AllowedCiphers default value changed from 63 (all ciphers) to 1
(AES-256 only).
Backslash no longer has special meaning in macro expansion, so does not need to
be escaped. Input field macro %(name) has been repurposed into multi-purpose
macro supporting the following: %(nl) - insert new line character; %(tab) -
insert tab character; %(in:name) - insert input field ‘name’ value. During
upgrade macros will be automatically converted.
Aditionally loaded MIB files will not work. They should be uploaded again in the
Configuration –> SNMP MIB files configuration view.
Starting with version 5.0, the MIB compilation file extension changed to “.mib”
and the already compiled MIB file extension is now “.cmib”. The default MIB file
location has changed to $HOME/share/netxms/mibs/ and user additional MIB files
should be loaded in Configuration –> SNMP MIB files.
The default format of SNMP OID changes to a format without leading dot. Potentially
this can break some scripts that use SNMP OID string comparisons.
The NXSL syntax has changed. During upgrade, existing scripts get
converted automatically . If you need to manually convert a script, this could be
done via the nxscript command line utility (nxscript-5script-file.nxsl). NXSL
syntax major changes:
Description
Old example
New example
String concatenation changes from ‘.’ to ‘..’
variable = “Text first part “ . “text second part”;
variable = “Text first part “ .. “text second part”;
Use ‘import’ keyword instead of ‘use’ for library import
use ToolBox;
import ToolBox;
Use ‘function’ keyword instead of ‘sub’ for function definition
sub EnumerateNodes(obj, level)
function EnumerateNodes(obj, level)
Class ‘TIME’ is now renamed as ‘DateTime’. Created Math, Base64, Crypto, Net, and IO
modules, and functions moved under them. The most used functions are left as deprecated,
but others were just renamed. The table below shows the full renamed list containing
functions that were just renamed and do not have deprecated versions:
Old name
New name
Type
TIME
DateTime
class
asin
Math::Asin
function
acos
Math::Acos
function
atan
Math::Atan
function
atan2
Math::Atan2
function
cosh
Math::Cosh
function
exp
Math::Exp
function
gethostbyaddr
Net::ResolveAddress
function
gethostbyname
Net::ResolveHostname
function
log
Math::Log
function
log10
Math::Log10
function
md5
Crypto::MD5
function
md5
Crypto::MD5
function
sha1
Crypto::SHA1
function
sha256
Crypto::SHA256
function
sinh
Math::Sinh
function
tanh
Math::Tanh
function
weierstrass
Math::Weierstrass
function
decode
Base64::Decode
function
encode
Base64::Encode
function
CopyFile
IO::CopyFile
function
CreateDirectory
IO::CreateDirectory
function
DeleteFile
IO::DeleteFile
function
FileAccess
IO::FileAccess
function
OpenFile
IO::OpenFile
function
RemoveDirectory
IO::RemoveDirectory
function
RenameFile
IO::RenameFile
function
Abort and other runtime errors in the script DCI will set DCI to an error state.
Before version 5.0, DCI changed state to unsupported.
Importing the dashboard configuration exported from the previous version of
NetXMS will not upgrade the script syntax to the 5.0 format.
The CreateDCI NXSL method changed. In the new version the last two parameters “polling interval” and “retention time” should
be set to null instead of 0 to have a default value in the DCI configuration.
NXSL decimal numbers written with leading zeros will NOT be interpreted as octal.
Incompatible attributes in NXSL DCI class:
instance now refers to an instance value (as in {instance} macro), not instance name as before.
The instance name can be accessed via the attribute “instanceName”.
Several WEB API endpoints were renamed, e.g. API_HOME/summaryTable/adHoc became API_HOME/summary-table/ad-hoc.
The minimal JRE (Java Runtime Environment) version for the management client is Java 11.
A Desktop Management Client with bundled JRE is provided for Windows.
Introduced boolean type in NXSL. Comparisons like “func() == 1”, where ‘func’ is a function that returns a boolean type, will
always result as false as the boolean value ‘true’ is not equal to 1. This might require fixes in some NXSL scripts.
Regexp matching operation in NXSL returns an array with capture groups or false as a result.
Clusters now have configuration poll. If you have a configuration poll hook script that is referring to the $node object, this will
produce an error message in the server log each time a configuration poll runs on a cluster. Replace $node with $object or
use the condition if(classof($object)=="Node") or if($node!=null) prior to accessing attributes or methods of $node.
In this version the “Certificate manager” was removed from server. All CA certificates configuration should be manually moved
to the “TrustedCertificate” configuration parameter in the server configuration file.
External Metrics (ExternalMetric, etc…) expect UTF-8 encoding on Windows. It might be needed to adjust scripts called
by external metrics if non-ASCII characters are returned.
Regexp matching operation in NXSL returns array with capture groups or NULL as result. NXSL objects and arrays in logical
expressions are evaluated to TRUE. This might require some NXSL script adjustments.
Notification channels are introduced as new functionality. SMS configuration automatically moved from server configuration to
notification channel depending on old driver with one of the next names: AnySMS, DBTable, Dummy, GSM, Kannel, MyMobile, Nexmo,
NXAgent, Portech, Slack, SMSEagle, Text2Reach, WebSMS. No manual actions are required.
Flags and dynamic flags are moved to the NetObject class. Separated node flags set by user and capability flags set by system to
flags and capabilities. Numeric values for flags, capabilities and dynamic flags were changed. This affects only NXSL scripts
that checked those flags directly.
The 32 bit version of management client is not available any more.
The Agent always requires encryption unless the RequireEncryption parameter explicitly set to off. It might be required to manually add
the “RequireEncryption” configuration parameter where required to disable encryption.
Agent policies were merged with templates. Each policy was converted to a template. No changes required.
Both NetXMS server and agent work fine on most operating systems, including Windows, Linux, and commercial UNIXes.
However, we test and officially support only some of them.
An important requirement on large systems might be the need to tune Linux network buffer size.
Default values may not be enough if the system is sending many ICMP pings, for example.
The following kernel parameters should be changed:
net.core.rmem_default
net.core.wmem_default
net.core.rmem_max
net.core.wmem_max
In our test lab, value 1703936 seems to be working well (default was 212992).
Example:
sudo sysctl -w net.core.rmem_default=1703936
sudo sysctl -w net.core.wmem_default=1703936
sudo sysctl -w net.core.rmem_max=1703936
sudo sysctl -w net.core.wmem_max=1703936
Kernel changes will not be preserved after reboot unless sysctl commands are applied in the system
configuration file, which is typically located at /etc/sysctl.conf. Increasing these kernel values also
increases kernel memory space in use and may impact other applications.
Microsoft SQL Server 2012, 2014, 2016, 2017, 2019, 2022
SQLite (only for test purposes)
PostgreSQL database tuning might be required depending on database size.
Increasing shared_buffers might be needed. A rough recommendation is 25% of available RAM.
Increasing max_locks_per_transaction is needed if using TimescaleDB. A rough recommendation is 512.
Database size and load is very hard to predict, because it is depending on the number of
monitored nodes and collected metrics. If you plan to install a database engine on
the same machine as NetXMS server, increase your hardware requirements accordingly.
A Java Runtime Environment (JRE) is needed for the Desktop Management Client (nxmc) and for the Web Management Client.
The Supported Java version is 17 and higher.
Since version 3.8 the Desktop Management Client with a bundled JRE is provided for Windows.
We host a public APT repository at http://packages.netxms.org/ for most deb-based distributions (Debian, Ubuntu, Mint, Raspbian, etc.).
Packages are signed, and you’ll need to install an additional encryption key for signature verification.
Supported URLs (CODENAME should be replaced with output of lsb_release -sc):
There are two options to add an APT repository: by hand or by using the netxms-release
package. Use of the release package is strongly encouraged because it allows
easy change in repository configuration and encryption keys will be updated in the future.
The server requires two components to function: the server itself (package “netxms-server”) and at least one database abstraction layer driver
(multiple can be installed at the same time, e.g. for migration purposes). These database drivers are also used by the agent for database
monitoring (performing queries to databases).
Provided driver packages:
netxms-dbdrv-pgsql - PostgreSQL driver
netxms-dbdrv-mariadb - Mariadb driver
netxms-dbdrv-mysql - MySQL driver (not built for Ubuntu 20 / Mint 20)
netxms-dbdrv-odbc - unixODBC driver (can be used with DB/2 and Microsoft SQL)
Modify server configuration file (“/etc/netxmsd.conf” to match your environment.
Load database schema and default configuration:
nxdbmgrinit
Start server:
systemctlstartnetxms-server
Enable automatic startup of server:
systemctlenablenetxms-server
If the database engine is running on the same system, add ordering dependency for
database in the netxmsd systemd unit override file. This will ensure database
shutdown only after netxmsd process completion on system shutdown/restart. To
add the dependency e.g. for the PostgreSQL database, run:
systemctleditnetxms-server
and add the following lines:
[Unit]After=postgresql.service
After editing run systemctldaemon-reload to reload systemd
configuration.
Note
Default credentials - user “admin” with password “netxms”.
Run the .jar file using java, for example java -jar nxmc-xxx.jar .
The desktop management client produces a log file named .nxmc/data/.metadata/.log in
the home folder of the currently logged in user. Inspect this log file if you encounter
errors when running the client.
The NetXMS web interface is java based and should be deployed into a
servlet container to run. Servlet container should support Jakarta Servlet API
(Jakarta EE 10). Supported versions are: Jetty 12 (with ee10 environment),
Tomcat 10.1+. The supported Java version is 17 or later.
Install one of the servlet containers that support Jakarta Servlet API.
Download the latest version of WAR file from the Web Interface Binaries section
https://www.netxms.org/download/ named nxmc-VERSION.war, for example
nxmc-5.1.0.war.
The web management client produces a log file. For Tomcat it is located at
/var/lib/tomcat10/work/Catalina/localhost/nxmc/eclipse/workspace/.metadata/.log.
Inspect this log file if you encounter errors when running the web client.
We provide RPM packages for RHEL and Fedora, both amd64 and aarch64.
If you need a build for another system, please contact us for support or check this section: Installing from source.
The server requires two components to function - the server itself (package “netxms-server”) and at least one database abstraction layer driver
(multiple can be installed at the same time, e.g. for migration purposes). These database drivers are also used by the agent for database
monitoring (performing queries to databases).
Provided driver packages:
netxms-dbdrv-pgsql - PostgreSQL driver
netxms-dbdrv-mariadb - Mariadb driver
netxms-dbdrv-mysql - MySQL driver, currently under development (not built for Ubuntu 20 / Mint 20)
netxms-dbdrv-odbc - unixODBC driver (can be used with DB/2 and Microsoft SQL)
Modify the server configuration file (“/etc/netxmsd.conf” to match your environment.
Load database schema and default configuration:
nxdbmgrinit
Start server:
systemctlstartnetxms-server.service
Enable automatic startup of server:
systemctlenablenetxms-server.service
If the database engine is running on the same system, add ordering dependency for
database into netxmsd systemd unit override file. This will ensure database
shutdown only after netxmsd process completion on system shutdown/restart. To
add the dependency e.g. for the PostgreSQL database, run:
systemctleditnetxms-server
and add the following lines:
[Unit]After=postgresql.service
After editing, run systemctldaemon-reload to reload systemd
configuration.
Note
Default credentials - user “admin” with password “netxms”.
Run the .jar file using java, for example java -jar nxmc-xxx.jar .
The desktop management client produces a log file named .nxmc/data/.metadata/.log in
the home folder of the currently logged in user. Inspect this log file if you encounter
errors when running the client.
The NetXMS web interface is java based and should be deployed into a
servlet container to run. Servlet container should support Jakarta Servlet API
(Jakarta EE 10). Minimal supported versions are: Jetty 12 (with ee10
environment), Tomcat 10.1+. The supported Java version is 17 or later.
Install one of the servlet containers that support Jakarta Servlet API.
Download the latest version of WAR file from Web Interface Binaries section
https://www.netxms.org/download/ named nxmc-VERSION.war, for example
nxmc-5.0.6.war.
The web management client produces a log file. For Tomcat it is located at
/var/lib/tomcat10/work/Catalina/localhost/nxmc/eclipse/workspace/.metadata/.log.
Inspect this log file if you encounter errors when running the web client.
The Desktop Management Client is also published on Flathub as a Flatpak application. Each release line has its own
application ID of the form com.netxms.NetXMSClientXX, where XX is the
major and minor version — for example com.netxms.NetXMSClient62 for 6.2.
(The legacy 4.5 client used the unversioned ID com.netxms.NetXMSClient;
versioned IDs were introduced afterwards.) Different release lines can be
installed side by side.
Find the available versions and install the one you need:
Only the Desktop Management Client is distributed this way; the DEB, RPM and
Windows builds are not affected by the sandbox restriction described below.
A Flatpak build can run inside a restricted sandbox that prevents the client
from executing commands on the machine it runs on. In that case object
tools of type Local Command — including tools that
open a terminal or SSH session on the machine the client runs on — are blocked.
When you run such a tool, the client shows a Host Command Execution
Blocked dialog with a ready-to-run unlock command (and a Copy
button) and a link to this page.
The restriction exists because these tools reach the host through
flatpak-spawn--host, which requires the org.freedesktop.Flatpak
talk-name permission. Flathub does not accept manifests that request this
permission, so an affected build ships without it and granting the permission is
left to the user.
To enable host command execution, copy the flatpakoverride command from the
blocked-tool dialog and run it in a terminal on the host — the dialog already
fills in the application ID of your installed client, so in most cases there is
nothing to edit. Then restart the client. No other reconfiguration is needed:
the override changes the sandbox’s effective permissions, which the client reads
on the next launch.
If you need to build the command by hand, it has the following form, where
com.netxms.NetXMSClientXX is the application ID of your client (list
installed IDs with flatpaklist--app):
Granting this permission lets the client run arbitrary commands on the host,
which breaks the isolation the Flatpak sandbox provides. Enable it only if you
actually use Local Command object tools (for example ones that
launch a terminal or SSH client on the host).
Download the latest version from http://www.netxms.org/download/.
You will need Windows the installer named netxms-VERSION-x64.exe, e.g.
netxms-server-5.0.8-x64.exe. Please note that in
the following steps VERSION will be used as a substitution for an actual version
number.
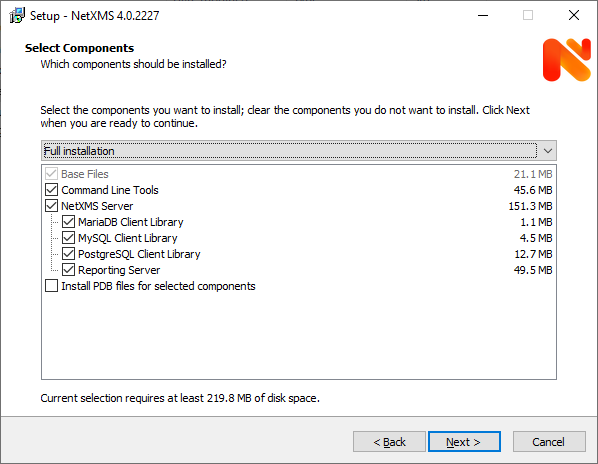
Run the installer package on your server. The installation wizard will be
displayed. Follow the prompts until the Select Components window opens.
On the Select Components window, select the NetXMS Server option and an appropriate
database client library. You do not have to install a database client library
from NetXMS package if it is already installed on the machine (however, it might
be required to add the folder where the client library is installed to system path).
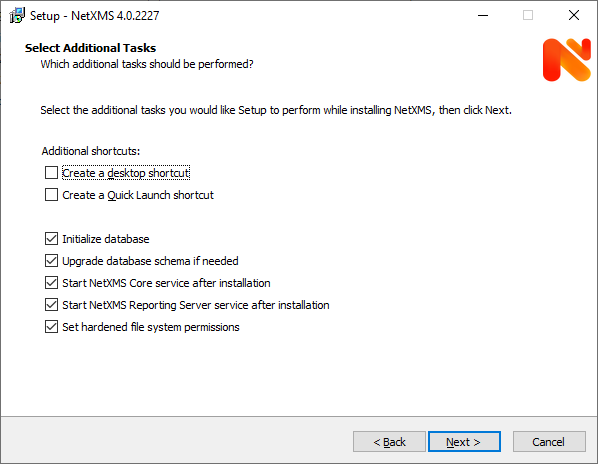
For a typical installation, keep default settings in the Select Additional Tasks window.
Set hardened file system permissions makes the installation folder
accessible only to members of the Administrators group and the SYSTEM user.
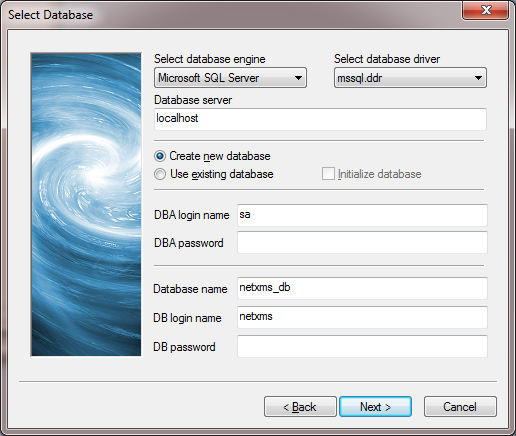
The Database selection window will open:
Select the desired database type. Enter the name of database server.
In the DBA login name and DBA password fields, enter the database administrator login
name and password. You have to fill these fields only if you have chosen the
Create database and database user before initialization option.
Enter the desired database name, database user name and password.
Note for MySQL:
The bundled MySQL database driver does not support caching_sha2_password authentication
which is the default for MySQL starting from version 8. Either select
Legacy Authentication Method when installing MySQL, or use the database driver
installed along with MySQL.
The database driver gets installed when installing MySQL with Server-only option, however these
two folders should be included into system path: C:\ProgramFiles\MySQL\MySQLServer8.0\libC:\ProgramFiles\MySQL\MySQLServer8.0\bin.
Note for Microsoft SQL Server:
Please refer to the Appendix for detailed Windows/MSSQL setup installation instructions instructions
Note for Oracle:
We recommend to use the native database driver (oracle.ddr).
On the Ready to Install window, check whether everything is correct, then press the Install button.
After installation, start the Netxms client and connect with the following credentials
Download the latest version from http://www.netxms.org/download/. You will need Windows Agent installer (named nxagent-VERSION.exe or
nxagent-VERSION-x64.exe, for example nxagent-5.0.8-x64.exe).
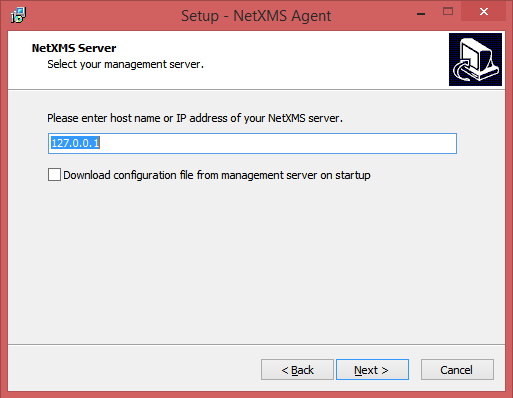
Run the installer package on the target server. The installation wizard will be displayed.
Follow the prompts until the NetXMS Server window opens:
Enter the IP address or host name of your NetXMS server. You can specify multiple
management servers, separating them by commas. Press the Next button to continue.
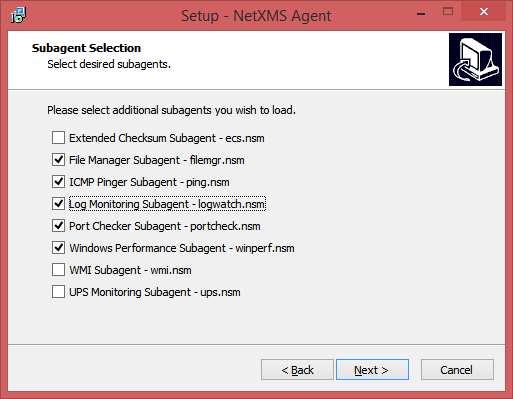
The subagent selection window will open:
In this window you can select which subagents you wish to load. Each subagent
extends the agents functionality, e.g.:
Subagent
Description
filemgr.nsm
Provides access to specified folders on the monitored host from the NetXMS Management Client File Manager.
This is also used for distributing Agent Policy configuration files (see Agent Policies.)
logwatch
Allows monitoring log files and Windows Event Log and sending matched events to NetXMS server.
ping.nsm
Adds the possibility to send ICMP pings from the monitored host. Ping round-trip times can be collected by management server.
netsvc.nsm, portcheck.nsm
Adds the possibility to check network services (like FTP or HTTP) from the monitored host.
winperf.nsm
Provides access to Windows performance counters. This subagent is required if you need to collect CPU utilization from monitored host.
wmi.nsm
Provides access to WMI data.
ups.nsm
Adds support for UPS monitoring. The UPS can be attached to host via a serial cable or USB.
For more information on subagents, please refer to Subagents.
Download the latest version of Management Client installer from
https://www.netxms.org/download/ (e.g. netxms-client-5.0.8-x64.exe).
Due to limitations of the Eclipse platform used to build the Management
Client, only an x64 build is provided.
Launch the installer and follow the instructions.
Launch Management Client from the Windows Start Menu.
Web Management Client:
On the Windows platform there are two options: one is to manually install the
.war file into a servlet container and the second one is to use the
netxms-webui-VERSION-x64.exe installer. The installer will install Jetty and
copy the .war file into required folder. Here the installation via the installer
is described:
Download the latest version from https://www.netxms.org/download. You will need
Windows installer netxms-webui-VERSION-x64.exe (e.g.: netxms-webui-5.0.8-x64.exe).
Due to a limitation of the Eclipse platform used to build the Management Client,
only an x64 build is provided.
Run the installer package on your server. The Installation wizard will be
displayed. Follow the prompts. The installer allows to change the
installation path and port.
After the installation procedure is finished, check that the WEB GUI is
available at http://SERVER_IP:4788/nxmc
The Windows Agent installer, named nxagent-VERSION.exe, for example nxagent-5.0.8-x64.exe,
has various command line options for unattended installation. Installation will ignore
any configuration file options (/CONFIGENTRY, /NOSUBAGENT, /SERVER, /SUBAGENT, etc) if a config
file already exists or if the /CENTRALCONFIG option is used. However, it is possible to
delete and recreate the configuration file using the /FORCECREATECONFIG command line option.
It can be used to add any parameter to the configuration file during initial install.
You can specify it multiple times to add multiple lines. Section names can be added as well.
/CONFIGINCLUDEDIR=path
Set folder containing additional configuration files
(will be set in configuration file as ConfigIncludeDir).
/DIR=path
Set installation directory (default is C:\NetXMS).
/FILESTORE=path
Sets directory to be used for storing files uploaded by management server(s)
(will be set in configuration file as FileStore).
/FORCECREATECONFIG
Delete existing agent configuration file and recreate it. However, settings stored by installer
in Windows registry will be used, if not explicitly specified by command line parameters. See /IGNOREPREVIOUSDATA.
/IGNOREPREVIOUSDATA
Ignore any settings from previous install that are not explicitly specified in current run. This is
related to settings that can be changed when installer is run in GUI mode, e.g. list of selected sub-agents.
These settings are stored in Windows registry.
/LOCALCONFIG
Use local configuration file (it is the default).
/LOG
Causes Setup to create a log file in the TEMP directory of the user detailing file
installation and [Run] actions taken during the installation process.
/LOG=filename
Same as /LOG, except it allows to specify a fixed path/filename to use for the log file.
If a file with the specified name already exists it will be overwritten.
If the file cannot be created, Setup will abort with an error message.
/LOGFILE=filename
Set agent log file (will be set in configuration file as LogFile).
/MERGETASKS=”tasknames”
Comma-separated list of tasks for installation. If a task is specified with ! character
prior to its name, it will be deselected. Possible values are fspermissions - set hardened file system permissions,
sessionagent - Install session agent, useragent - Install user support application.
e.g. /MERGETASKS="!fspermissions,useragent"
/NOSUBAGENT=name
Disable subagent name
/NOTUNNEL
Disable tunnel operation (it is the default)
/REINSTALLSERVICE
Reinstalls Windows service
/SERVER=IP
Set server IP address or host name (will be set in the configuration file as MasterServers).
/SILENT
Don’t show installation wizard, only a progress bar
/SUBAGENT=name
Add sub-agent loading directive to configuration file. You can specify this
parameter multiple times to add more than one sub-agent. List of possible subagents: Subagents.
/SUPPRESSMSGBOXES
Don’t ask user anything. Only has an effect when combined with /SILENT and /VERYSILENT.
/TUNNEL
Enable tunnel operation to IP address specified with /SERVER=.
Download the source archive (netxms-VERSION.tar.gz) from https://www.netxms.org/download/. VERSION is used in names instead of an actual version number.
Unpack the archive:
tar zxvf netxms-VERSION.tar.gz
Since version 3.8, the reporting server is being built along with the sources. This requires maven to be installed on the system. You need Oracle and MS SQL JDBC drivers in your local maven repository.
By default, server load configuration file PREFIX/etc/netxmsd.conf (where PREFIX is installation prefix set by configure), unless different file is specified with command line switch “-c”.
Create database user and adjust configuration file (netxmsd.conf) accordingly. Database creation examples can be found there.
Further adjust server configuration file if required.
Download the source archive (netxms-VERSION.tar.gz) from https://www.netxms.org/download/. VERSION is used in names instead of an actual version number.
Unpack the archive:
tar zxvf netxms-VERSION.tar.gz
Change directory to netxms-VERSION and run the configure script:
cd netxms-VERSION
./configure --enable-release-build --with-agent
Most commonly used options (check full list with ./configure --list):
Name
Description
--prefix=DIRECTORY
Installation prefix, all files go to the specified directory
--with-agent
Build monitoring agent. It is strongly recommended to install the agent on a server
Run build binaries and install them into /usr/local (unless changed with configure flag --prefix)
By default the agent load configuration file is PREFIX/etc/netxmsd.conf (where PREFIX is installation prefix set by configure), unless a different file is specified with the command line switch “-c”.
It is possible to change the default logo on the login screen to a custom image by setting
the loginFormImage property in nxmc.properties file. The image file must be located within
the application server class path and the file name must be given relative to the class path
root with a leading slash. For example, if the custom image is in a file logo.jpg located
in the same directory as nxmc.properties, the correct entry will be:
loginFormImage=/logo.jpg
How to configure the NetXMS web client with jetty in Linux
Download the latest version of Jetty (12.0.13 at the moment of writing).
Generate ssl key (for testing purposes) and adjust the ssl.ini file. A reverse proxy with proper certificate should be used in production. Adjust DN, keyStorePassword and keyStorePath as per requirements.
echo"CREATE DATABASE netxms CHARACTER SET utf8mb4 COLLATE utf8mb4_unicode_ci;"|mysql-uroot-p
echo"CREATE USER 'netxms'@'localhost' IDENTIFIED BY 'PaSsWd';"|mysql-uroot-p
echo"GRANT ALL on netxms.* to 'netxms'@'localhost';"|mysql-uroot-p
echo"CREATE DATABASE netxms CHARACTER SET utf8mb4 COLLATE utf8mb4_unicode_ci;"|mysql-uroot-p
echo"CREATE USER 'netxms'@'localhost' IDENTIFIED BY 'PaSsWd';"|mysql-uroot-p
echo"GRANT ALL on netxms.* to 'netxms'@'localhost';"|mysql-uroot-p
-- USER SQLCREATEUSERnetxmsIDENTIFIEDBYPaSwDDEFAULTTABLESPACEUSERSTEMPORARYTABLESPACETEMP;-- QUOTASALTERUSERnetxmsQUOTAUNLIMITEDONUSERS;-- ROLESGRANTCREATESESSION,CREATETABLE,CREATEPROCEDURETOnetxms;
Run NetXMS Server installer. When prompted for database information, use the following answers:
Server type: MS SQL
Server name: localhostSQLEXPRESS
Database name: (any valid name, we use “netxms”)
Login name: (any valid account name, we use “netxms”)
Password: (any password complex enough to match OS password policy)
Create database and database user: check
DBA login name: *
DBA password: (left empty)
This assumes the currently logged in user has DBA access to the SQL Server instance. This should be the case if SQL Server was just installed by the same user.
An alternative approach is to enable the “sa” user in SQL server and use sa login and password as DBA login name and password.
The installer should create database, database user, assignthe user as database owner, and the NetXMS Core service should start successfully.
If mixed authentication is not an option:
Currently the installer does not support automatic database creation for Windows authentication mode, so there will be more manual steps.
Login to SQL Server Management Studio
Create a new database with the default owner (owner should be set to currently logged in administrator user)
Run the NetXMS Server installer. On “Select additional tasks” page uncheck “Start NetXMS Core service”.
When prompted for database information, use the following answers:
Server type: MS SQL
Server name: localhostSQLEXPRESS
Database name: (database name from step 4)
Login name: *
Password: (left empty)
Create database and database user: uncheck
After installation is complete, go to “Services”, find the “NetXMS Core” service, and set it to login as administrator user (same user used for installation)
Start NetXMS Core service
How to install NetXMS server on Windows Server with remote Microsoft SQL Server Express
Assumptions:
Both the SQL Express Server and the NetXMS Server are in the same domain
TCP/IP is enabled in SQL Server network properties
TCP/IP is configured to use a fixed port
A firewall rule is added to allow incoming connections on the SQL Server TCP port (it may be needed to add this manually)
Mixed authentication mode is already enabled on SQL Server (only for scenario 1 below)
If using a SQL account for NetXMS services is acceptable
Log in to the NetXMS Server machine with a domain account that has local administrator rights as well as sysadmin rights on SQL Server
Install ODBC Driver for SQL Server
Run the NetXMS Server installer. When prompted for database information, use the following answers:
Server type: MS SQL
Server name: SQL server domain computer name or fully qualified DNS name (if the TCP port is not 1433, then use the form server_name,port)
Database name: (any valid name, we use “netxms”)
Login name: (any valid account name, we use “netxms”)
Password: (any password complex enough to match OS password policy)
Create database and database user: check
DBA login name: *
DBA password: (left empty)
The installer should create database, database user, assign user as database owner, and the NetXMS Core service should start successfully.
In this scenario the server will use login and password on SQL server, so the service can continue to run under Local System account, or you can change it to any domain account.
If the server has to use domain account for accessing the database
Install ODBC Driver for SQL Server
If not already done, create a new login on SQL Server for the domain user to be used by NetXMS Core service
Create the new database, assign login from step 2 as owner
Log in to the NetXMS Server machine with the same domain user
Run the NetXMS Server installer. On “Select additional tasks” page, uncheck “Start NetXMS Core service”.
When prompted for database information, use the following answers:
Server type: MS SQL
Server name: SQL server domain computer name or fully qualified DNS name (if the TCP port is not 1433, then use the form server_name,port)
Database name: (database name from step 4)
Login name: *
Password: (left empty)
Create database and database user: uncheck
After installation is complete, go to “Services”, find the “NetXMS Core” service, and set it to login as administrator user (same user used for installation)