In this section will describe basic configuration to be performed after server
and agent clean install. Configuration for monitoring some common metrics like
CPU usage of file system free space will also be shown.
Minimal configuration that should be set for agent is server address and path to
log file. Action differ depending on a platform where agent is installed. On
Windows systems configuration file is automatically generated and populated by
installer, on UNIX systems it should be created/edited manually.
See below for editing agent configuration file on Windows and UNIX/Linux
platforms.
After agent is installed on a UNIX/Linux system it is required to create/edit
file /etc/nxagentd.conf. This file should contain at least this
information:
Server has two types of configuration: configuration file parameters and server
configuration variables.
For server configuration file minimal requirements are path to log file,
database driver name and all required credentials depending on database.
Location and required actions depends on what OS is used. More about OS specific
configuration search in OS subsections of this chapter.
List of possible database drivers:
mssql Driver for Microsoft SQL database.
mysql Driver for MySQL database.
odbc ODBC connectivity driver (you can connect to MySQL, PostgreSQL, MS SQL, and Oracle via ODBC).
oracle Driver for Oracle database.
pgsql Driver for PostgreSQL database.
sqlite Driver for embedded SQLite database.
See below for editing server configuration file on Windows and UNIX/Linux platforms.
For Windows systems this information is added to configuration file while
installation procedure. It can be check that all data was set correctly in this
file: 'installationdirectory'\etc\netxmsd.conf (by default
C:\NetXMS\etc\netxmsd.conf.)
Example of sample Windows configuration for mysql:
## Sample server configuration file#DBDriver=mysql.ddrDBServer=localhostDBName=netxms_dbDBLogin=netxmsDBPassword=passwordLogFile={syslog}
For UNIX based systems /etc/netxmsd.conf file should be
created/populated manually.
Configuration file example for oracle database:
DBDriver=oracle.ddrDBServer=ServerIP/Hostname.DomainName#Here is service (full database name), not SIDDBName=netxmsDBLogin=netxmsDBPassword=PaSwDLogFile=/var/log/netxmsd
There are quite a few important server parameters to be set right after
installation. These parameters are accessible through the Server
Configuration window in the management client. To open it, click on
Configuration ‣ Server Configuration. To edit a setting,
double click on the row in the table or right-click and select Edit.
The following parameters may need to be changed:
Parameter
Description
ThreadPool.Poller.MaxSize
This parameter represents maximum thread pool size. This pool provides
threads for all types of polls: Status poll, Configuration poll, etc. In
case of big load on a server number of threads will be increased up to
this size. When load come back to normal, number of threads will be
automatically decreased down to base size. If you plan to monitor large
number of hosts, increase this parameter from the default value to
approximately 1/5 of host count.
ThreadPool.Poller.BaseSize
This parameter represents base thread pool size. This is minimum number
of threads that will always run. If you plan to monitor large number of
hosts increase this parameter from the default value to approximately
1/10 of host count.
ThreadPool.DataCollector.MaxSize
Maximum number of threads that perform data collection. If you plan to
monitor large number of hosts, increase this number to approximately 1/5
of host count. Use larger value if you plan to gather many DCIs
from each host.
ThreadPool.DataCollector.BaseSize
Minimum number of data collection threads what will always run. For large
number of hosts increase to approximately 1/10 of host count.
Syslog.EnableListener
Set this parameter to True if you want to enable NetXMS
built-in syslog server.
Various ways how to send notifications - email, messengers, SMS, etc are
configured via Notification Channels. This allows to create actions that will
send notification on defined events.
Notification channels are configured on Configuration ‣
Notification Channels. Each channel has textual configuration, e.g. for SNMP
driver configuration may look like this:
In this section we will configure alarm automatic creation and termination and
message sending via a notification channel on predefined SYS_THRESHOLD_REACHED
and SYS_THRESHOLD_REARMED events.
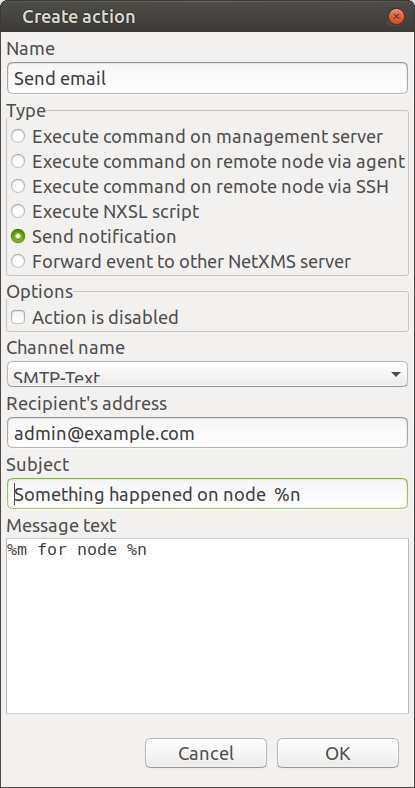
Given that a notification channel is configured, we can create an action in
Configuration ‣ Actions. Recipient address is specified in
action’s properties, it’s possible to set several recipients separated by
semicolon (;). Subject and message fields support
Macros for Event Processing - in below example when message will be sent,
macros “%n” will be substituted with name of the node and “%m” will be
substituted with event message. Value of event message is specific for each
event and can be found in event template (Configuration ‣
Event Templates).
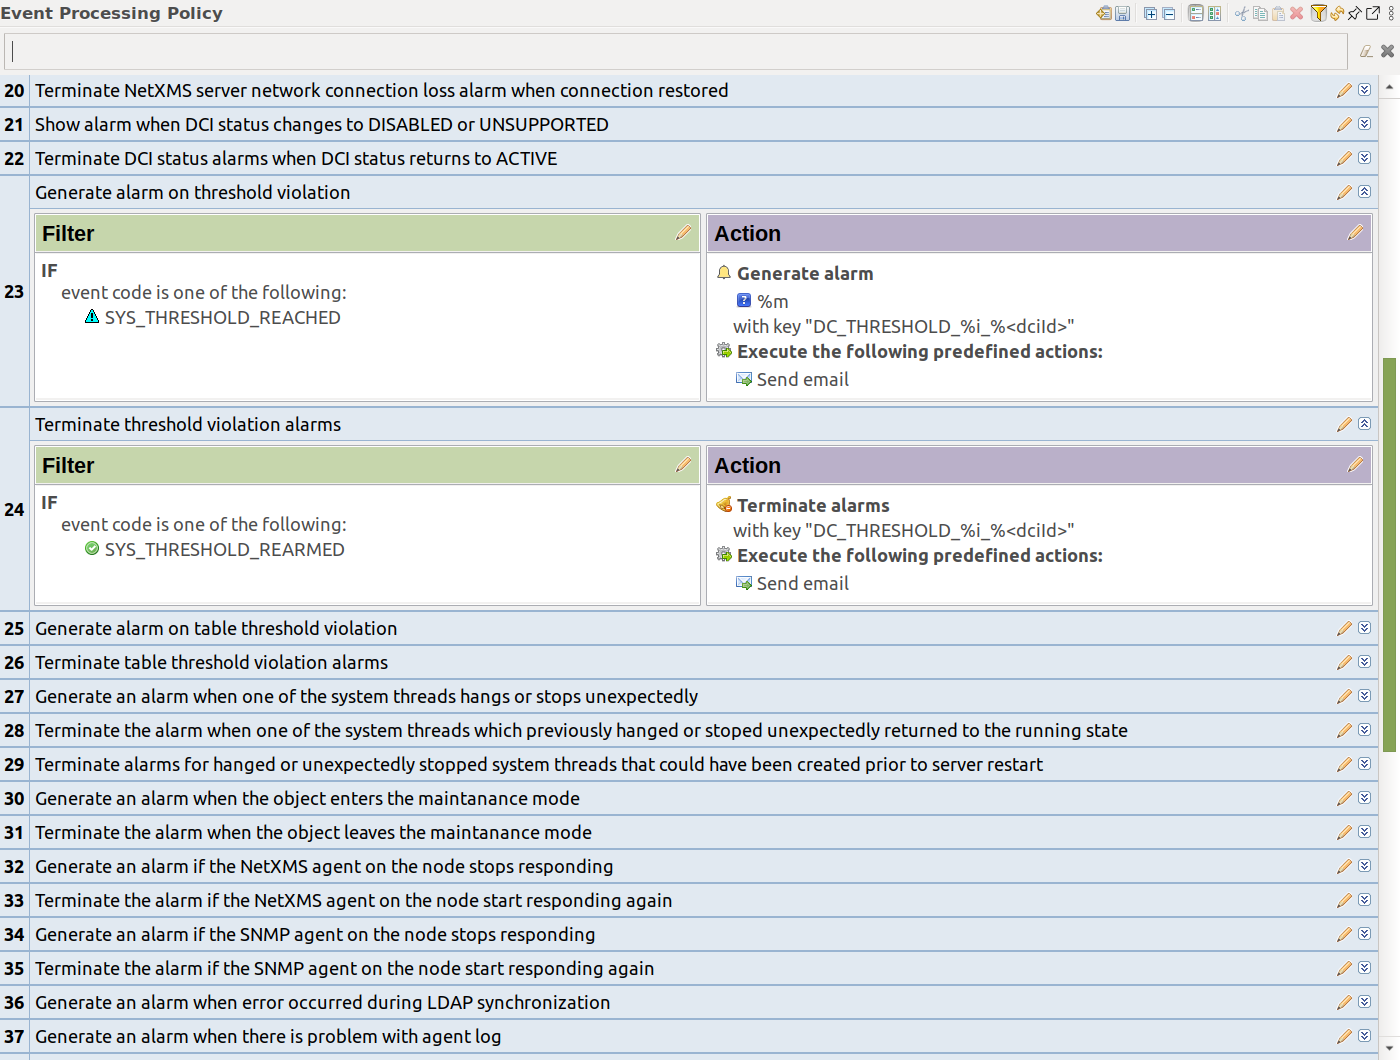
Next step is to configure event processing policies. It is done in
Configuration ‣ Event Processing Policy. A number of rules is
included out-of-the-box, including rules that react to SYS_THRESHOLD_REACHED and
SYS_THRESHOLD_REARMED events. In these rules we will add email sending action
that we have configured above.
Alarm created by the rule for SYS_THRESHOLD_REACHED has a key which is composed
from “SYS_THRESHOLD_REACHED_” text, id of DCI and ID of node. This allows to
resolve or terminate alarms automatically - for example rule for
SYS_THRESHOLD_REARMED automatically terminates alarm using the key.
After all configuration is done Event Processing Policy should be
saved.
If you have a number of SNMP devices with same credentials on your
network, you can configure default community strings and authorization
credentials. This information is set in Configuration -> Network
Credentials.
When performing configuration poll, provided commynity strings, USM credentials
and network ports will be tried sequentially until a combination that allows
comminication with a device is found.
It is recommended to enable passive discovery when it is required to add all nodes
in local network. In case if NetXMS server has access to switches and routers
via SNMP, all devices in network will be added automatically by discovery process.
To enable passive network discovery open Configuration –> Network
Discovery. There in General section select Passive only
option. Network discovery will be using default SNMP credentials that were
discussed above in SNMP Defaults section. Other options
that can be set depending on requirements:
Option to use SNMP trap source for further network discovery
Option to set filer that will define rules for not adding nodes to
NetXMS server
In our configuration we will not use filter to add all node available on our
network and turn on option to use SNMP trap source address for discovery.
After all configuration is done remember to save it.
If you have enabled automatic network discovery, wait for initial network
discovery completion. This process can take time, depending on size and
complexity of your network. For large networks, we recommend that you let
NetXMS run over night to gather the majority of network information
available. Once devices are discovered, they appear under appropriate subnets in
the Network perspective.
Please note that for successful network discovery your network must meet the
following requirements:
NetXMS server must have access to switches and routers via SNMP.
All your network devices credentials (community string and credentials for
SNMP v3) should be added to default credential list in Network
Credentials.
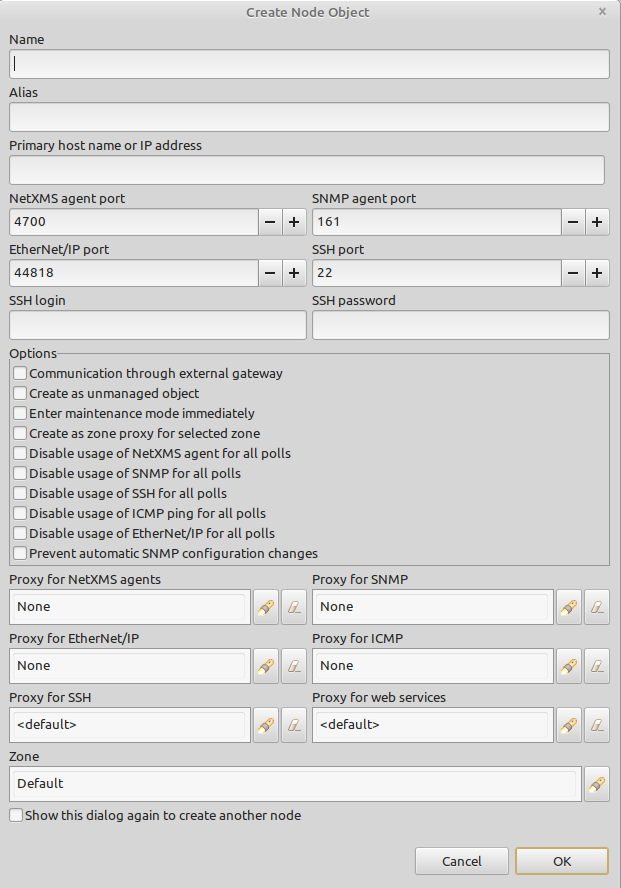
If the automatic network discovery does not detect all of your hosts or devices,
or you decide not to use network discovery at all, you may need to manually add
monitored nodes to the system. The easiest way to accomplish this is to
right-click on Infrastructure Services in the
Infrastructure perspective and select Create node. You
will be presented with the following dialog window:
Please note that adding a new node object may take some time, especially if a
node is down or behind a firewall. After successful creation, a new node object
will be placed into appropriate subnets automatically. As soon as you add a new
node to the system, NetXMS server will start regular polling to determine the
node status.
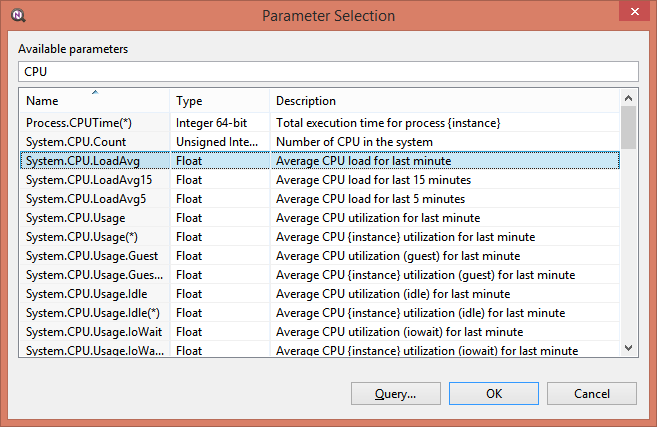
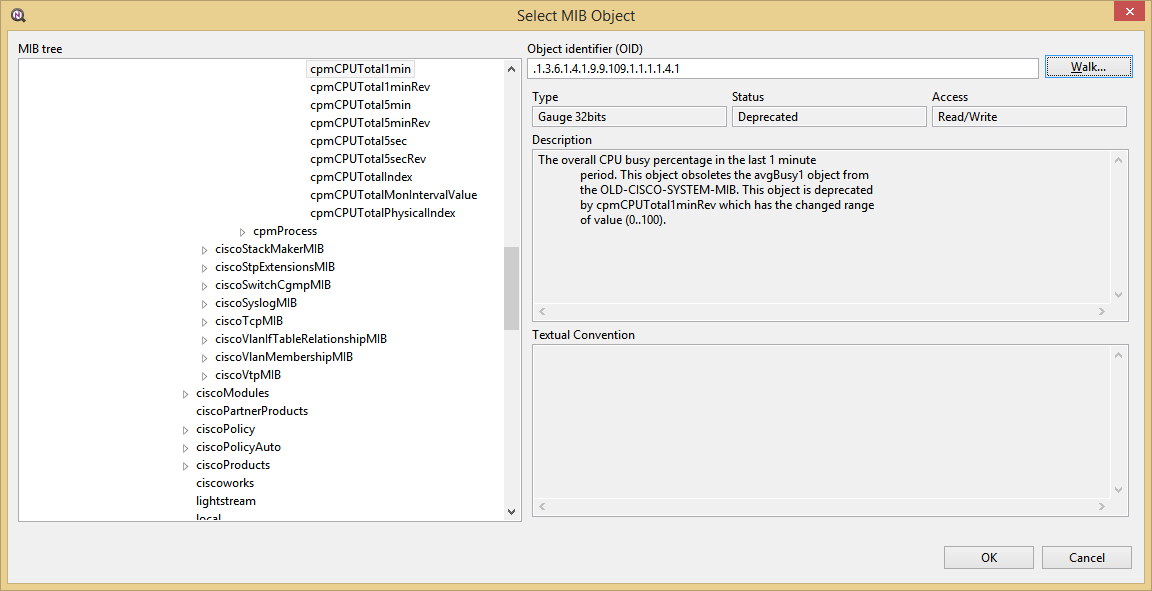
In this section we will add data collection items (DCIs) for CPU usage
monitoring and interface incoming traffic via NetXMS agent or SNMP.
Threshold configuration for these DCIs will be shown. This threshold will
generate SYS_THRESHOLD_REACHED event when defined condition is met and
SYS_THRESHOLD_REARMED when collected data value returns to normal.
Earlier we already described how to configure notification sending and alarm
generation and termination based on events. This chapter describes data
collection and event generation based on collected data.
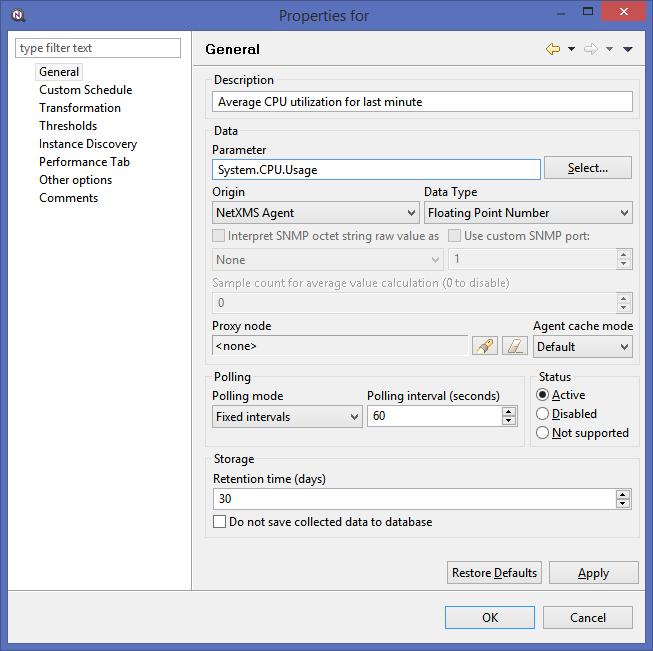
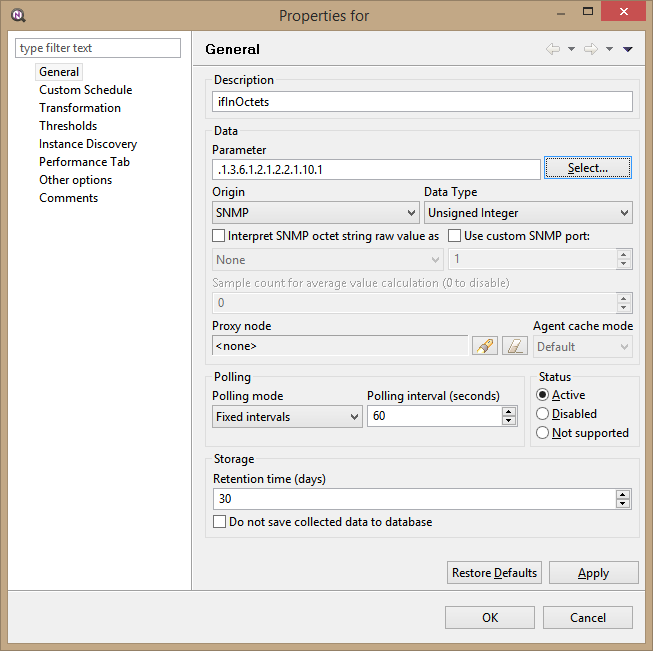
To add DCI for a node select the node, open Data Collection tab and
click + button on the toolbar.
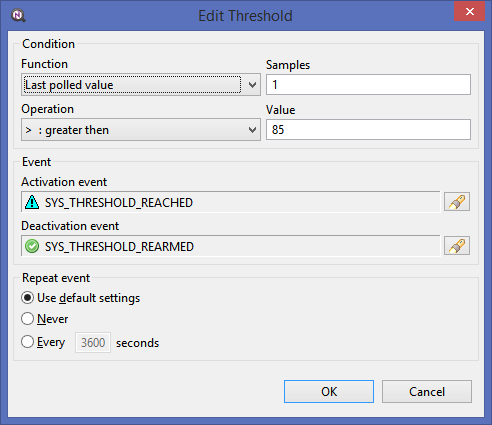
Set that if last one polled value is gather than 85, then generate
SYS_THRESHOLD_REACHED event, when value is back to normal generate
SYS_THRESHOLD_REARMED event.
Set that if last one polled value is gather than 85, then generate
SYS_THRESHOLD_REACHED event, when value is back to normal generate
SYS_THRESHOLD_REARMED event.
Now you configured data collection of metric for CPU usage that will be
collected every 60 seconds, data will be stored for 30 days, with 1 threshold
that will be activated when CPU usage is mote than 85%.
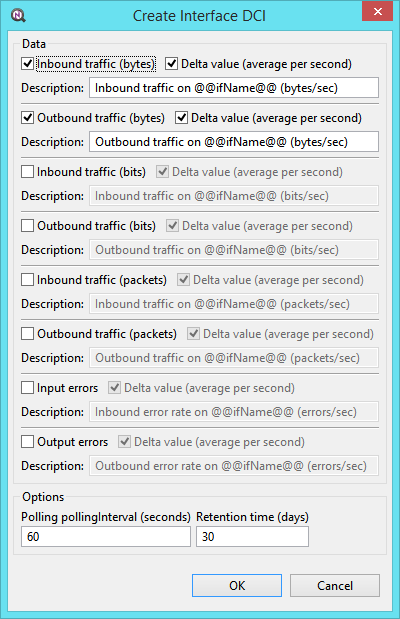
There is shortcut to create all required DCIs for interface traffic for nodes
where you have either NetXMS agent or SNMP. Select interfaces for which
should be created traffic collection DCIs and select Create data
collection items from context menu. Select checkboxes for the metrics that you
need - DCIs will be created automatically.