Agent management
Introduction
NetXMS agent is daemon or service that runs on a node to provide additional monitoring options. This is optional for installation, but it’s installation gives following advantages:
Centralized configuration - you can change configuration of agent from management client; if needed, you can even store agent configs on NetXMS server
More secure: communications between NetXMS server and agent is encrypted by default, additional authentication on agent can be configured
TCP instead of UDP is used for communications with agent - this can help in case of slow and poor quality links
Remote command execution - agents can be used to execute commands on managed systems as a reaction to certain events
Proxy functionality: agent can be used as a proxy to reach agents on hosts not directly accessible by NetXMS server
SNMP proxy: agent can be used as a proxy to reach remote SNMP devices
SNMP Trap proxy: agent can be used as a proxy to get messages from remote SNMP device
Syslog proxy: agent can be used as a proxy to get syslog messages from remote devices
Modbus TCP proxy: agent can be used as a proxy to reach remote devices via Modbus TCP protocol
Web service proxy: agent can be used as a proxy to reach remote web services
TCP proxy: agent can be used to establish connection to TCP port on remote devices, e.g. to access web UI on a device
Extensible: you can add new metrics very easy using configuration option like
ExternalMetricor by writing your own subagentsEasy upgrade - you can upgrade all agents at once from management client
Provides file management possibilities on agent.
Provides log file monitoring functionality.
Agent configuration files
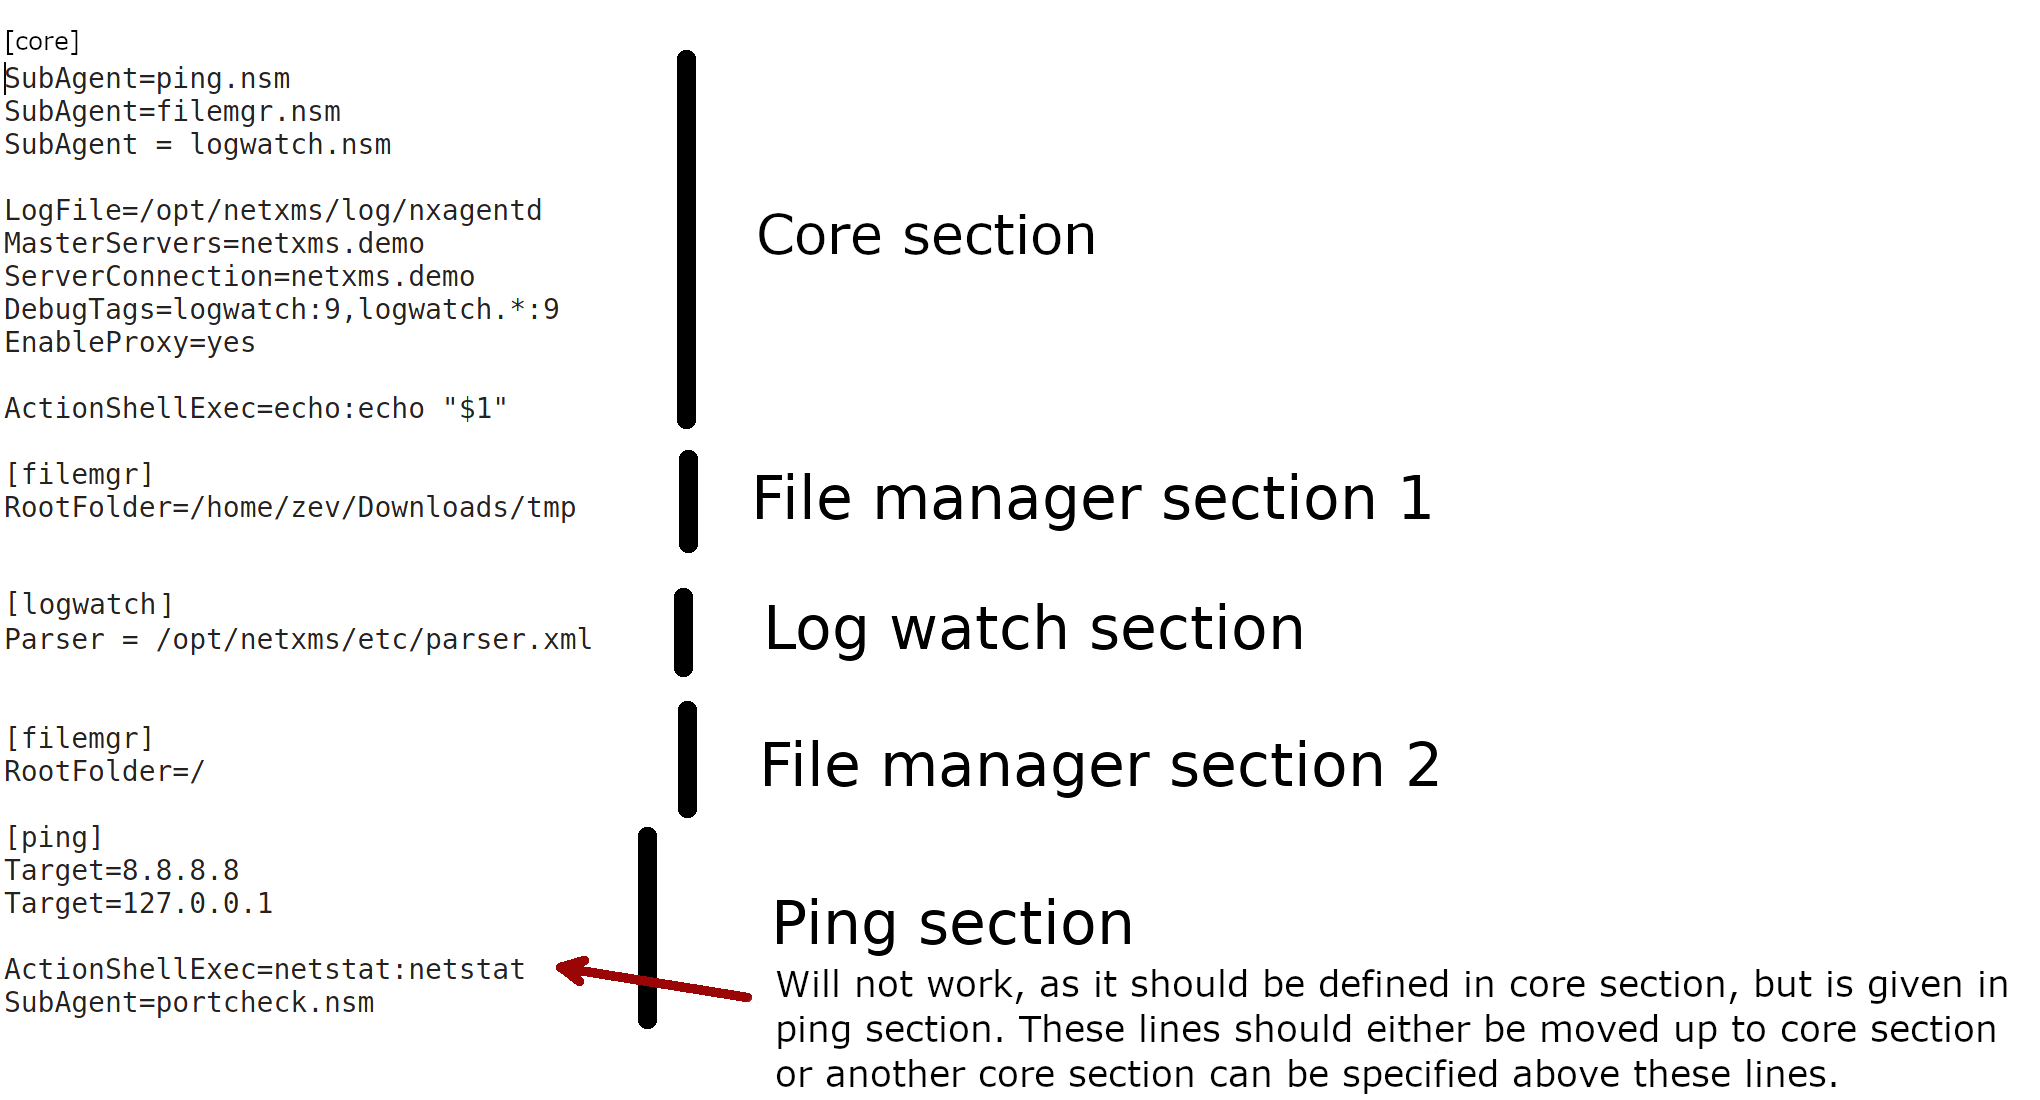
Agent have 3 types of configuration files: master configuration file, additional configuration files and Agent Policy configuration files. Master configuration file is the only mandatory file. Minimal configuration for master configuration file is server address. Address should be set as MasterServers to be able to apply other configuration settings from the server.
After configuration file change agent should be restarted to apply new changes.
Two formats are supported for configuration files and configuration file policies: XML and ‘key = value’ format.
In ‘key = value’ format configuration file can contain one or more parameters in Parameter = Value form, each parameter should be on its own line. Parameters are grouped into sections. Beginning of a section is denoted by section name in square brackets (example: “[sectionName]”). Section named “[Core]” contains parameters for agent itself. It’s the default section, if a configuration file starts from parameter and not from section name, parameters are treated as belonging to “Core” section. Subagents’ parameters should be placed in separate sections named by subagent name. Same section name can be present several times in the configuration file. Comments can be inserted after “#” sign
In XML format general tag should be <config>, second level tags contain section names and third level tags are agent or subagent configuration parameters.
‘key = value’ format example:
[Core]
MasterServers = 10.0.0.4
SubAgent = winperf.nsm
# Below is a configuration for winperf subagent, in separate section
[WinPerf]
EnableDefaultCounters = yes
Same example in XML format:
<config>
   <Core>
      <MasterServers>10.0.0.4</MasterServers>
      <SubAgent>winperf.nsm</Subagent>
   </Core>
   <!-- Below is a configuration for winperf subagent, in separate section -->
   <WinPerf>
      <EnableDefaultCounters>yes</EnableDefaultCounters>
   </WinPerf>
</config>
Example of configuration sections:
Detailed list of parameters can be found here: Agent configuration file (nxagentd.conf).
The following parameters can be specified in master configuration
file only (and will be ignored if found in other configuration files):
DataDirectory and ConfigIncludeDir.
Master configuration file
File nxagentd.conf is a master configuration file for NetXMS agent. Depending on OS there are different locations, where agent tries to find master configuration file.
UNIX-like systems
On UNIX systems master configuration file is searched in the following order:
If
$NETXMS_HOMEenvironment variable is set:$NETXMS_HOME/etc/nxagentd.conf
'prefix'/etc/nxagentd.conf. ‘prefix’ is set during build configuration with--prefix='prefix'parameter. If that parameter was not specified during build,/usr/localis used.
/Database/etc/nxagentd.conf
/usr/etc/nxagentd.conf
/etc/nxagentd.conf
If configuration file is placed in a different location or named in a different way,
then it’s location and file name can be given to agent with -c parameter or by
specifying $NXAGENTD_CONFIG environment variable. In this cause
search in the locations mentioned above is not performed.
Windows
On Windows location of NetXMS config is stored in the registry. Alternatively,
location of configuration file can be provided to agent with -c command line parameter.
If there is no record in the registry and -c parameter is not specified, then
agent tries to find configuration files in the following locations:
'installation directory'\etc\nxagentd.conf
C:\nxagentd.conf
Additional configuration files
To increase maintainability, configuration can be stored in multiple additional configuration files located in a specific folder. Additional configuration files override (if a parameter supports only one value) or supplement (if parameter supports multiple values, e.g. list of servers or root folders for filemgr subagent) configuration parameters from master file. Depending on OS there are different locations, where agent tries to find master configuration file.
UNIX-like systems
On UNIX systems it is searched in the following order (search is performed until first existing folder is found):
If
$NETXMS_HOMEenvironment variable is set:$NETXMS_HOME/etc/nxagentd.conf.d
'prefix'/etc/nxagentd.conf.d. ‘prefix’ is set during build configuration with--prefix='prefix'parameter. If that parameter was not specified during build,/usr/localis used.
/Database/etc/nxagentd.conf.d
/etc/nxagentd.conf.d
/usr/etc/nxagentd.conf.d
A different configuration file folder name can be given by specifying $NXAGENTD_CONFIG_D environment variable. In this cause search in the locations mentioned above is not performed.
Windows
On Windows location of configuration file folder is stored in the registry. If there is no record in the registry, then agent tries to find configuration file folder in the following locations (search is performed until first existing folder is found):
'installation directory'\etc\nxagentd.conf.d
C:\nxagentd.conf.d
Agent policy configuration files
Agent policies allow to store agent configuration on server and deliver it to the agents. More information about Policies can be read there: Agent Policies.
On agent configuration policy files are stored in a separate folder named config_ap under DataDirectory folder. Every policy is saved into a separate file named by policy GUID.
Agent configuration options from server
Edit configuration file remotely
Right click on node, select Edit agent’s configuration file from menu. When closing the editor, a dialog will be presented. New configuration apply is performed on agent restart. So to immediately apply new configuration select Save and Apply. This option will save configuration file and automatically restart the agent. If just Save is selected, then agent should be manually restarted to apply new configuration.
Agent configuration files on server
Agent master configuration files can be stored on server side and requested by agent, if it is launched with -M <serverAddress> command line parameter. Each configuration file on server is stored along with filter script. When server receives configuration request from agent, it goes through available configs and executes filter scripts to find an appropriate configuration.
If appropriate configuration file is found, it is sent to agent and old
nxagentd.conf file is overwritten (or a new nxagentd.conf file is created, if
it did not exist). When agent can’t connect to server or server hasn’t found right configuration,
the agent is started with old configuration file. In case if agent configuration file does not
exist and it is not possible to get new one from the server - agent fails to start.
Doesn’t work with tunnel agent connection
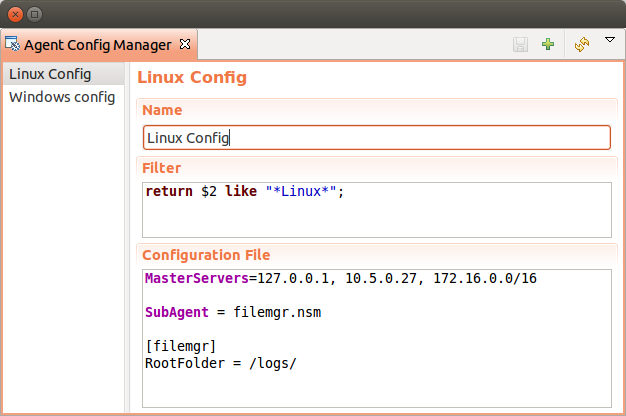
Configuration
Each configuration has a name, filter script and the configuration file text.
Name just identifies the configuration.
Filter script is executed on configuration request to define which configuration file to send to the agent. Filter is defined with help of NXSL scripting language. The following parameters are available in the filter script:
$1 - IP address
$2 - platform
$3 - major version number
$4 - minor version number
$5 - release number
Configuration file is the text of returned configuration file.
Agent configuration policy
Another option to store and distribute agent configuration are agent policies. In this case agent configuration is stored on the server side as a policy belonging to template and deployed to the agent when corresponding template is applied to a node. More information about policies and their types can be found in Agent Policies chapter.
Agent Configuration Policies vs. Agent Configuration Files on Server
A short lists of main points to compare both options:
- Agent Configuration Files on Server:
Assignment is based on rules described in filter scripts
When configuration is changed, agent restart is needed to activate new configuration
Config download from server is each time the agent starts (if option ‘-M servername’)
When config is found on server, local Master config is overwritten, if not - existing Master config is used
Works with master configuration file
Does not required initial config (agent can be started without config), but in this case agent would fail if nothing was returned from server
Server provides configuration file without authorization which can be a security issue, if sensitive information is present in configuration file.
Doesn’t work via proxy
Doesn’t work via tunnel agent connection
- Agent Policies:
Not possible for bootstrap agent
After policy is deployed to agent, the agent should be restarted to activate new configuration.
At minimum the server connection parameters must be in master config to be able to start agent
Each policy is saved in a separate configuration file
If policy and master config have same parameter that can be set only once (e.g. LogFile), then policy will overwrite master config configuration
If policy and master config have same parameter that can be set multiple times (e.g. Target for PING subagent or Query for DBQUERY), then policy will merge lists of configs
Can work via proxy
Can work with tunnel agent connection
Agent Policies
Agent policies are additional configuration created by user (agent configuration or files) that are uploaded and updated on agent when template is manually or automatically applied on the node. Agent policies belong to templates, so they are applied to nodes to which a corresponding template is applied.
- The following policy types are available:
Agent configuration policy
File delivery policy
Log parser policy
User support application policy
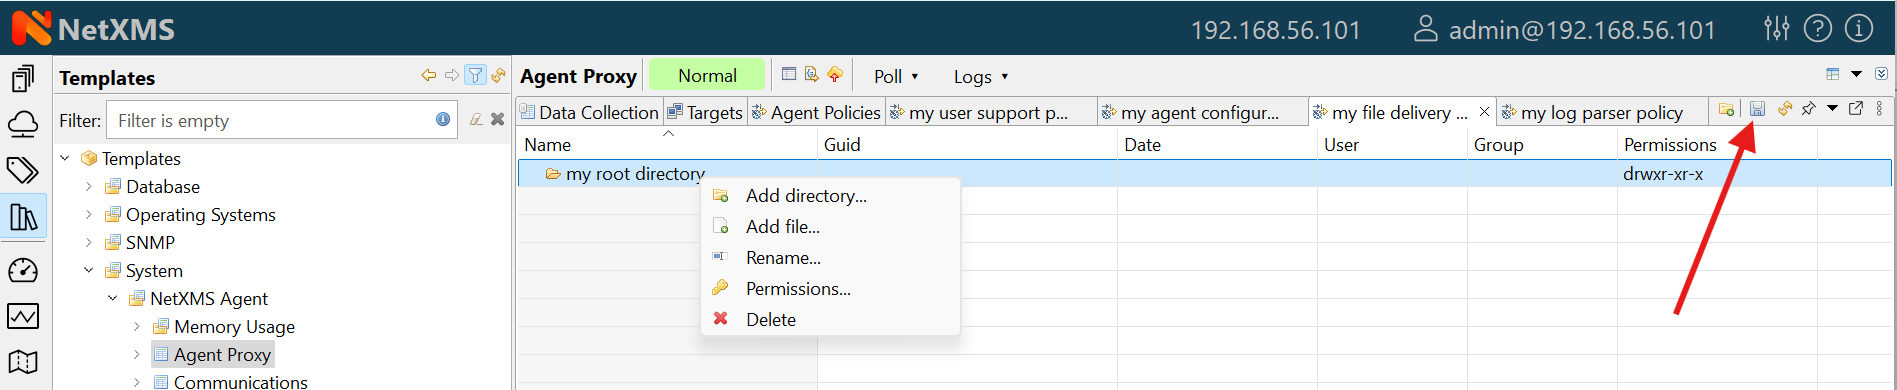
To create policy, select a template and click Agent policies tab. Click plus icon to create a new policy, give it a name, choose correct policy type and click OK. Newly created policy will open for editing in a new tab. For example, for File Delivery policy, right click and option will prompt you to create directory. Then, right click on newly created directory and more options, like , , , and will be avalable. Existing policy can be modified by right clicking it and selecting from the menu or by double clicking on it. Use Save button after configuration changes.
Policies are automatically deployed to nodes after creation/modification or when a template is applied to a node. When configuration policy is deleted or template is removed from a node, the policy is automatically undeployed from node.
- Policies get deployed / undeployed:
On node configuration poll.
When list of Agent Policies is closed in the management client. If a node is down at that moment, next attempt will happen on configuration poll.
When template is applied or removed from a node. If a node is down at that moment, next attempt will happen on configuration poll.
Installed policy configurations are stored as additional files under agent DataDirectory. List of applied policies is stored in agent local database.
If agent discovers for a record in local database, that policy file is missing, it will delete the record from database.
When performing deployment, server checks information in agent’s database with it’s database and issues necessary commands.
Agent configuration policy
Agent configuration policy provides option to populate agent configuration with additional parts. Main agent configuration is merged with additional rules from policy. Using policy for configuration file maintenance has advantages that configuration is edited in centralized way and gives granular control on the configuration that each node gets. More information about different agent configuration options can be found in above chapters.
It is possible to use the same parameters and format as in any NetXMS agent configuration file (key=value format or XML format).
Example:
MasterServer=127.0.0.1
SubAgent=netsvc.nsm
SubAgent=dbquery.nsm
SubAgent=filemgr.nsm

[DBQUERY]
Database=id=myDB;driver=mysql.ddr;server=127.0.0.1;login=netxms;password=xxxxx;dbname=netxms
Query=dbquery1:myDB:60:SELECT name FROM images
ConfigurableQuery=dbquery2:myDB:Comment in param :SELECT name FROM images WHERE name like ?
ConfigurableQuery=byID:myDB:Comment in param :SELECT name FROM users WHERE id=?

[filemgr]
RootFolder=/
<config>
  <core>
    <!-- there can be added comment -->
    <MasterServers>127.0.0.1</MasterServers>
    <SubAgent>netsvc.nsm</SubAgent>
    <SubAgent>dbquery.nsm</SubAgent>
    <SubAgent>filemgr.nsm</SubAgent>
  </core>
  <DBQUERY>
    <Database>id=myDB;driver=mysql.ddr;server=127.0.0.1;login=netxms;password=xxxxx;dbname=netxms</Database>
    <Query>dbquery1:myDB:60:SELECT name FROM images</Query>
    <ConfigurableQuery>dbquery2:myDB:Comment in param :SELECT name FROM images WHERE name like ?</ConfigurableQuery>
    <ConfigurableQuery>byID:myDB:Comment in param :SELECT name FROM users WHERE id=?</ConfigurableQuery>
  </DBQUERY>
  <filemgr>
    <RootFolder>/</RootFolder>
  </filemgr>
</config>
Example:

Agent should be manually restarted to apply the configuration after the configuration policy is deployed or undeployed to node.
Log parser policy
Information about log parser format and usage available in Log monitoring chapter.
Log parser configuration is applied right after log parser policy is deployed or undeployed to node - no agent restart is required.
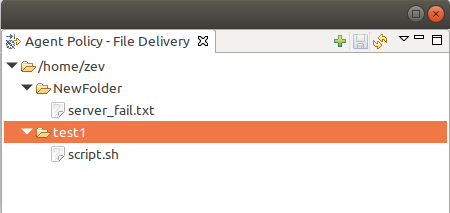
File delivery policy
File delivery policy is created to automatically upload files from server to agents.
Firstly, root folder or folders should be created - folders with the full path to location where uploadable file(s) and folder structure should be placed. After folder structure is created, files can be added to this structure. On policy apply folders will be created, if possible, and files will be uploaded.
In file and folder names the following macros can be used:
Environment variables as %{ENV_VAR_NAME}
strftime(3C) macros
Text inside ` braces will be executed as a command and first line of output will be taken
Example:
Note
File delivery policy uses File manager to upload files so filemgr subagent should be loaded and root folders should be defined to provide write access to folders.
For Windows there is the following access rights conversion: Read is translated to FILE_GENERIC_READ, write to FILE_GENERIC_WRITE and execute to FILE_GENERIC_EXECUTE. Other are translated as Windows group Everyone access rights.
User support application policy
Agent registration
Two ways of agent-server communication are available. Standard one is when server initializes connection to agent, the second one is when tunnel is used and agent initialize connection to server.
Server to agent connection
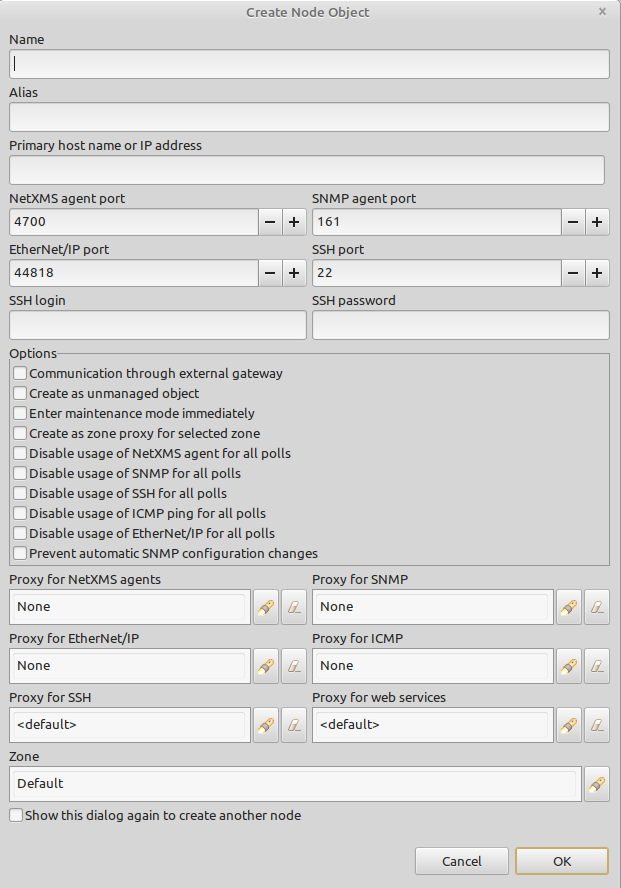
- There are few ways to register agent:
To enter it manually by creating a node
Run the network discovery and enter the range of IP addresses.
Register agent on management server
nxagentd -r <addr>, where <addr> is the IP address of server. To register agents using this optionEnableAgentRegistrationserver configuration parameter should be set to 1.
Agent to server connection
This connection requires certificate configuration on server side. More about required actions can be found in Server configuration for Agent to Server connection / Tunnel connection. Server address to which the agent should connect is specified in agent configuration file. There are two options:
ServerConnection parameter
ServerConnection parameter set in nxagentd.conf file to server
DNS or server IP address. It’s also possible to specify port number
separated by colon, e.g.:
ServerConnection=monitoring.example.com
ServerConnection=192.168.77.77:1234
ServerConnection section
[ServerConnection] section is set in nxagentd.conf. This allows to
specify additional parameters, e.g.:
[ServerConnection]
Hostname=192.168.77.77
Port=4703
CertificateFile=/etc/cert/agent_certificate.crt
ServerCertificateFingerprint=E6:5A:5D:37:22......FC:EF:EA:4B:22
The following parameters are supported in ServerConnection section:
Parameter |
Description |
|---|---|
Hostname |
Server DNS or server IP address |
Port |
Port number |
CertificateId |
Id of Certificate in Certificate Store (Windows only). E.g.:
|
CertificateFile |
Agent certificate file. |
Password |
Certificate password |
ServerCertificateFingerprint |
Fingerprint to verify server certificate. Setting this parameter forces verification of server certificate. |
Using CertificateId or CertificateFile allows to provide
agent certificate manually, not by auto-generation by NetXMS server.
It is possible to have several ServerConnection parameters or
sections in the config, in this case agent will establish tunnel connection to
multiple servers.
In addition to ServerConnection it’s necessary to set
MasterServers, ControlServers, UpgradeServers or Servers
parameter to configure what access rights server has to this agent.
Agent can validate certificate chain, when connecting to server. This is configured in agent configuration file, e.g.:
TrustedRootCertificate=/etc/cert/root_cert.crt
TrustedRootCertificate=/etc/cert/root_certs
VerifyServerCertificate=yes
TrustedRootCertificate can point to either certificate file or a
folder with certificates. Several TrustedRootCertificate parameters
can be specified. For Windows system agent loads certificates from Certificate Store.
For non-Windows systems a number of default certificate locations are automatically
loaded by agent:
Path |
OS where this path is used |
|---|---|
/etc/ssl/certs |
Ubuntu, Debian, and many other Linux distros |
/usr/local/share/certs |
FreeBSD |
/etc/pki/tls/certs |
Fedora/RHEL |
/etc/openssl/certs |
NetBSD |
/var/ssl/certs |
AIX |
If ServerCertificateFingerprint is specified for a server, server
certificate is always verified, disregarding the
VerifyServerCertificate value.
Agent registration on server
Right after agent start it will try to connect to the server. On first connect node will be shown in Agent Tunnels.
- There are few ways to register agent:
To enter it manually by creating a node and then binding tunnel to already created node.
Create node from Agent Tunnels view by selecting one or more tunnels and selecting Create node and bind… menu item.
Debugging
In case of errors enable server debug for “agent.tunnel” and “crypto.cert” to level 4 and agent log debug for “tunnel” and “crypto.cert” to level 4. Check for “SYS_TUNNEL_SETUP_ERROR” events on management node.
Security
Message encryption in server to agent communication
Server encryption policy is configured in Server Configuration view by selecting one of 4 options for DefaultEncryptionPolicy parameter. Default Policy is 2.
Policy types:
0 - Forbid encryption. Will communicate with agents only using unencrypted messages. If agent force encryption (RequireEncryption agent configuration parameter is set to yes), server will not accept connection with this agent.
1 - Allow encryption. Will communicate with agents using unencrypted messages if encryption is not enforced by setting RequireEncryption agent configuration parameter to yes or by selecting Force encryption option in Communication properties of node object.
2 - Encryption preferred. Will communicate with agents using encryption. In case if agent does not support encryption will use unencrypted communication.
3 - Encryption required. Will communicate with agent using encryption. In case if agent does not support encryption will not establish connection.
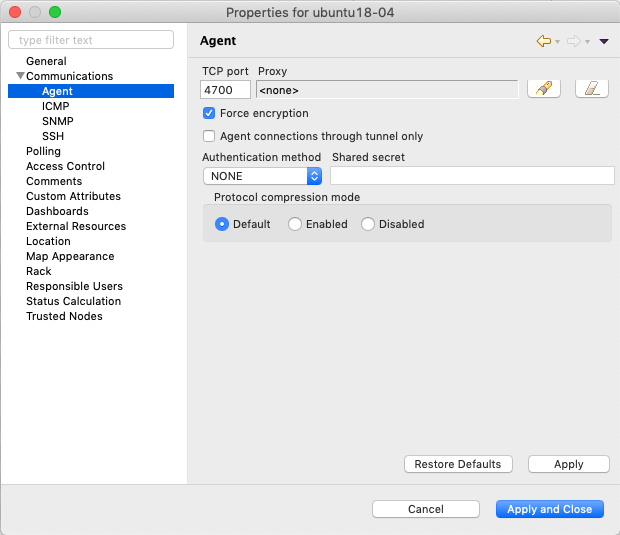
Force encryption option for node.
Security in agent to server connection
Agent to server connection uses TLS protocol to ensure communication security. Server has root certificate, that is used to issue public certificate for agent. Server issues certificate to node when user manually binds tunnel to a node in Agent Tunnels, or node is bind automatically (when AgentTunnels.UnboundTunnelTimeoutAction server configuration parameter is set to Bind tunnel to existing node or Bind tunnel to existing node or create a new node). If required, this process can also be automated by NXShell. More information: NXShell examples, Latest Javadoc.
Server access levels
Depending on how server’s IP address (or domain name) is added to in nxagentd.conf, it will have different access level. It is preferred to use MasterServers. There are 4 levels of access for an agent:
MasterServers - full access.
ControlServers - can read data and execute predefined actions and make screenshots.
UpgradeServers (since version 6.2) - read-only access plus the ability to deliver an agent installer package and trigger an agent upgrade.
Servers - read only access. (Is default for tunneled agent connection if other server level is not defined)
In case if server IP is not listed in one of this parameters agent will not enable connection with server in server to agent connection or will set access level to Servers if tunnel connection is used.
Detailed list of functionality available to above mentioned access levels is the following:
Functionality |
MasterServers |
ControlServers |
UpgradeServers |
Servers |
|---|---|---|---|---|
Read metrics, lists and table metrics |
X |
X |
X |
X |
Web service, modbus, SNMP trap, syslog, tftp proxy operation (also requires enabling specific proxy type in agent configuration file) |
X |
X |
X |
X |
Execute actions defined in agent configuration files or configuration policies |
X |
X |
||
Take screenshots |
X |
X |
||
Edit agent main configuration file |
X |
|||
Remote agent upgrade (agent-installer package) |
X |
X |
||
Install software packages (non agent-installer) |
X |
|||
Deploy/undeploy agent policies |
X |
|||
File manager – all write operations, e.g. file or folder creation, deletion, etc. (also requires enabling file manager and specifying root folder in agent configuration file) |
X |
|||
Sending notifications via user support application |
X |
|||
Running commands inside ` braces for File.* metrics and in log file monitoring |
X |
|||
Use of File.Content() metric |
X |
|||
SNMP.ScanAddressRange() and TCP.ScanAddressRange() lists (respectively require EnableSNMPProxy = yes / EnableTCPProxy = yes in agent configuration file) |
X |
|||
Agent, SNMP and TCP proxy operation (also requires enabling specific proxy type in agent configuration file) |
X |
Shared secret
Shared secret is another level of server verification. By default authentication is disabled.
To enable Shared Secret verification on agent set RequireAuthentication agent configuration parameter to yes. In SharedSecret agent configuration parameter set password what should be used for authentication.
If authentication for agent is enabled, then while connection agent requested shared secret from the server. Server check if password was set for this specific node in Shared secret field in communication properties of node. In case if there is no shared secret server sends content of AgentDefaultSharedSecret server configuration variable as shared secret.
Shared secret field in node communication properties.
In case shared secrets are not identical connection is not established.
Password encryption
When it is required to write password or Shared Secret in agent configuration file, there is possibility to encrypt it. All passwords can be encrypted with help of nxencpasswd command line tool and added in configuration file in encrypted way.
File signature verification (Windows)
On Windows, the agent verifies digital signatures of executable files before running them during upgrade and reload operations. If signature verification fails, the agent will refuse to execute the file.
Signature verification can be disabled entirely via registry key
HKLM\Software\NetXMS\DisableFileSignatureVerification (DWORD, set to 1 to
disable). When disabled, the agent will skip signature checks and allow
execution of unsigned or incorrectly signed files. This may be useful in
test environments but is not recommended for production use.
By default, certificate revocation checks are not performed during signature
verification to avoid network delays and dependency on external CRL
distribution points or OCSP responders. To enable certificate revocation
checks (CRL/OCSP), set the EnableCertificateRevocationChecks agent
configuration parameter to yes:
EnableCertificateRevocationChecks = yes
When enabled, Windows will contact CRL distribution points or OCSP responders to verify that certificates in the signing chain have not been revoked. This requires network access to the CA’s revocation endpoints and may introduce delays during verification.
This setting can also be controlled via registry key
HKLM\Software\NetXMS\EnableCertificateRevocationChecks (DWORD, 1 to enable).
Agent configuration takes precedence over the registry value.
See Windows agent registry keys for a complete list of Windows registry keys that affect agent operation.
Subagents
Subagents are used to extend agent functionality. NetXMS subagent are libraries that are loaded by agent.
On Linux systems, where agent is installed from packages, some subagents are
provided in separate packages (e.g. netxms-agent-mqtt) to avoid pulling
unnecessary dependencies on systems where specific functionality is not needed.
Subagents that do not require dependencies are shipped in netxms-agent
package.
On Windows all available subagents are shipped in agent installer.
Subagents are enabled by adding corresponding line in agent configuration file
(for example: SubAgent=dbquery).
Below is list of available NetXMS subagents:
Bind9
File Manager (filemgr)
gps
Linux (automatically loaded on Linux systems)
ICMP Ping (ping)
sms
WinNT (Automatically loaded on Windows systems)
Windows Performance (winperf)
XEN
Java subagent
This is a special type of subagent, that allows to load Java plugins (subagents written using Java language). Java subagent does not provide any functionality by itself.
There are several configuration parameters that are supported by Java subagent. None of them is mandatory.
Parameter |
Description |
|---|---|
Jvm |
Path to JVM. System default is used if not set. |
Classpath |
This parameter is added to java CLASSPATH. |
Plugin |
This parameter defines plugin that should be loaded. Can be used multiple times. |
Configuration example:
MasterServers = netxms.demo
SubAgent=java.nsm

[JAVA]
Jvm = /path/to/jvm
Classpath = /path/to/user/classes
Plugin = bind9.jar
Java plugins
List of available java plugins:
JMX
Bind9
Load of subagent as separate process
Load of subagent as separate process can be used in case it is necessary to load agent and subagent
under different users. It can be done by adding ExternalSubagent parameter with unique ID that
will represent connection name between agent and subagent. Create second configuration file for this
subagent and add there ExternalMasterAgent parameter with same ID and run instance of nxagentd with
this config. Now external subagent will communicate with master agent using Named Pipe. Only master agent will
communicate with server.
Agent Proxy node configuration
In case it is required to monitor nodes behind firewall, it can be configured access to one of subnet nodes and used this node as a proxy node for others.
Proxy node can be set during node creation or in Communications tab of node properties. To configure proxy node select node in object selector NetXMS Agent Proxy.
Agent configuration
To enable NetXMS Agent proxy EnableProxy agent configuration parameter should
be set to yes.
Agent External Metrics
Other option to define new metric that can be collected from node is to use
ExternalMetric, ExternalList, or ExternalMetricProvider
configuration parameters to define a command that will be executed on the node
and it’s output will be provided as metric’s value. This functionality provides
flexible way to create your own metrics, lists or table metrics.
New metric will be visible in the Available metrics list only after agent restart (agent reads it’s configuration files only once on start) and subsequent configuration poll, so to force new metric appearance run Configuration poll manually after agent restart.
Note
On Windows platforms UTF-8 encoding should be returned in External Metrics.
ExternalMetric
ExternalMetric defines name of the metric and command that is executed
synchronously when this metric is requested by the server. Only first line of
command output will be given as a result of execution (metric’s value). To add
multiple metrics, you should use multiple ExternalMetric in agent
configuration. This configuration parameter has two possible forms:
ExternalMetric = metric:["executable", "param1", "param2", ...](exec form)
ExternalMetric = metric:command param1 param2 ...(shell form)
The exec form does not use shell, it launches the executable directly. On Linux
full path to the executable should be provided. On Windows the executable is
launched using API’s CreateProcess() function, it will search in PATH, but the
executable should be with file extension, e.g. command.exe. Both double
quotes (") or single quotes (") can be used to enclose the executable
and the parameters.
The shell form uses shell to execute the command.
# Example

ExternalMetric = MyUptime:uptime -p
ExternalMetric = MyText:echo This command was executed under $USER user
ExternalMetric = MyUptime2:["/usr/bin/uptime", "-p"]
Server can provide parameters when requesting the metric. To enable parameter
support, metric name should contain (*) symbols after its name:
ExternalMetric = metric(*):["executable", "$1", "$2", ...](exec form)
ExternalMetric = metric(*):command $1 $2 ...(shell form)
Parameters are available as $1, $2, $3… variables. Note that shell
form with parameters is a security concern because shell will execute other
commands provided in parameters, e.g. by providing $(some_command)
parameter. It’s strongly recommended to use exec form when using parameters.
# Example with metric parameters

ExternalMetric=My.Resolve(*):['/usr/bin/dig','+short', '$1', '@1.1.1.1']
As external commands are executed synchronously, long-executing commands may
cause timeout. There are two timeouts - one on the agent side (controlled by
ExternalMetricTimeout in agent’s configuration file) and generic timeout for
all requests to agent (controlled by AgentCommandTimeout in server’s
configuration file). It’s strongly not recommended to increase server timeout to
more then a few seconds because this may lead to performance issues due to
poller threads spending too much time on timeouts. ExternalMetricProvider
can be used to handle long-executing commands.
For each metric configured two agent metrics are provided - one is Name as
specified in ExternalMetric which provides output of the command (first line
only), the other is Name.ExitCode that provides exit code of the executed
command.
# Example
ExternalMetric = Test:echo test
ExternalMetric = LineCount(*):cat $1 | wc -l
> nxget localhost Test
test
> nxget localhost 'LineCount(somefile.txt)'
42
> nxget localhost 'LineCount(somefile.txt).ExitCode'
0
ExternalList
ExternalList defines name of the list metric and command that is executed
synchronously when this metric is requested by server. Command should provide
list items separated by new line character.
Configuration is similar to ExternalMetric. Both exec form and shell form
are supported, parameters can be provided along with the metric.
# Example

# Without metric parameters
ExternalList=Name:command
ExternalList=Name:["command"]

# With metric parameters
ExternalList=Name(*):["command", "$1", "$2"]
ExternalMetricProvider
ExternalMetricProvider defines command (script) and execution interval in
seconds. Defined script will be executed regularly and agent will cache list of
metrics along with their values. When server will request one of provided
metrics, it’s value will be read from the agent’s cache. Main purpose is to
provide data from long-running processes, or retrieve multiple values by running
a command only once.
Timeout in milliseconds for command execution is defined by
ExternalMetricProviderTimeout parameter in agent configuration file.
Script should print one or more “Metric=Value” pairs to standard output. Multiple
pairs should be separated by new line. If metric takes a parameter, it should be
included in brackets after metric’s name: Metric(...).
Example of the script:
#!/bin/sh
echo 'Metric1=Value1'
echo 'Metric2=Value2'
echo 'MetricWithParams(parameter)=Value3'
echo 'MetricWithParams(another_parameter)=Value4'
Example of agent configuration:
#Example
ExternalMetricProvider=PATH_TO_PROVIDER_SCRIPT:EXECUTION_INTERVAL_IN_SECONDS

#Example (run /tmp/test.sh every 5 seconds)
ExternalMetricProvider=/tmp/test.sh:5
ExternalDataProvider
Added in version 5.2.0.
ExternalDataProvider is used with external command (script) that produces
JSON, XML or textual output. Command is regularly executed in the background,
agent caches its output. Specific elements of the cached data can be accessed
via agent metrics.
Configuring ExternalDataProvider
External data providers are configured as sections in agent configuration file. Configuration format can be seen in the following example:
[ExternalDataProvider/myApp]
Command = echo '{ "version" : "1.2.5", "queues": {"in" : 10, "out" : 42 }}'
# above is Linux command, on Windows use
# Command = echo { "version" : "1.2.5", "queues": {"in" : 10, "out" : 42 }}
Description = Information about my application
ForcePlainTextParser = false
PollingInterval = 600
Timeout = 1
Above configuration add one agent metric - myApp. This metric accepts
one parameter - path in JSON or XML document (or PCRE compliant regex with one
capture group if text parsing is used). E.g. myApp(.queues.out) metric
will return value of 42.
Agent autodetects if output of the command is JSON or XML. jq is used to
extract data from JSON, allowing to use complex queries, e.g.
myApp(.queues | add) will return 52. XPath is used to extract data
from XML.
Additional metrics
We can define separate agent metrics for particular data elements by adding
.../Metrics section to agent configuration:
[ExternalDataProvider/myApp/Metrics]
myApp.Version = .version
myApp.Queue.Inbound = .queues.in
myApp.Queue.Outbound = .queues.out
myApp.Queue.Outbound.description = Number of files in inbound queue
myApp.Queue.Outbound.dataType = int32
This way in addition to myApp metric agent will provide myApp.Version,
myApp.Queue.Inbound and myApp.Queue.Outbound metrics.
myApp.Queue.Outbound metric will have description and data type set as
well. Dot-separated metric naming here is just an example, other naming
conventions can be used as well.
.description and .dataType are special suffixes used to set metric
description and data type respectively, so you can not have metric names ending
with these suffixes.
Additional metrics with parameters
Separate agent metrics can also accept parameters, e.g. myApp.Queue(*)
metric can be defined to access different queues by name ((*) is actually
optional - agent detects that metric accepts parameter by presence of $1,
$2, … macros).
Note
Support for metrics with parameters was added in version 6.0.
[ExternalDataProvider/myApp/Metrics]
myApp.Queue(*) = .queues.$1
myApp.Queue(*).description = Number of files in given queue
myApp.Queue(*).dataType = int32
List metrics
We can also have list metrics by adding .../Lists section to agent
configuration. There are multiple ways of what jq query can return:
Array - all elements are returned as a list
Newline-separated strings - each line is returned as a list item
JSON Object - keys of the object are returned as list items
Below are examples of each case:
[ExternalDataProvider/myApp/Lists]
myApp.SupportedQueuesArray = .queues|keys
myApp.SupportedQueuesStrings = .queues|keys[]
myApp.SupportedQueuesKeys = .queues
Configuration parameter reference
Name |
Required |
Description |
|---|---|---|
[ExternalDataProvider/name] |
Yes |
Section name, where |
Command |
Yes |
This configuration parameter has two possible forms:
The exec form does not use shell, it launches the executable directly. On Linux
full path to the executable should be provided. On Windows the executable is
launched using API’s CreateProcess() function, it will search in PATH, but the
executable should be with file extension, e.g. The shell form uses shell to execute the command. |
Description |
No |
Textual description, agents provides it to the server in the list of available metrics. |
ForcePlainTextParser |
No |
Use plain text parser even if output looks like JSON or XML. Default value is false. |
PollingInterval |
No |
Command execution interval in seconds. Default value is 60 seconds. |
Timeout |
No |
Timeout in milliseconds for command execution. Default value is defined
by |
Name |
Required |
Description |
|---|---|---|
[ExternalDataProvider/name/Metrics] |
No |
Section for defining additional agent metrics. |
metricName |
No |
|
metricName.dataType |
No |
Metric data type. Possible values:
Default value is string. |
metricName.description |
No |
Textual description of the metric. |
Name |
Required |
Description |
|---|---|---|
[ExternalDataProvider/name/Lists] |
No |
Section for defining additional agent lists. |
listName |
No |
|
ExternalTable
ExternalTable defines table that is provided by agent and how it can be
obtained. Table can be collected synchronously when requested by the server or
regularly in the background (in this case server gets cached data). Second
option is useful when command for table creation is taking a long time to avoid
timeout. To collect table in the background “PollingInterval” configuration
option is required.
Timeout in milliseconds for background operation is defined by
ExternalMetricProviderTimeout parameter in agent configuration file.
Each table line is separated with new line character. First line in returned text should contain name of columns, subsequent lines contain table data.
Server can provide parameters when requesting the metric, these are available as
$1, $2, $3… variables. To enable parameter support, metric name
should contain (*) symbols after its name.
External tables are configured as sections in agent configuration. Section name
has the following format: [ExternalTable/MetricName]. Section can contain
the following configuration parameters:
Name |
Required |
Description |
|---|---|---|
Command |
Yes |
Command that should be executed. Both exec form and shell form are
supported, see configuration of |
Separator |
No |
Symbol that will be used as a separator for columns. If separator is not
specified, default value of
|
MergeSeparators |
No |
Boolean option ( Added in version 5.2.7. |
InstanceColumns |
No |
Comma separated instance column list.
|
Description |
No |
Table DCI description that will be shown in table DCI selector. |
PollingInterval |
No |
Interval that is used to poll table in the background. Table will be collected synchronously (per request) if this parameter is omitted. |
ColumnType |
No |
Data type of the column. Is set in format
|
DefaultColumnDataType |
No |
Default data type for columns that do not have an explicit type set via
Added in version 6.0. |
# Example

# Simple example
[ExternalTable/test]
Command = echo -e 'col1;col2;col3\na;b;c'
Separator = ;

# Without metric parameters
[ExternalTable/MyTable]
Command = command
Separator = ;
InstanceColumns = columnName,columnName2
Description = description
PollingInterval = 60
ColumnType = columnName:string
ColumnType = columnName3:string
MergeSeparators = false

# With metric parameters
[ExternalTable/MyTable(*)]
Command = ["/usr/bin/cat", "/folder/with/my/files/$1"]


# Old configuration format
ExternalTable=MyTable::command
ExternalTable=MyTable:instanceColumns=columnName;description=description;separator=|:command
ExternalTable=MyTable:instanceColumns=columnName;separator=\s;mergeSeparators=true:command
ExternalTable=MyTable(*):instanceColumns=columnName;description=description;separator=|:command $1 $2
#Old configuration format with background polling
ExternalTable=MyTable:instanceColumns=columnName;description=description;separator=|:command;backgroundPolling=yes;pollingInterval=60
Note
backgroundPolling configuration should be set to true or yes in order to use polling interval with old configuration format.
Agent Actions
For security reasons actions that can be executed on agent first are defined in agent configuration file and only then can be used by users. This excludes that an unauthorized user can access system data through an arbitrary entered command. Only users with access to the agent configuration file editing can define executed commands.
Action configuration parameter defines name of the action and command that
is executed. To add multiple action, you should use multiple Action in agent
configuration. This configuration parameter has two possible forms:
Action = actionName:["executable", "param1", "param2", ...](exec form)
Action = actionName:command param1 param2 ...(shell form)
The exec form does not use shell, it launches the executable directly. On Linux
full path to the executable should be provided. On Windows the executable is
launched using API’s CreateProcess() function, it will search in PATH, but the
executable should be with file extension, e.g. command.exe. Both double
quotes (") or single quotes (") can be used to enclose the executable
and the parameters.
The shell form uses shell to execute the command.
Both forms accept parameters that will be available as $1, $2, $3…
variables.
From the server side an action can be used in the object tools - agent action, in actions - action execution on remote node or from a NXSL script.
Action should be defined in core section of agent configuration file.
# Example without parameters
Action=name:command
Action=cleanLogs:rm /opt/netxms/log/*

# Example with parameters
Action=listFiles:dir $1
Action=a:['/usr/bin/ping', '$1', '-c 3']