SNMP
SNMP Drivers
Various SNMP devices might require special measures to get information, e.g. some devices provide additional information for interfaces only under vendor OIDs, etc. To address this, NetXMS provides a concept of SNMP drivers. Drivers have auto-detection mechanism, each driver can query additional OIDs to determine if it’s fitting this device, best fitting driver is selected.
If specific driver is not detected automatically, GENERIC driver is used. In
this case you can specify a name of specific driver in snmp.driver custom
attribute on the node to force it’s detection.
You can globally blacklist specific SNMP drivers by providing comma-separated
list of their names to NetworkDeviceDrivers.BlackList server’s configuration
variable. This will prevent incorrect auto-detection of some drivers on
particular devices.
List of available drivers is logged to server’s log file on server startup. At the moment of writing the following drivers were available:
ARUBA-SW
AT
BAYSTACK
CAMBIUM-CNPILOT
CAMBIUM-EPMP
CATALYST-2900XL
CATALYST-GENERIC
CISCO-ESW
CISCO-GENERIC
CISCO-NEXUS
CISCO-SB
CISCO-WLC
DELL-PWC
DLINK
EDGECORE-ESW
ELTEX
ERS8000
ETHERWAN
EXTREME
FORTIGATE
H3C
HIRSCHMANN-CLASSIC
HIRSCHMANN-HIOS
HPE-ILO
HPSW
HUAWEI-SW
IGNITENET
JUNIPER
MDS-ORBIT
MIKROTIK
MOXA-EDR
NET-SNMP
NETONIX
NETSCREEN
NTWS
OPTIX
PING3
PROCURVE
QTECH-OLT
QTECH-SW
RITTAL
RUGGEDCOM
SAF-INTEGRA-B
SYMBOL-WS
TB
TELTONIKA
TPLINK
UBNT-AIRMAX
UBNT-EDGESW
WESTERSTRAND
MIB Explorer
MIB browser shows all loaded MIB configurations, and allows to run SNMP walk on a selected node nodes. Node can be selected in browser by selecting Set node object… option in view menu or by opening MIB Explorer from node menu.

To run walk user should select line of tree from were will be requested all data. By walk will be requested all OID subtree of selected item. Walk can also be started by clicking the Walk… button next to the OID field in the object details panel.
After walk is done it’s results will shown in the table below.

- There are next options available for results:
Copy result line to clipboard
Copy name of selected line to clipboard
Copy type of selected line to clipboard
Copy value of selected line to clipboard
Export selected lines to CSV
Show selection in MIB tree
Create DCI from selected item
SNMP Trap Configuration
In this view is configured which event will be generated on exact trap OID and which OID data will be used as event parameter data.

In SNMP Trap mapping configuration window can be set next parameters:
Description of mapping rule
Trap OID or trap OID group with many subtree OIDs, matching OID will be given to event as $1 parameter
Event that will be generated on selected Trap OID
User Tag is special event attribute, that can be got by %u macros or as attribute of event class. This attribute can be set there or by script.
Parameters - OID values that will be passed to event as $2, $3, $4… parameters
In parameter configuration(Edit SNMP Trap Parameter Mapping) can be configured next things:
Description of a parameter
Select if parameter should be found by OID or by position in the message
Option not to convert value to hex string. If string contains not readable symbols(symbol number less than space symbol number) it will be automatically converted to hex string, this option is required to prevent auto conversion.

Default SNMP credentials
Default SNMP credentials can be set in . It does not matter if credentials are used for adding nodes manually, through network discovery or with the help of agent registration - in each case SNMP Credentials configuration value will be checked.

Using ifTable and ifXTable
There are 2 types of subtree that provides information about interfaces: old one
ifTable and new one ifXTable. Sometimes usage of new one creates error situations.
In this situation ifXTable can be disabled. This can be done in Properties of
node in Polling. Or this configuration can be set
globally by changing UseIfXTable server configuration parameter.

Configure SNMP Proxy
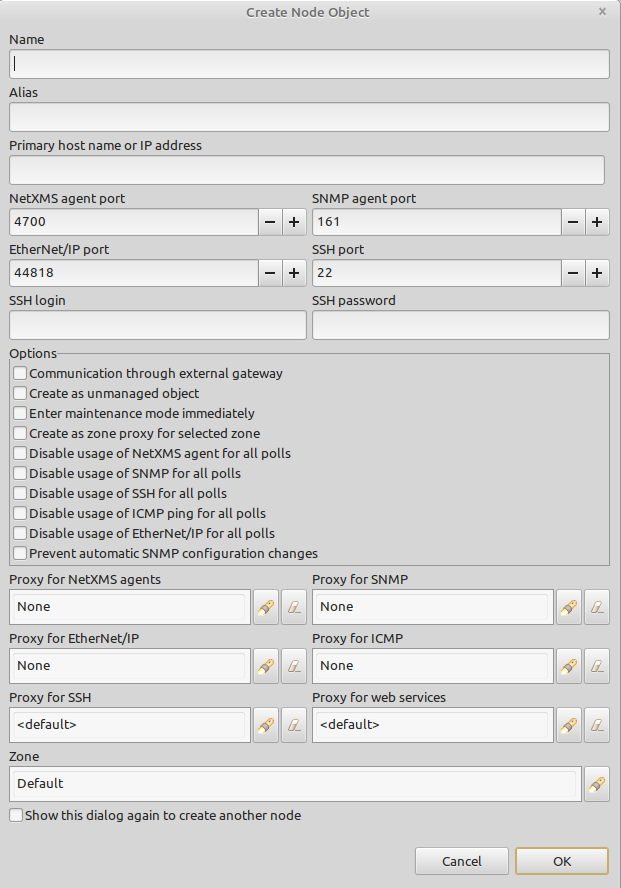
If there is need to monitor nodes behind firewall using SNMP, there is option to install on one of the nodes NetXMS agent, open all required ports for this node and send SNMP request to other nodes in this subnet through installed agent.
Proxy configuration can be done wile creation of node of for already created node can be change in Communications tab of node properties. To configure proxy node select node in object selector SNMP Proxy.
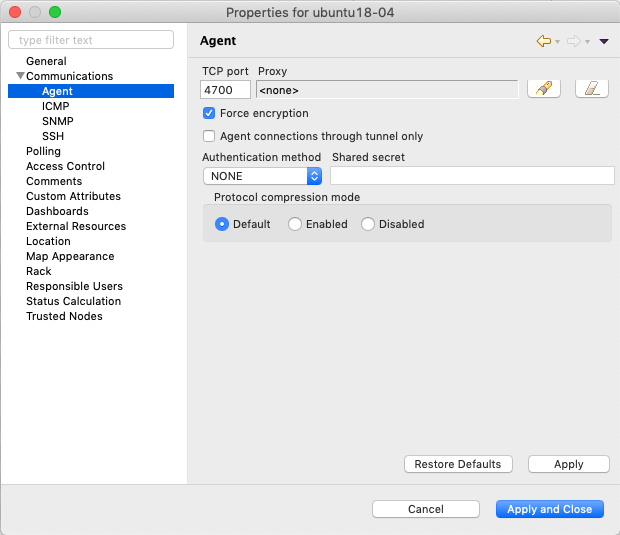
Agent configuration
To enable SNMP proxy “EnableSNMPProxy” parameter should be set to “yes”.
Configure SNMP Trap Proxy
It is possible to proxy SNMP traps.
In this case as a destination of traps should be set the proxy node.
Agent configuration
To enable trap proxy “EnableSNMPTrapProxy” parameter should be set to “yes”.
Optionally can be configured also “SNMPTrapListenAddress” and “SNMPTrapPort”. Default values can be checked there: Master configuration file
Server configuration
By default traps are accepted only from known nodes. To accept all traps set “LogAllSNMPTraps” server configuration variable to 1.
To correctly send response for SNMPv3, it should be also configured the proxy node for the sender node. It is done in sender node properties in “Communications” tab, SNMP section.
Import MIB
MIB files (MIBs) describe structure of information transferred via SNMP. Every device can support multiple MIBs, some of them are standard and public, other can be proprietary and vendor specific. NetXMS uses compiled MIBs to allow you to select OID and see its description (for example when selecting SNMP data for DCI collection). You do not need to compile new MIBs if you are OK with direct input of OID.
Manage User MIBs
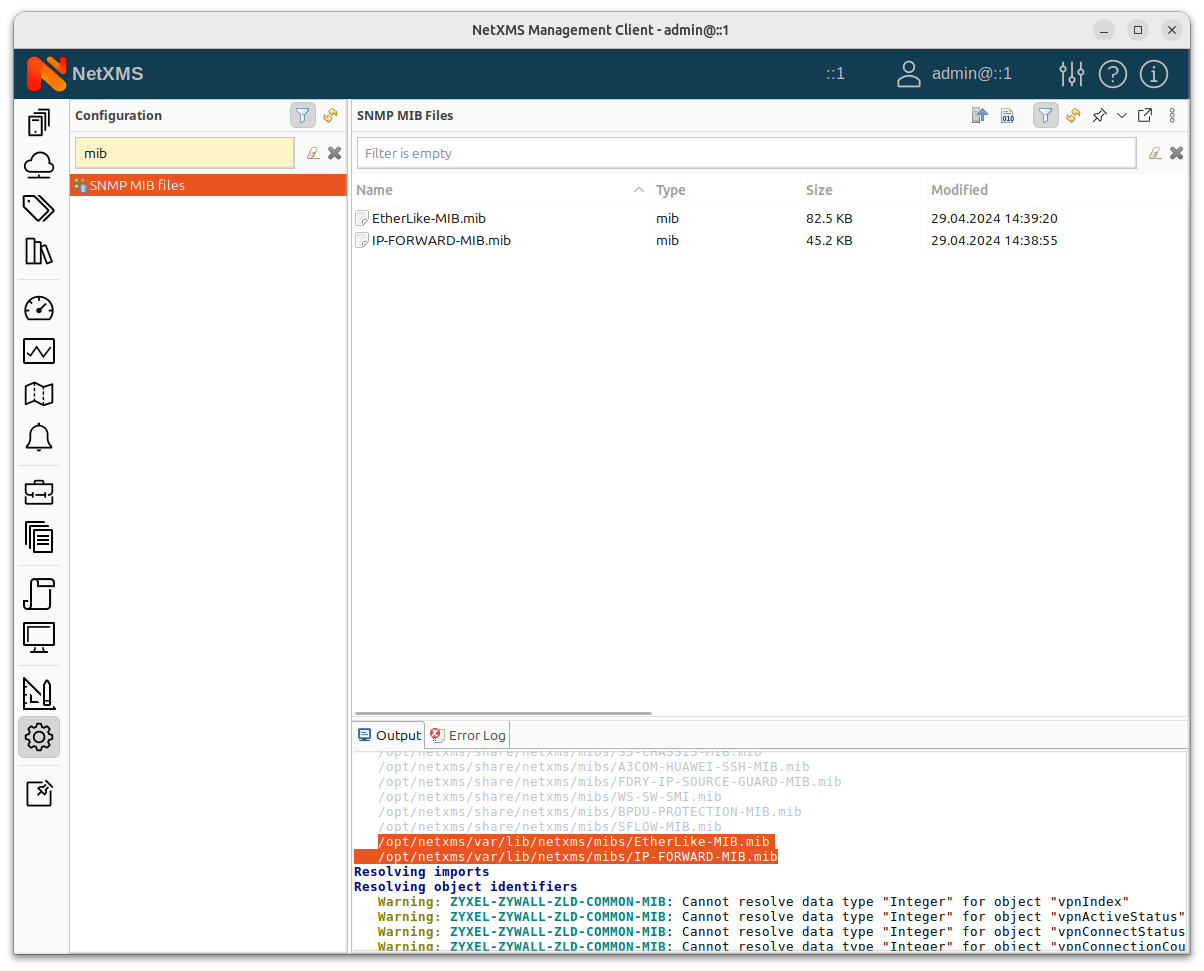
To add additional MIBs go to Configuration –> SNMP MIB files. Upload mib files with extension .mib and hit compile button. MIB compilation log will be visible in Output tab and warnings/errors will be added to Error Log tab. After MIB files are succesfully compiled all opened clients automatically dowload new version from server.
For versions older 5.0
Compiling MIBs
Change suffix of your new MIB file to .txt
Copy your MIB file to /usr/share/netxms/mibs
Use nxmibc binary to create a new compiled MIB file from all MIBs in directory. Add parameter -z for compressed output file.
nxmibc -d /usr/share/netxms/mibs -o /var/lib/netxms/netxms.mib
Parameters recognized by nxmibc:
nxmibc [options] source1 ... sourceN

Valid options:
  -d <dir>  : Include all MIB files from given directory to compilation
  -o <file> : Set output file name (default is netxms.mib)
  -P        : Pause before exit
  -s        : Strip descriptions from MIB objects
  -z        : Compress output file
Troubleshooting
If nxmibc fails, it may be caused by syntax or import errors in your MIB. Try to check it with smilint (part of net-snmp package) and correct any errors on level 3.
Working with the SNMP Tables
When we do SNMP walk the resulting SNMP table item OIDs consist of three parts. For the sake of our explanation, we will mark these parts with the letters:
XXXYYYNNN, where
XXX is part that does not change — we can call it a Table base OID; YYY is part that represents different columns; NNN is the instance part. The instance part represents rows in the table.
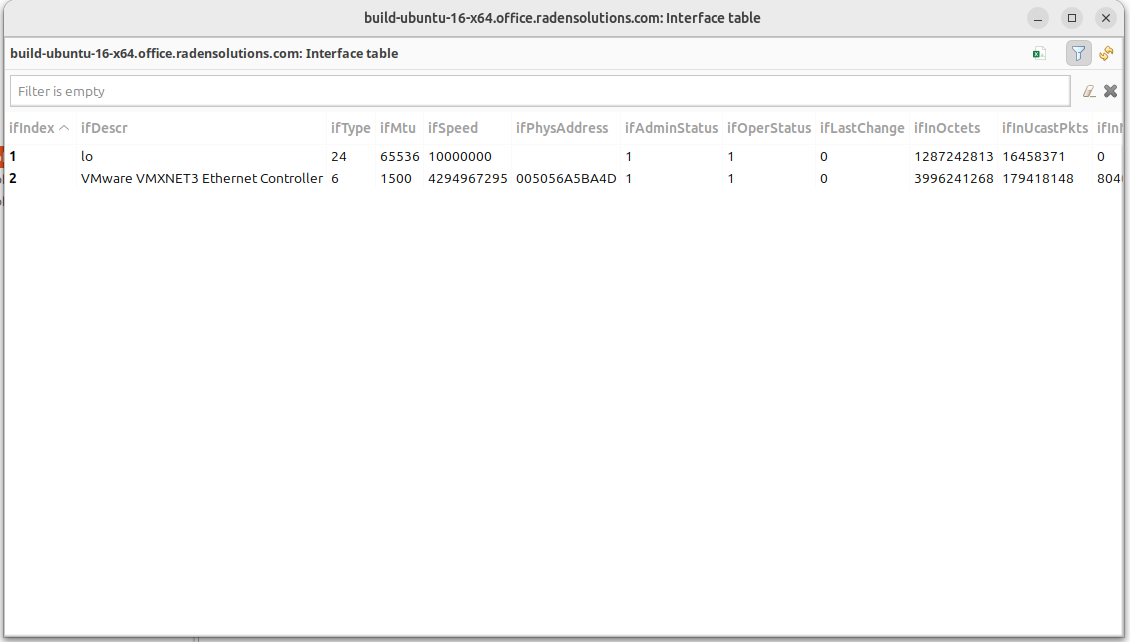
Now, as an example, we can imagine the table with base “.1.3.6.1.2.1.2.2.1” like the one below:
1.3.6.1.2.1.2.2.1 |
.1 |
.2 |
.3 |
.4 |
.5 |
.6 |
|---|---|---|---|---|---|---|
.1 |
1 |
lo |
24 |
65536 |
10000000 |
|
.2 |
2 |
VMware VMXNET3 Ethernet Controller |
6 |
1500 |
4294967295 |
005056A5BA4D |
In this table the columns are YYY numbers (that are usually single numbers in ascending order), and the rows are the NNN number.
In this table the columns are YYY numbers (that are usually single numbers in ascending order), and the rows are the NNN number.
How to Create a Table
To create a table, use the table base and the column part OID (XXXYYY).
In this way, taking as the example the SNMP table shown above, “1.3.6.1.2.1.2.2.1.1” can be used as the metric for the DCI cofniguration.
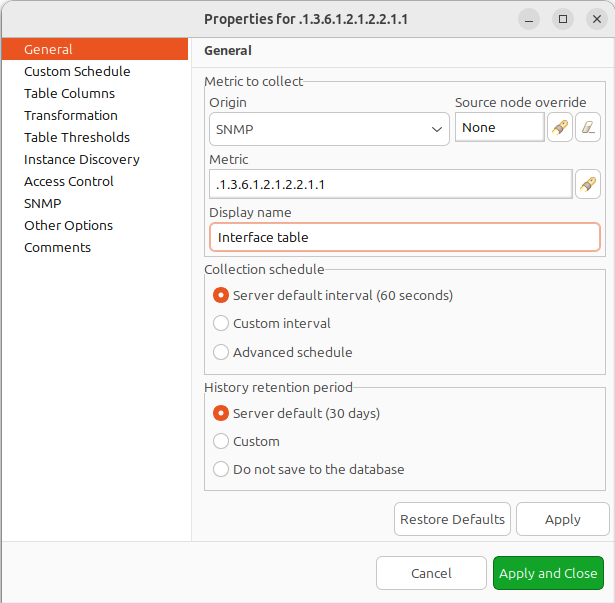
General Page
Moreover, we can use any table column for configuraiton (in the example in the sentence above, we used the “.1” column, as you rightly understood), that returns non-empty results in MIB Explorer, as they will be used to make the SNMP walk to get all the instances.
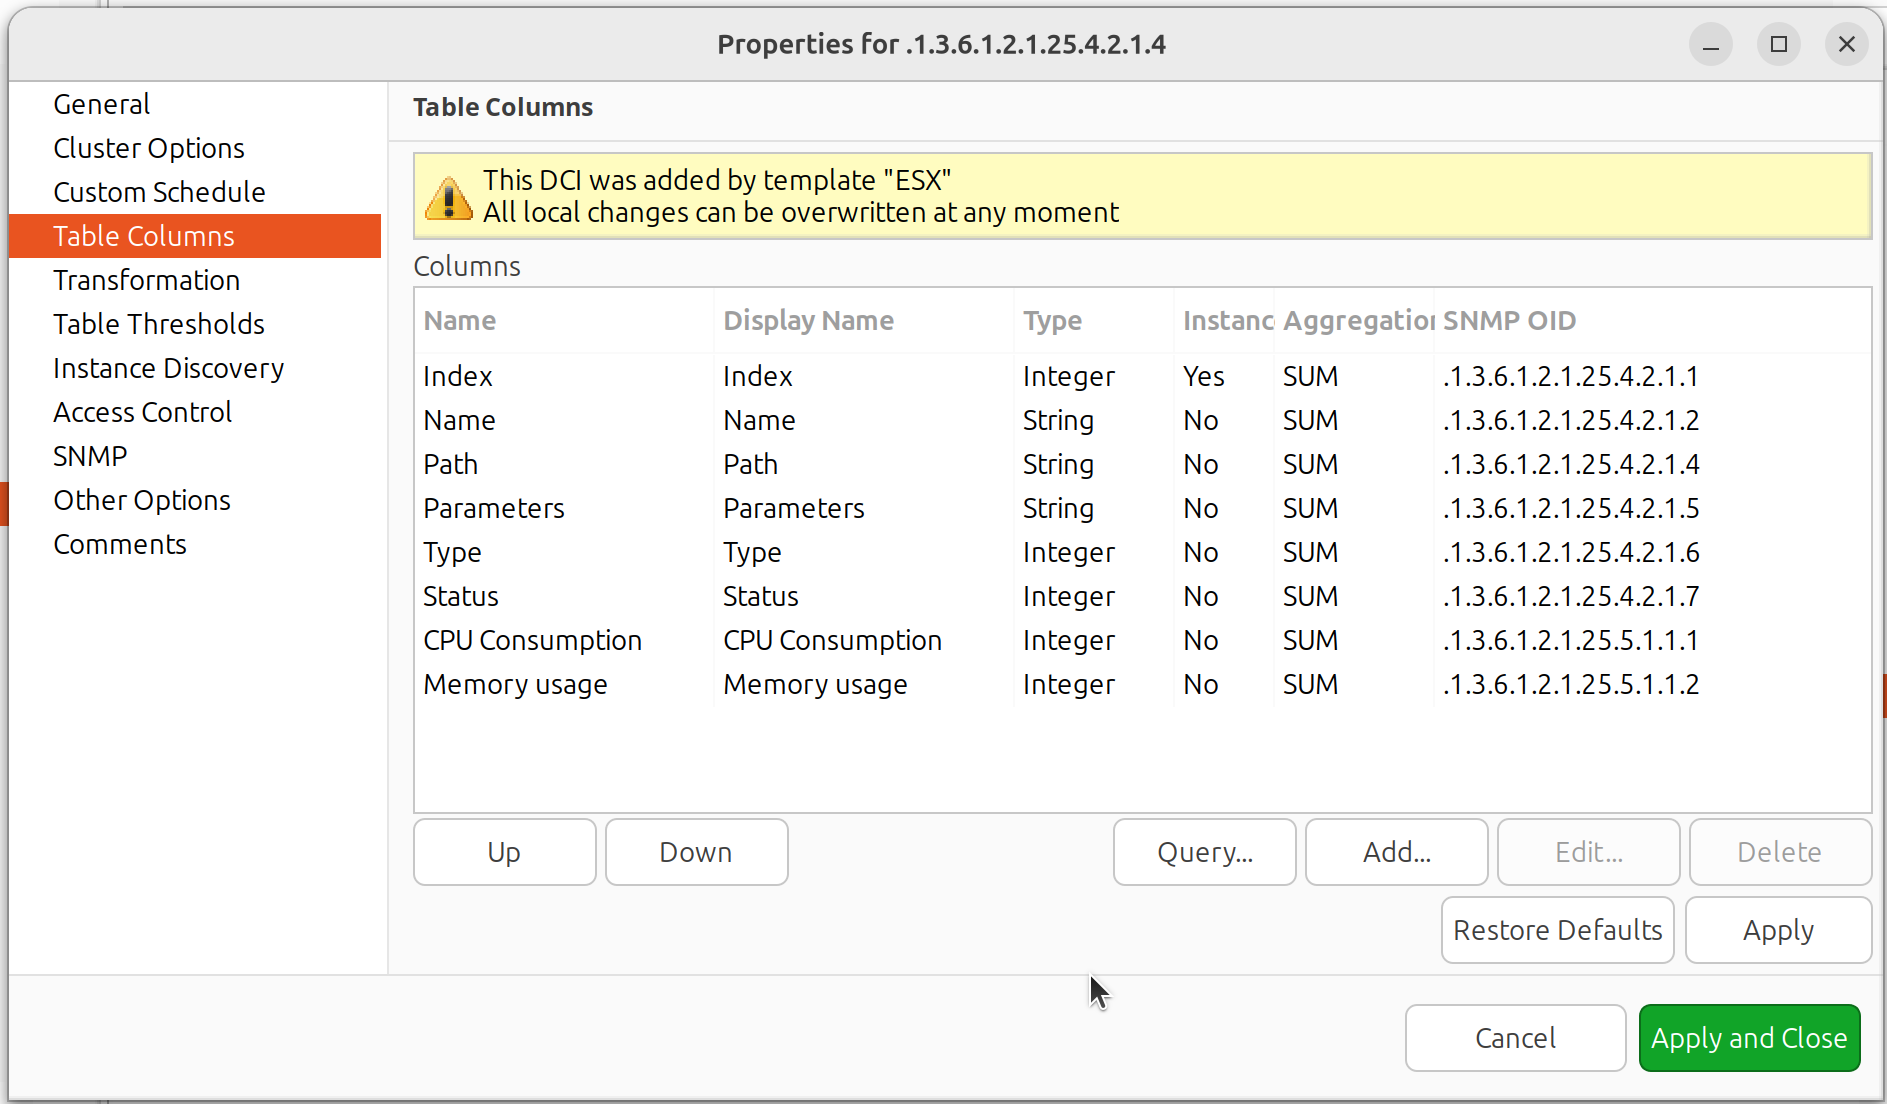
As for the columns — each of those you’d like to monitor should then be added to the Table Columns property page.
In our case they could be:
Add index column 1.3.6.1.2.1.2.2.1.1
Add description 1.3.6.1.2.1.2.2.1.2
Add Physical address 1.3.6.1.2.1.2.2.1.6
Add MTU 1.3.6.1.2.1.2.2.1.4…
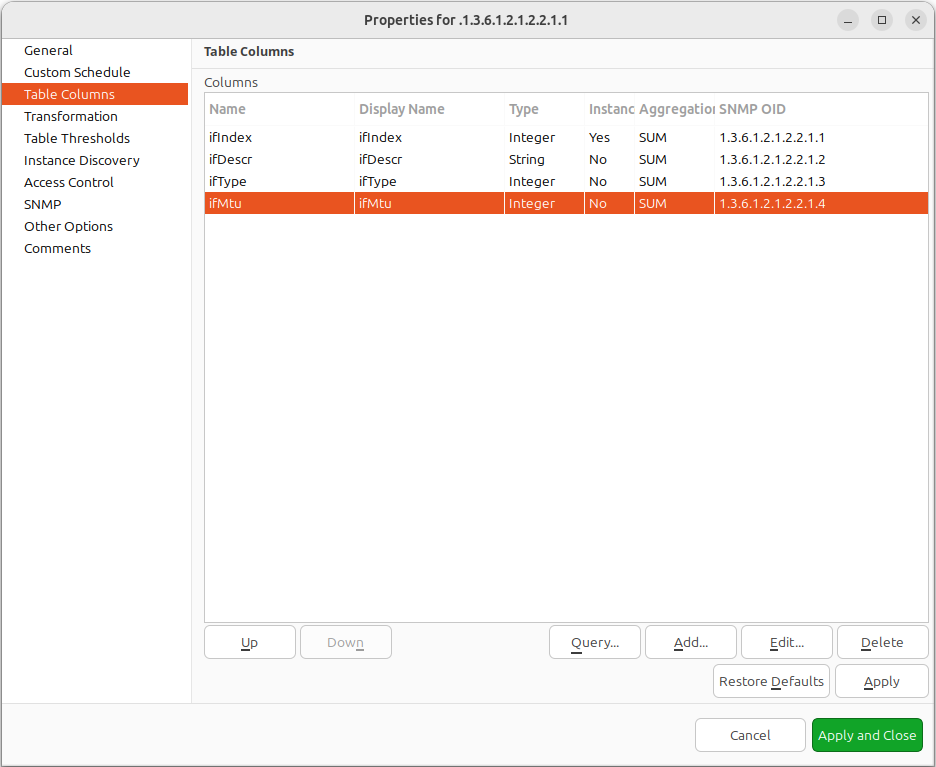
Table Columns configuration
Another option to add columns is to click Query… button. Automatic table columns query is done by SNMP Walk on Metric OID where column part is cut out.
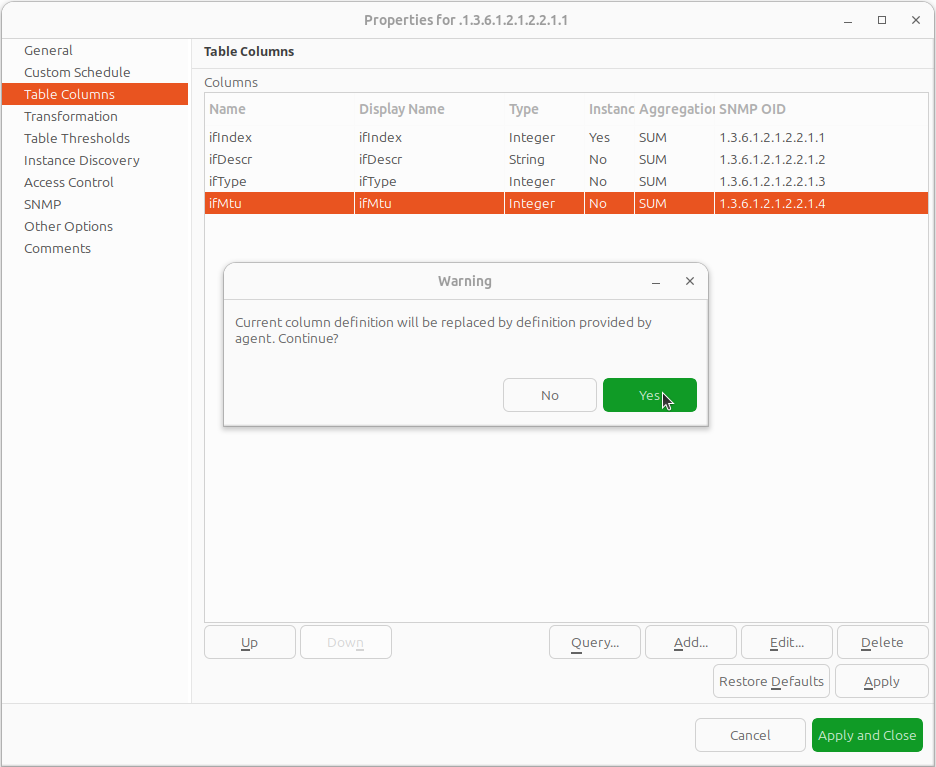
Query warning
Configured table
1.3.6.1.2.1.4.35.1 |
.4 |
.5 |
.6 |
.7 |
|---|---|---|---|---|
.2.1.4.10.5.5.1 |
00 23 7D 5F 27 BB |
428943151 |
3 |
1 |
.2.1.4.10.5.5.20 |
00 50 56 A5 3D 86 |
428943151 |
3 |
1 |
We can see in the table above that the instance OID can also be a string of multiple numbers with dots. In the case of a physical address map instance, OID part will contain IP address.
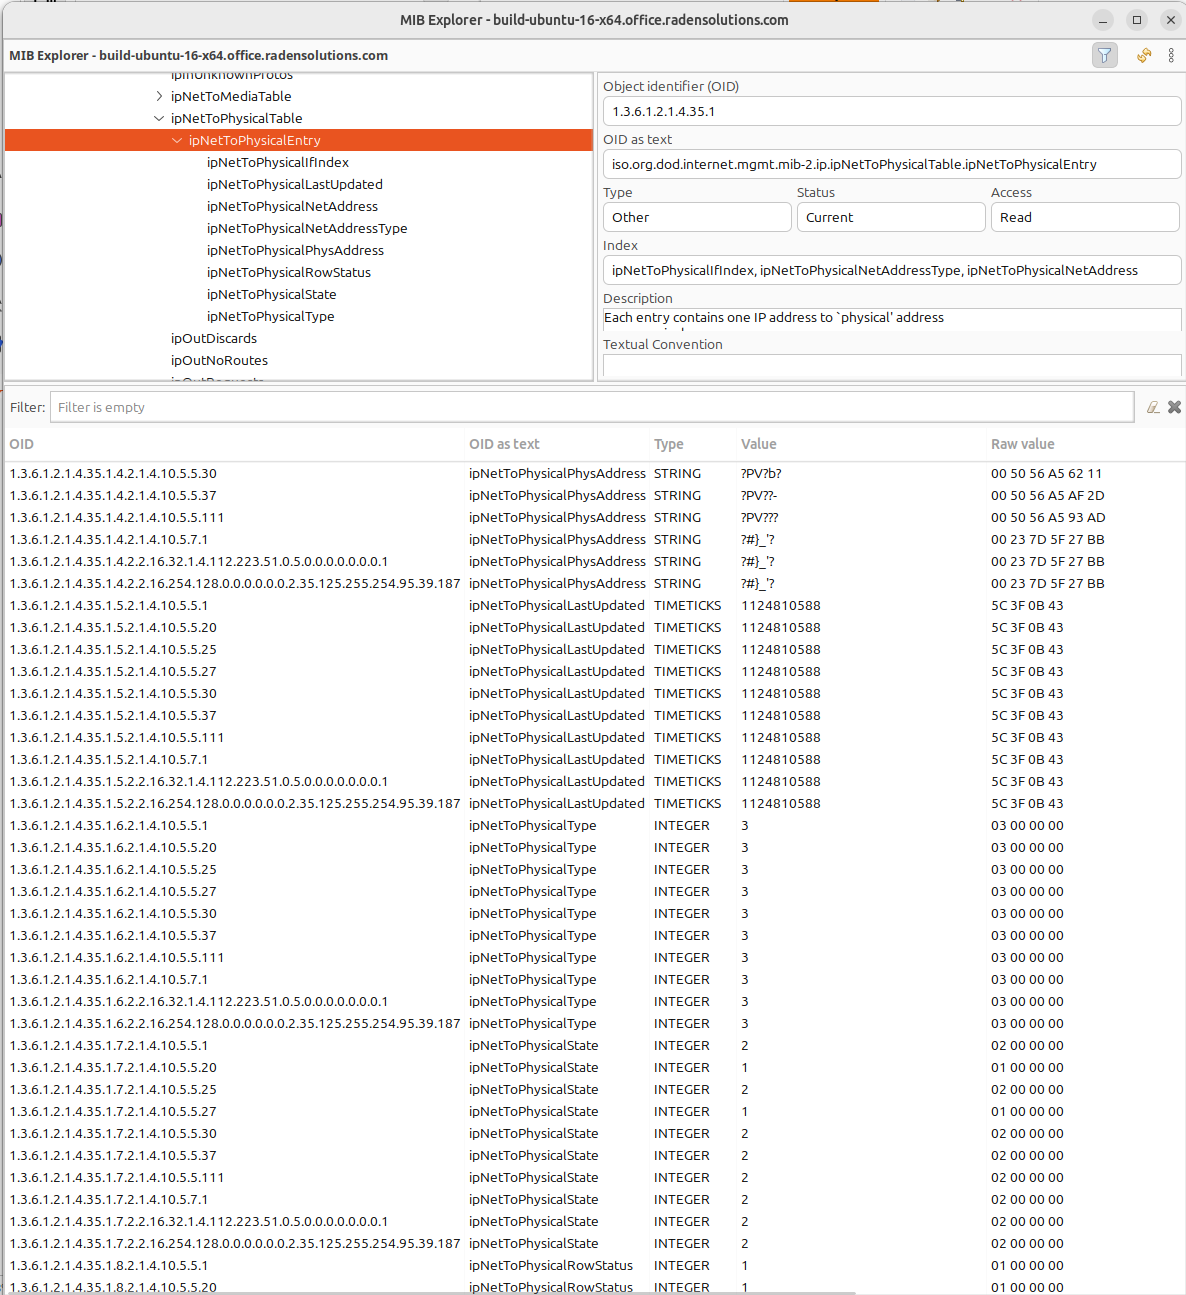
Physical Address MIB Explorer
Another difference with the first example can be determined by executing the SNMP walk for the table above. The device returns values only for the columns with the OIDs “.4”, “.5”, “.6”, “.7”, “.8”.
If we do walk for the “1.3.6.1.2.1.4.35.1.1” table column, it will return us empty result. This also should be taken into consideration when we create a table with physical addresses - only columns that return indexes can be used for the Metric field in the DCI Table creation property page.
Table Thresholds and Instance Columns
When setting up table thresholds, it’s helpful to understand instance columns. An instance column is similar to a primary key in a database — it’s the unique ID. In NetXMS, this is known as an instance- or key column. It is possible to set multiple columns as instance columns, similar to composite keys in databases. However, if instance columns aren’t defined, and rows change order between polling periods, it can trigger false threshold alerts. The system might register that a different row is exceeding a threshold when, in fact, the same data is present, just in a different row. Specifying an instance column can mitigate this confusion.
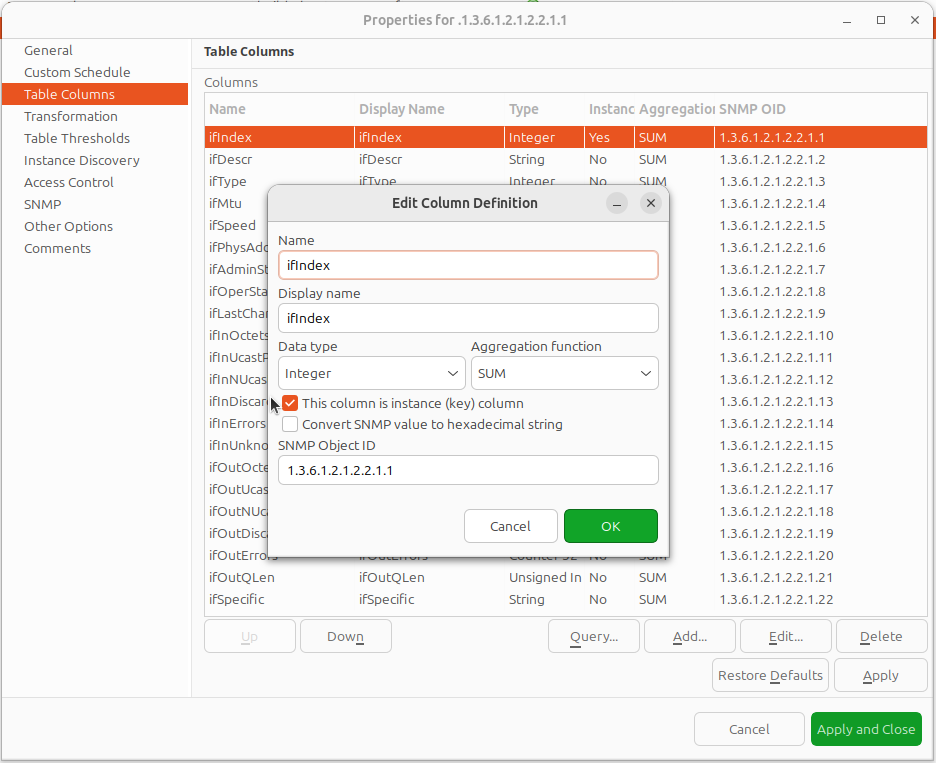
Table columns configuration — editing column definition
As you see, the NetXMS table metrics are a powerful tool for collecting and managing a wealth of network data. While they can be more complex to set up and require more storage than single with similar content, they present a great possibility to view more complex sets of data.
Configuration example
In order to show how table metrics are configured in NetXMS, and how to distinguish what each part of it represents, we will go to the MIB explorer and use one of the tables in the system.
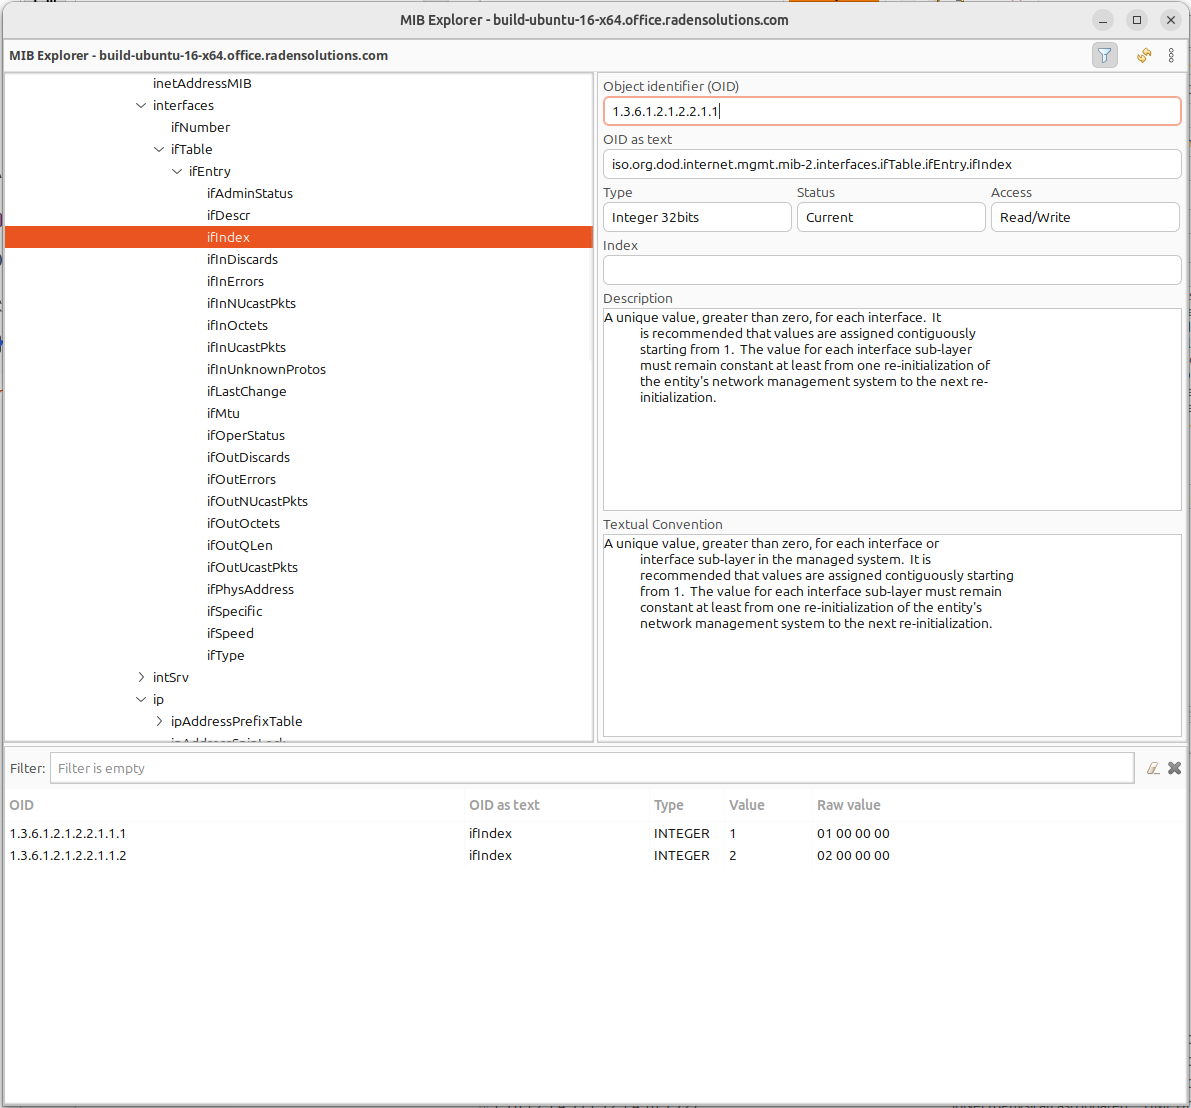
In this picture we can see the table OID “1.3.6.1.2.1.2.2.1”. After the “1.3.6.1.2.1.2.2.1” goes “.1”, that represents the column OID. So in OID search field we have “1.3.6.1.2.1.2.2.1.1” — the table column OID. And as a result of the MIB walk for the given OID we get 2 instances “1.3.6.1.2.1.2.2.1.1.1” and “1.3.6.1.2.1.2.2.1.1.2”.
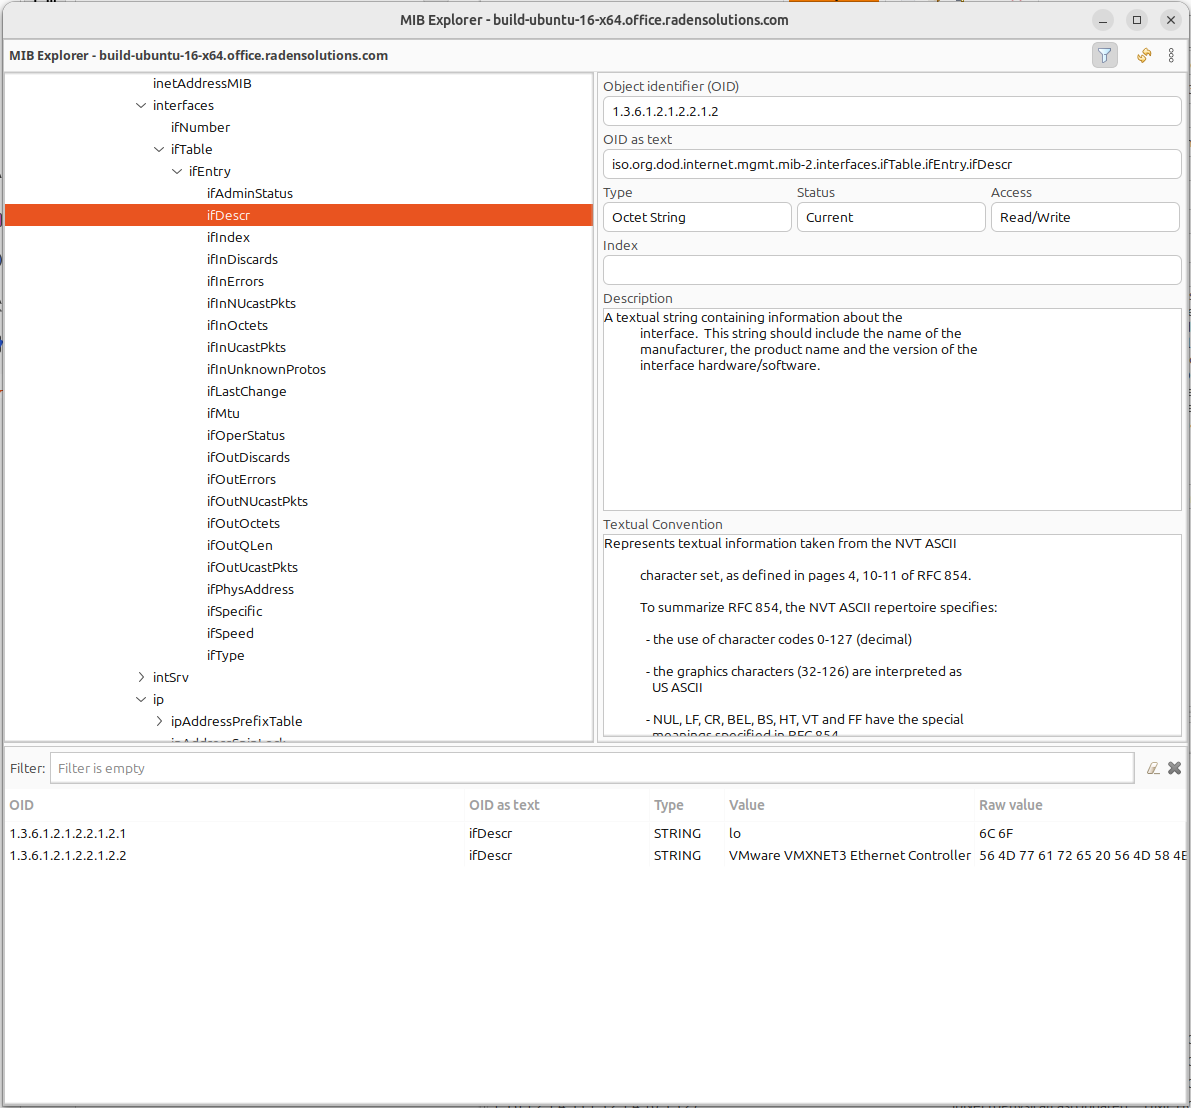
We can make the MIB walk for another table column “1.3.6.1.2.1.2.2.1.2” and get the same two instances, just for another column: “1.3.6.1.2.1.2.2.1.2.1” and “1.3.6.1.2.1.2.2.1.2.2”. In this way we know now, that the table base id is “1.3.6.1.2.1.2.2.1.2”.
To configure this table we can use any table column, that via a MIB walk will return the instances like: “1.3.6.1.2.1.2.2.1.1” or “1.3.6.1.2.1.2.2.1.2”. Let’s use “1.3.6.1.2.1.2.2.1.1”.
General Page
Press Apply and Close button to apply changes and open configuration again (To update DCI configuration). Than let’s go to the Table Column configuration property page and do query. It will add all the columns to the table list.
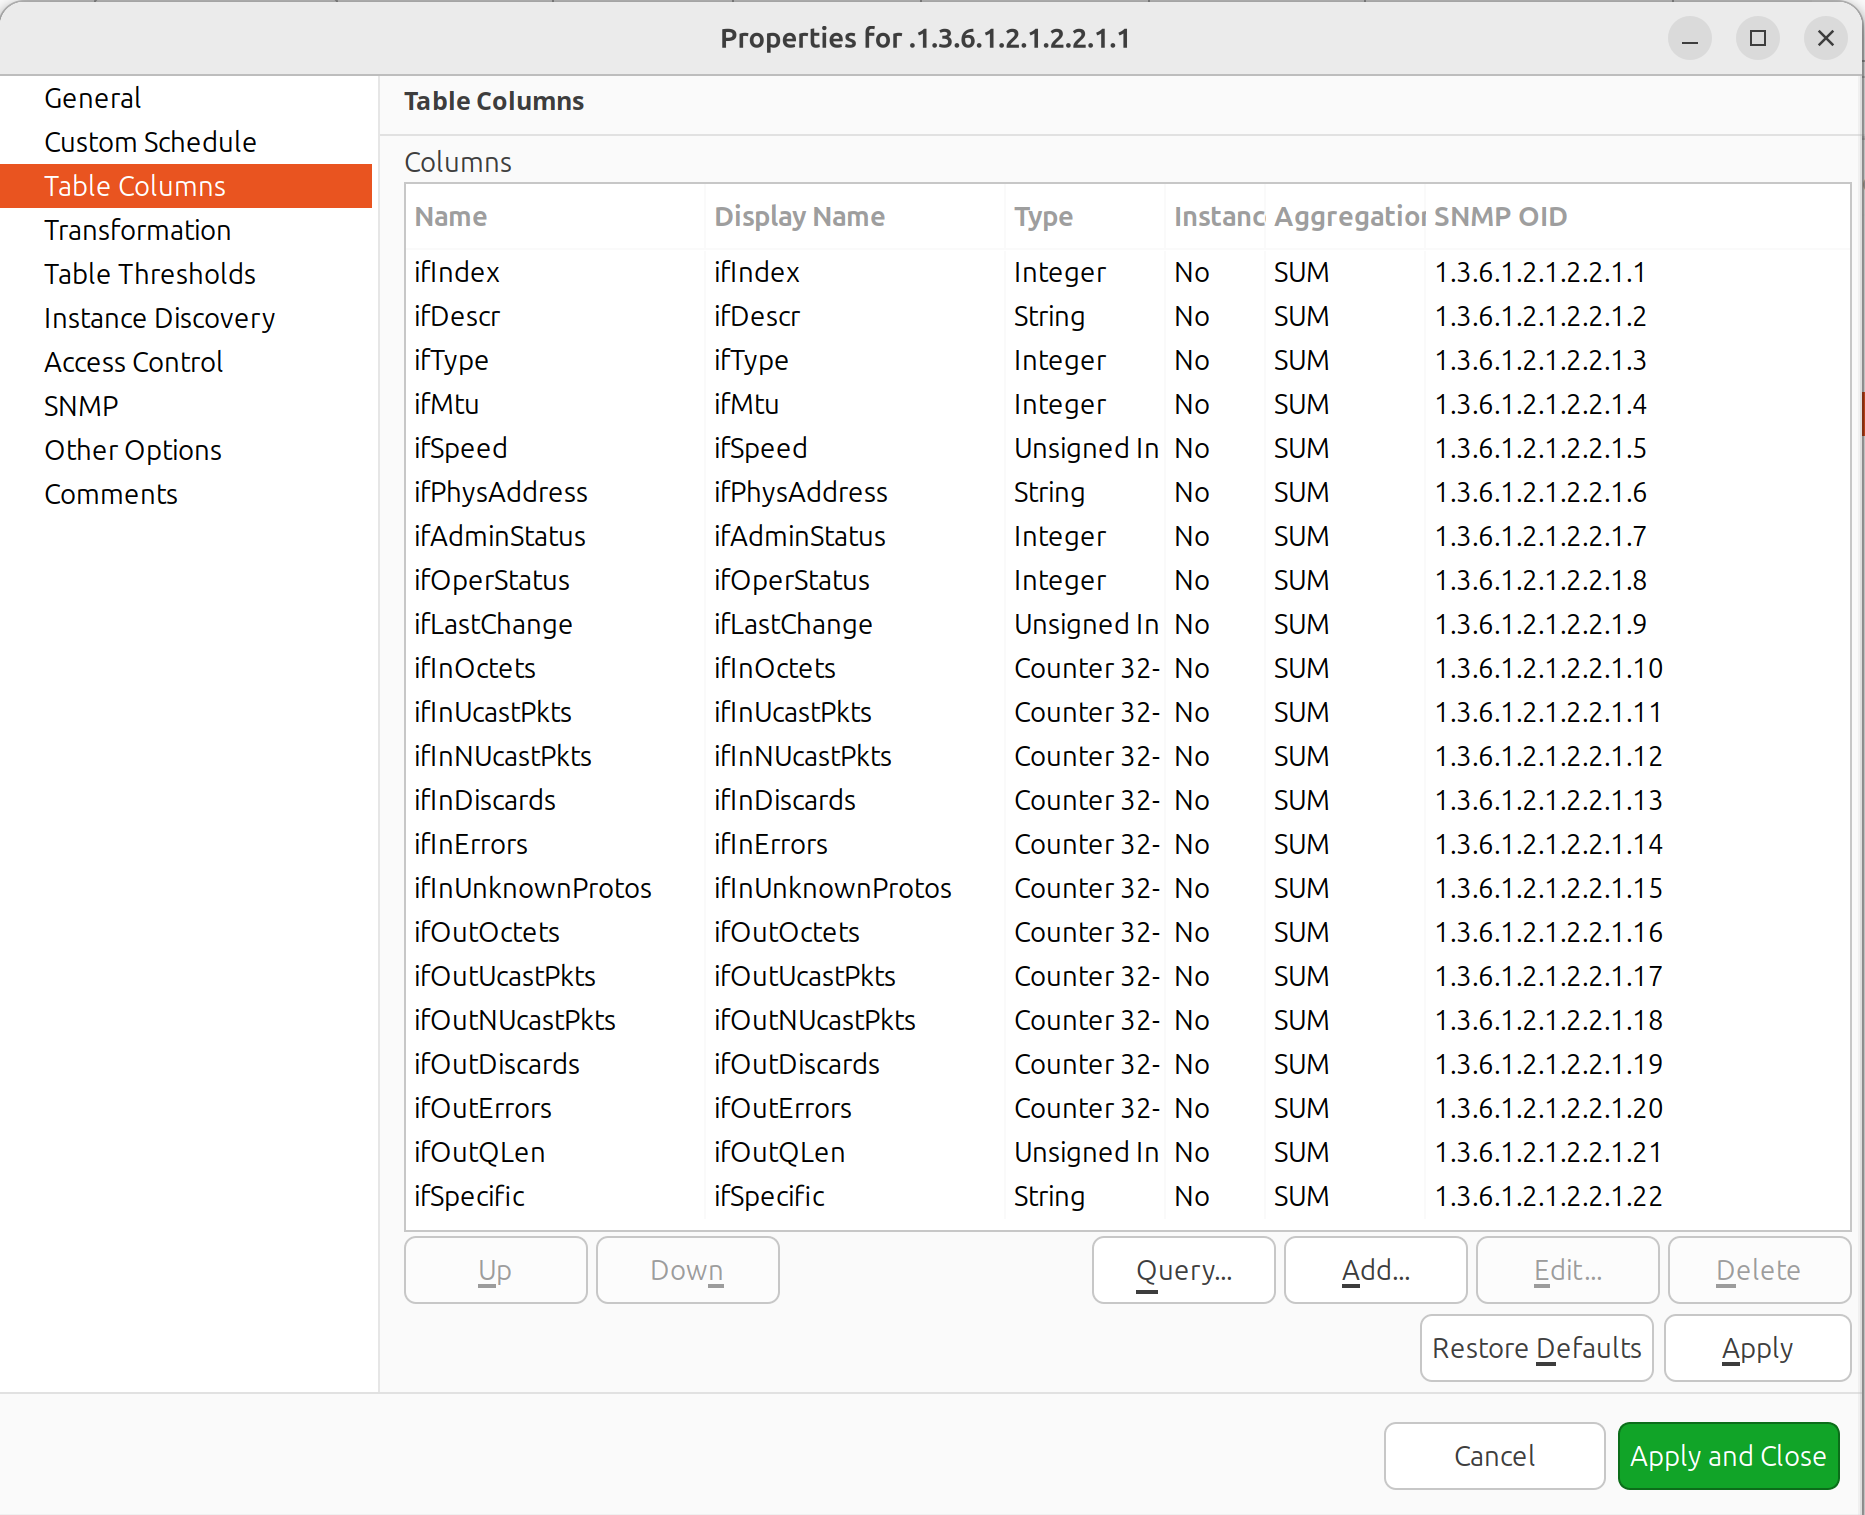
The query result of the table columns
Now we have table with all the columns. Columns can be renamed by a user afterwards, as necessary. What we are missing here is an instance column. Our instance column will be the ifIndex column.
Table column configuration — renaming columns and editing their definition
As a result we will get the table below:
As we can see, the column ipPhysAddress shows nonsense. The column contains the hexdecimal string, but we try showing it as a regular string.
Let’s go back to the table configuration and adjust it by setting “Convert SNMP value to hexdecimal string” option for a column.
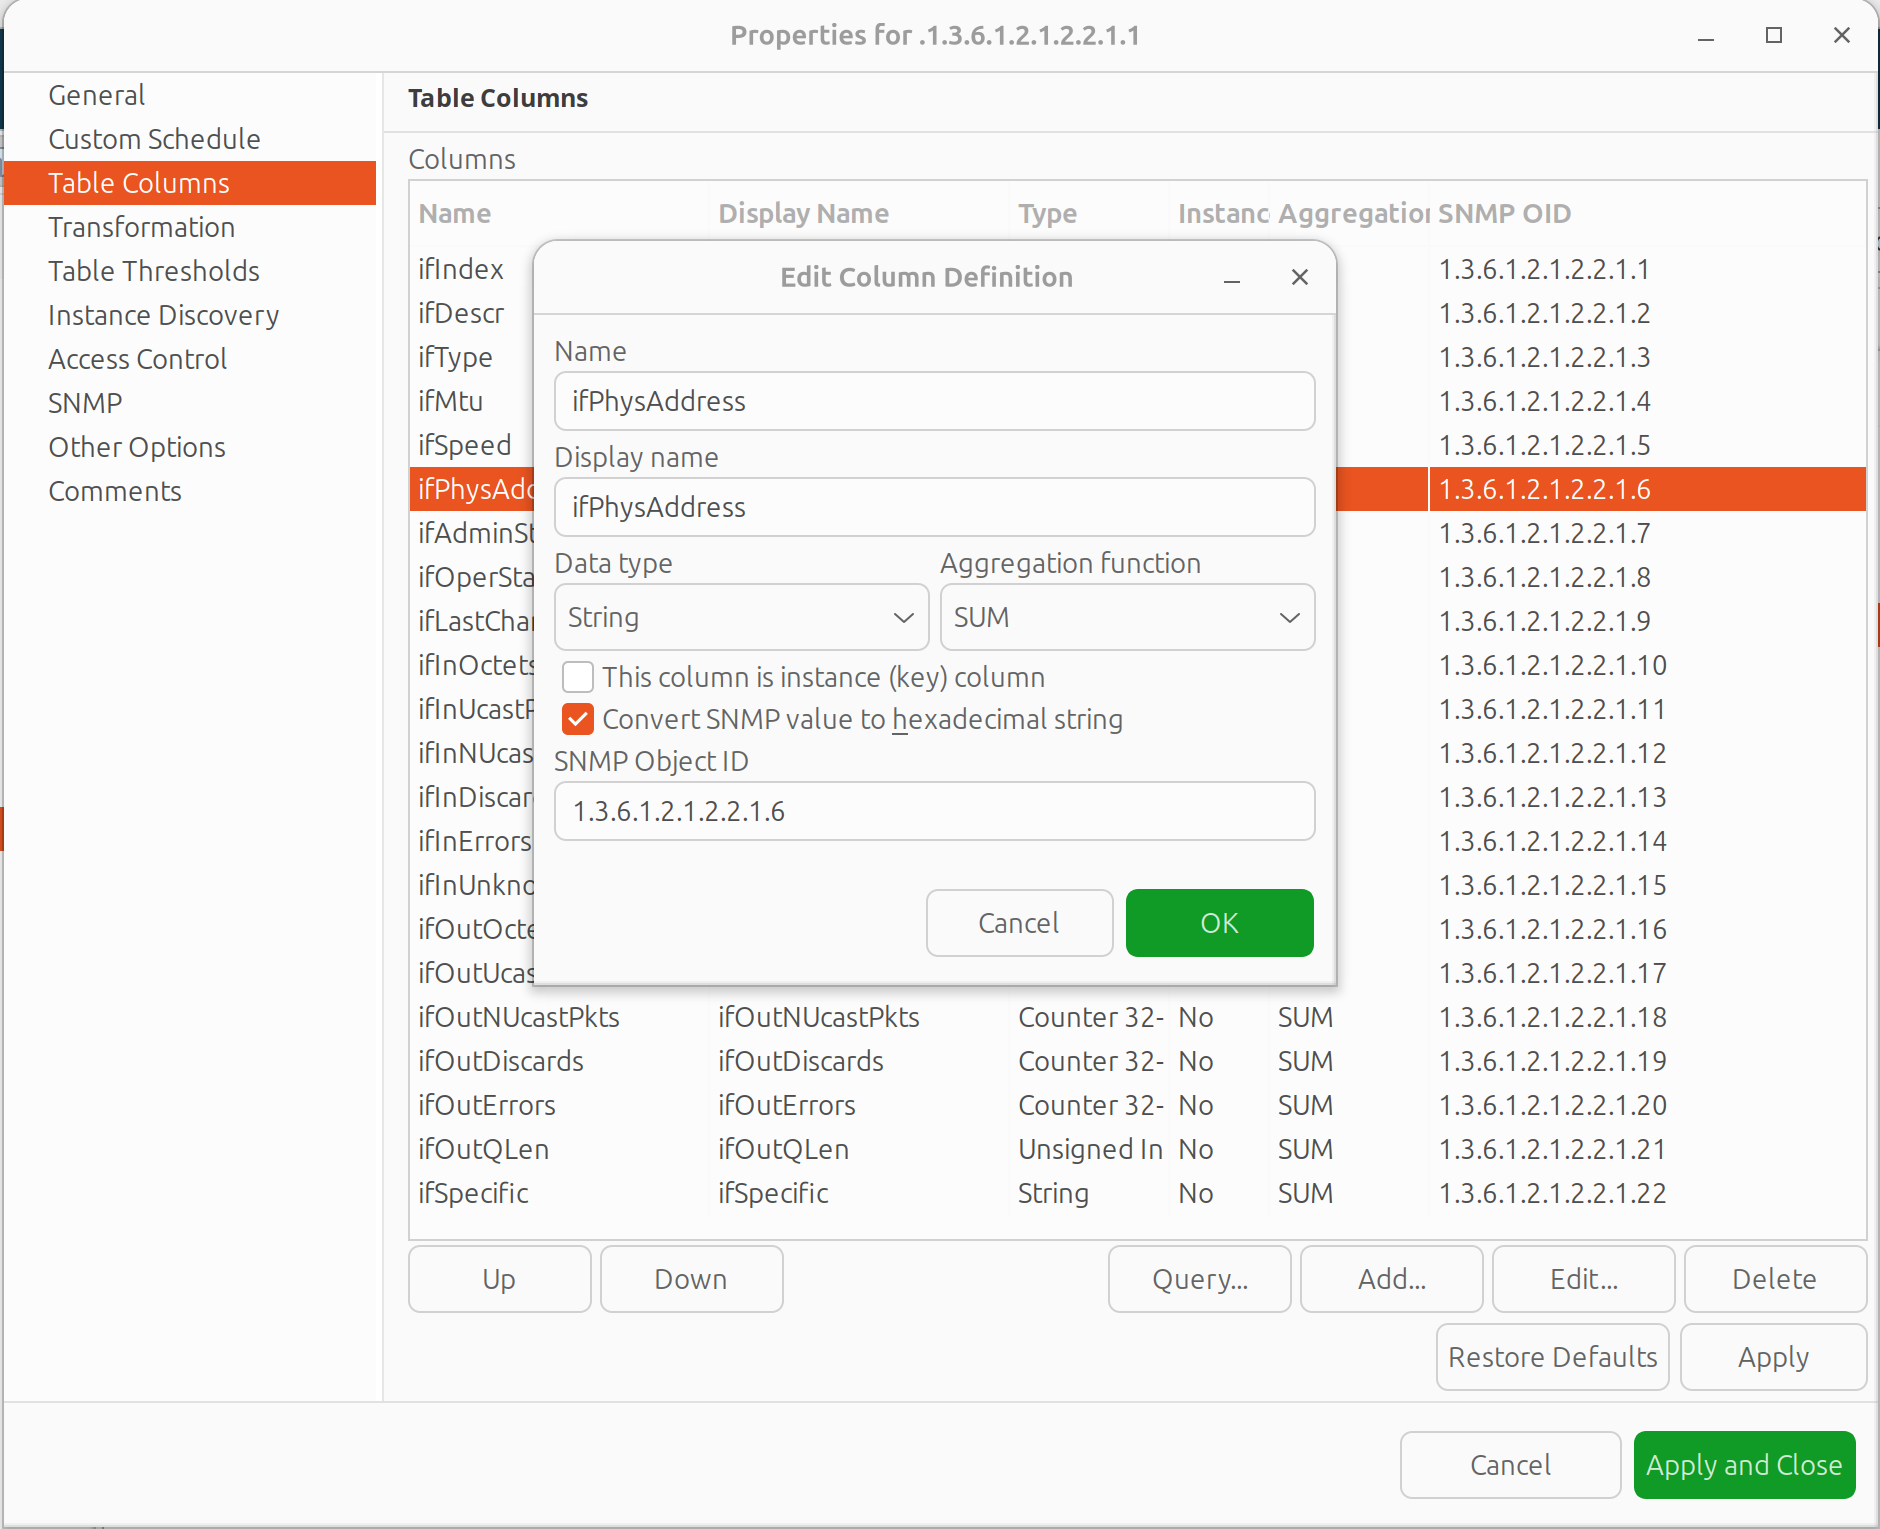
Table column configuration — renaming columns and editing their definition
You can also adjust some column names for more clarity.
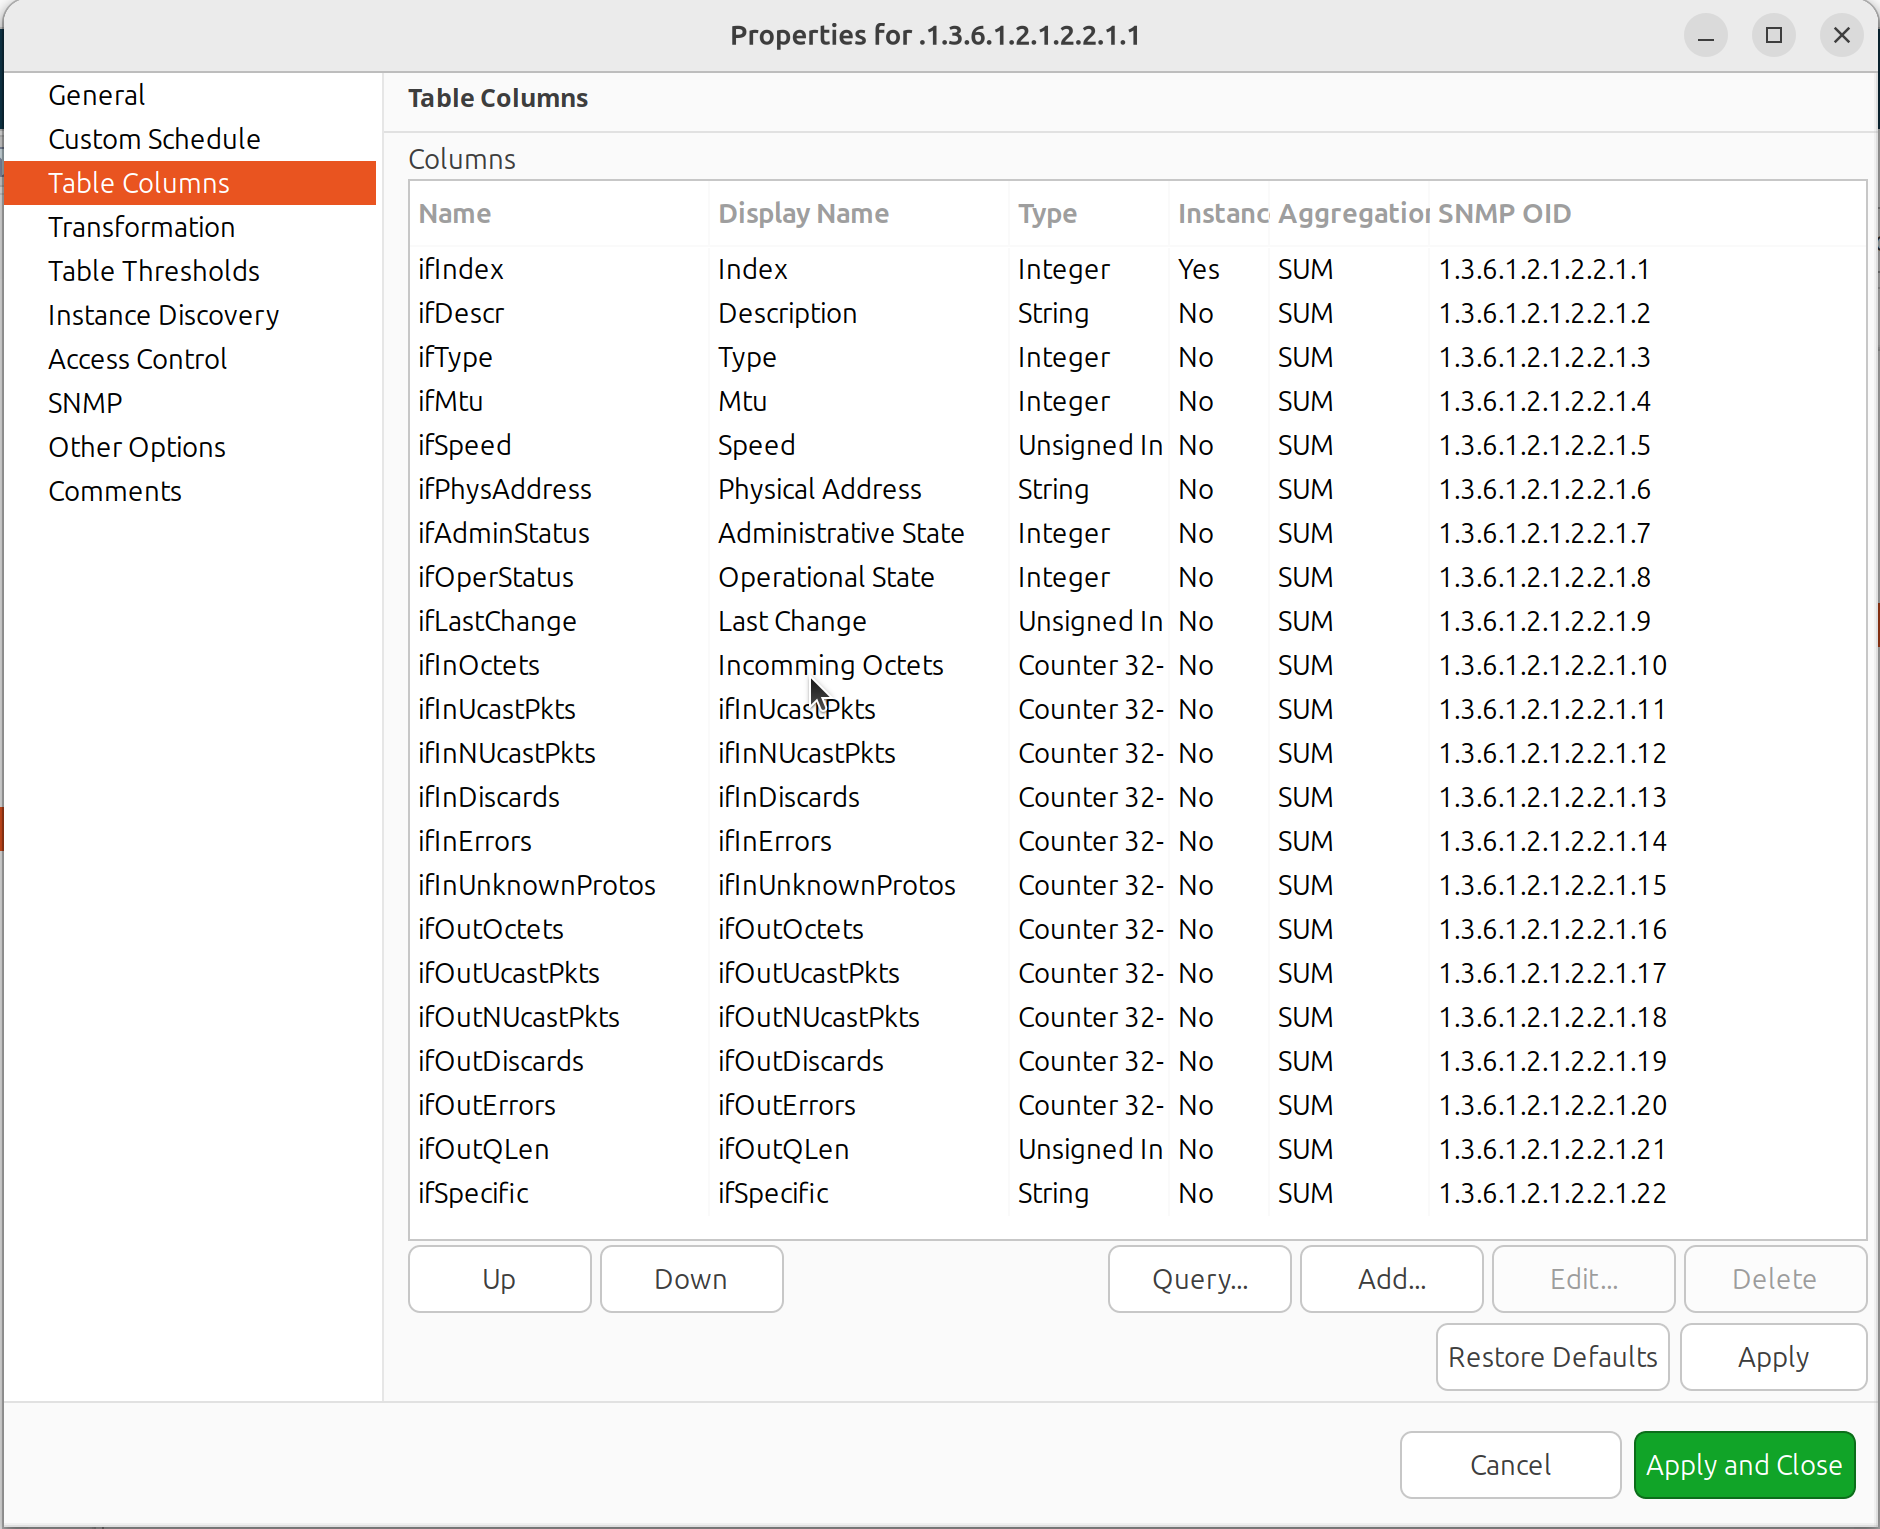
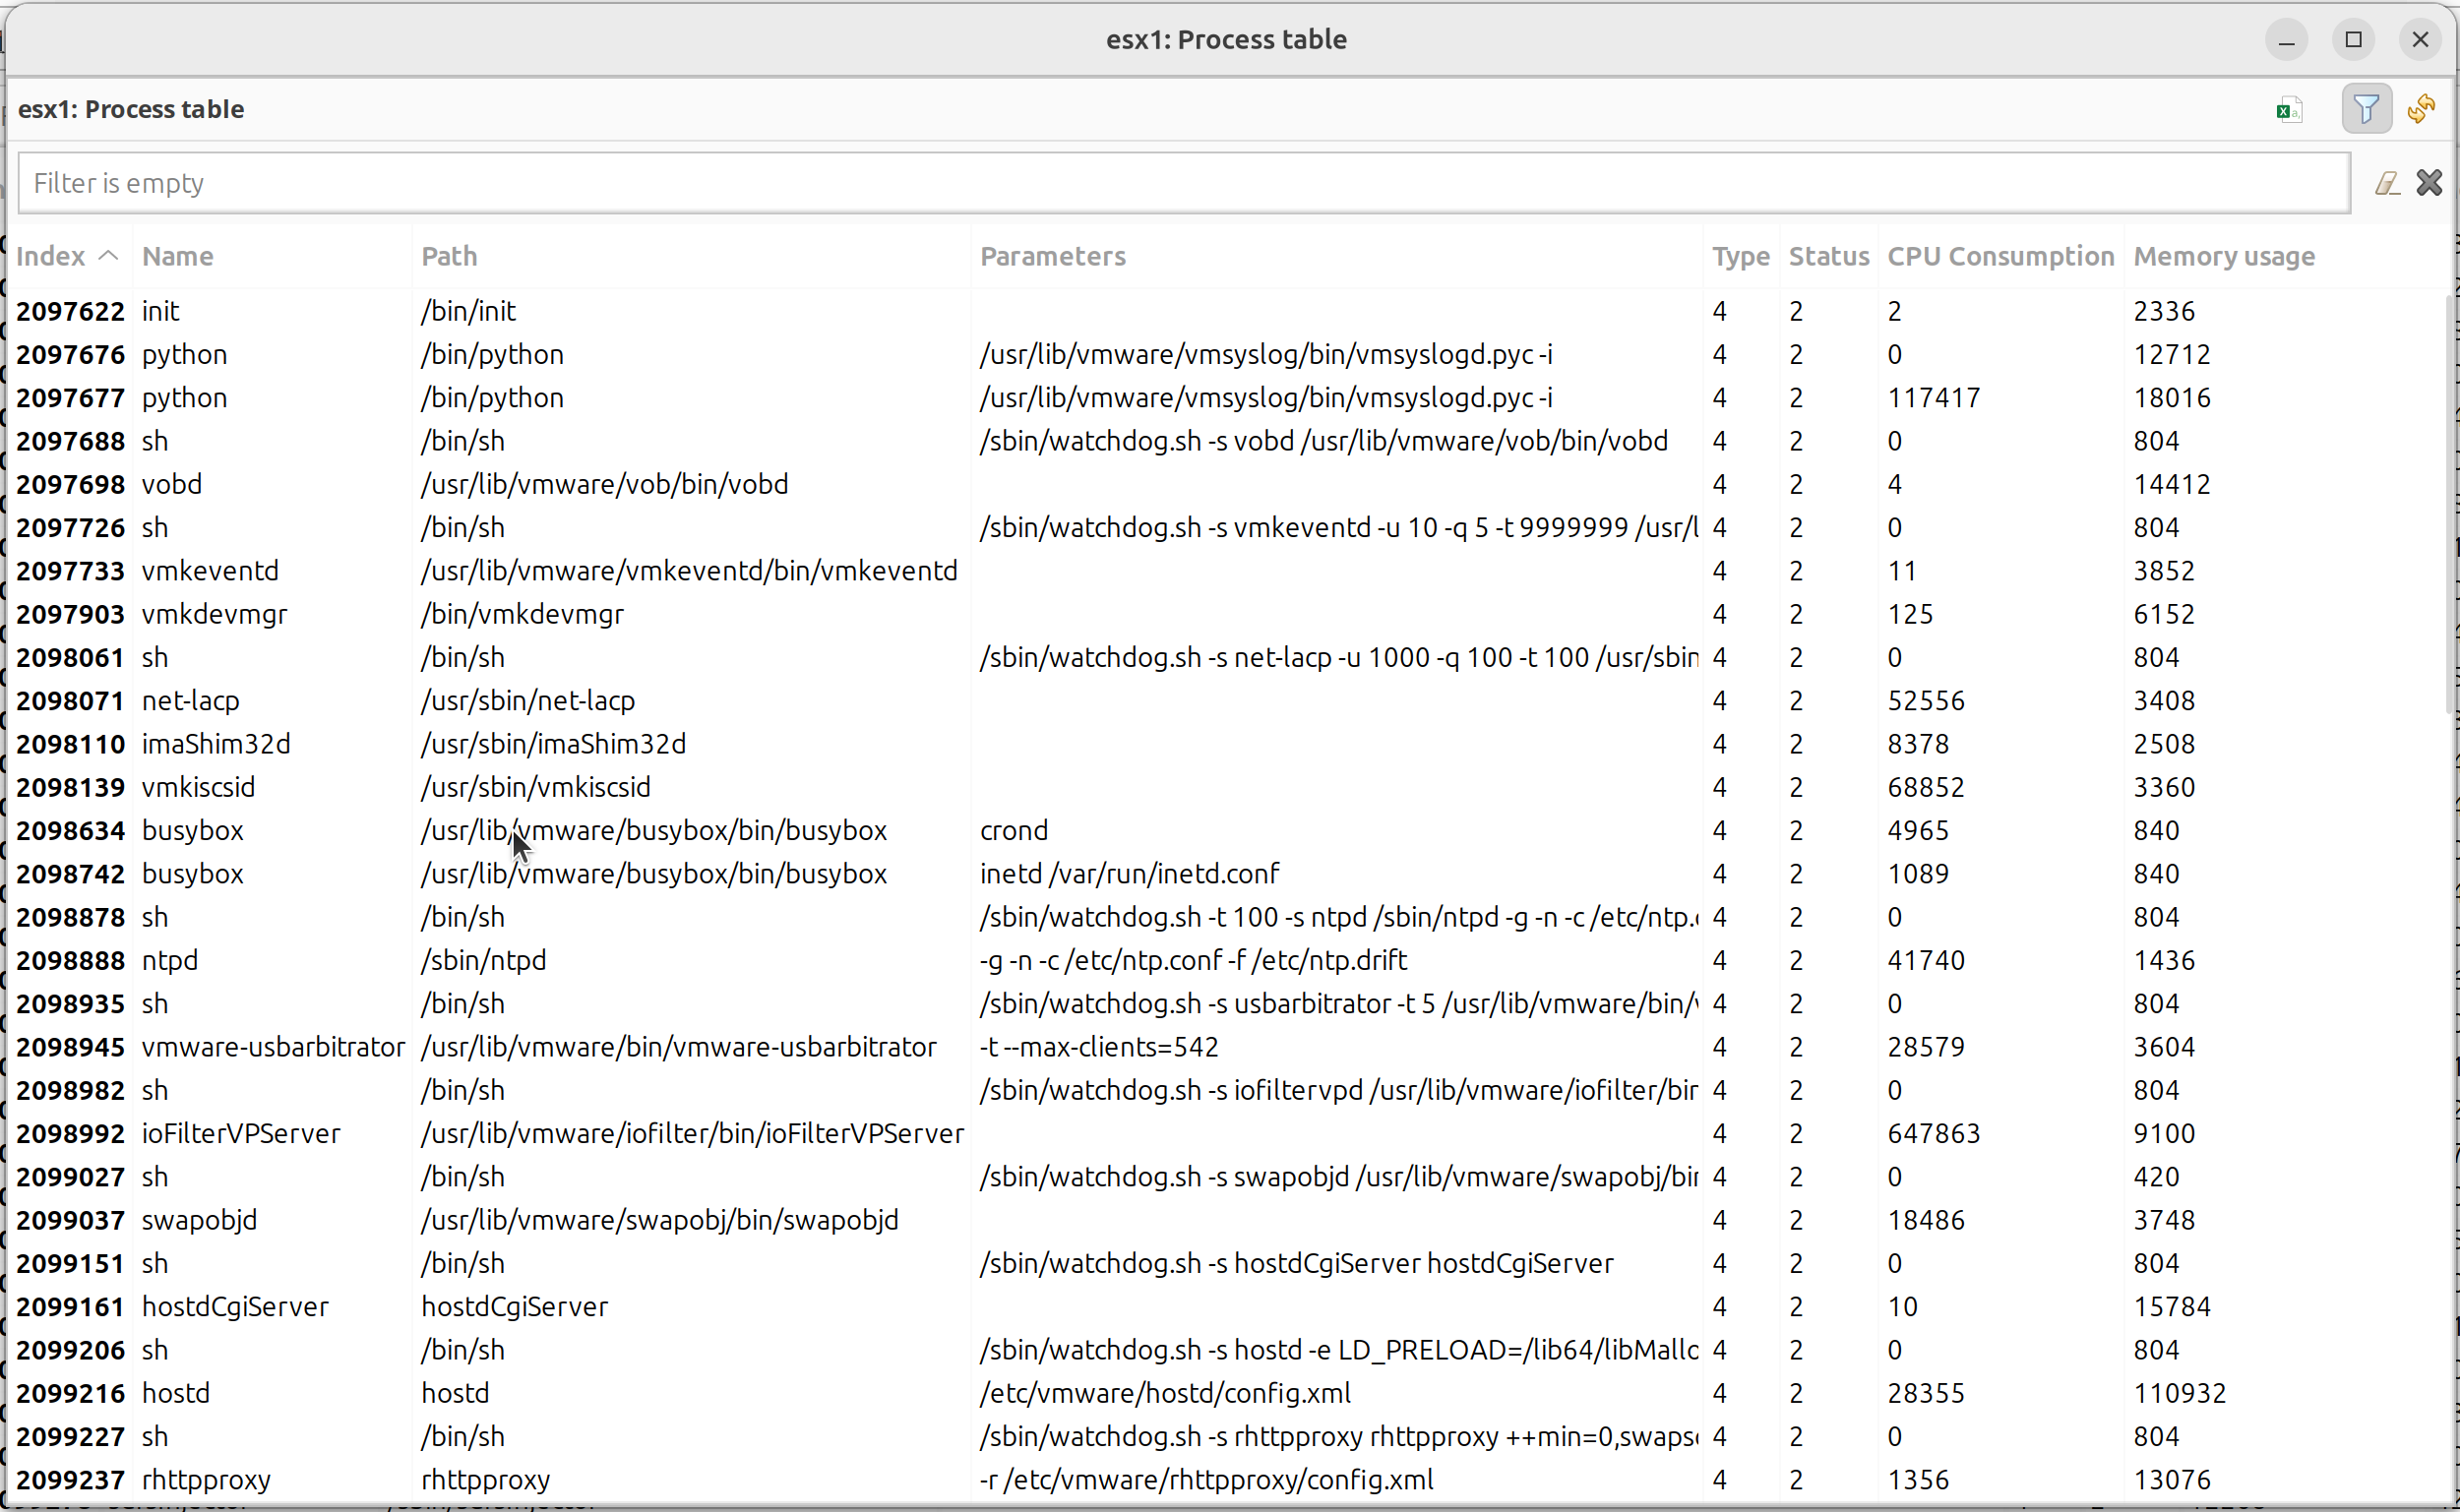
The end result will look like the table below:
Additional tips
If two tables share the same instances, they can be shown in one table — as a process table for ESX: